
Our account team had a shared drive with 14 folder levels and nobody could find last month’s invoice. Jordan Ellis, the account manager, asked me to move their client files into SharePoint without recreating that maze.
The fix was a library that uses one level of folders for each client, a few metadata columns for everything else, and views that answer the questions people actually ask, like “show me every invoice.”
In this tutorial, I’ll show you how to organize documents in SharePoint step by step, using a real client library with folders, columns, folder default values and saved views.
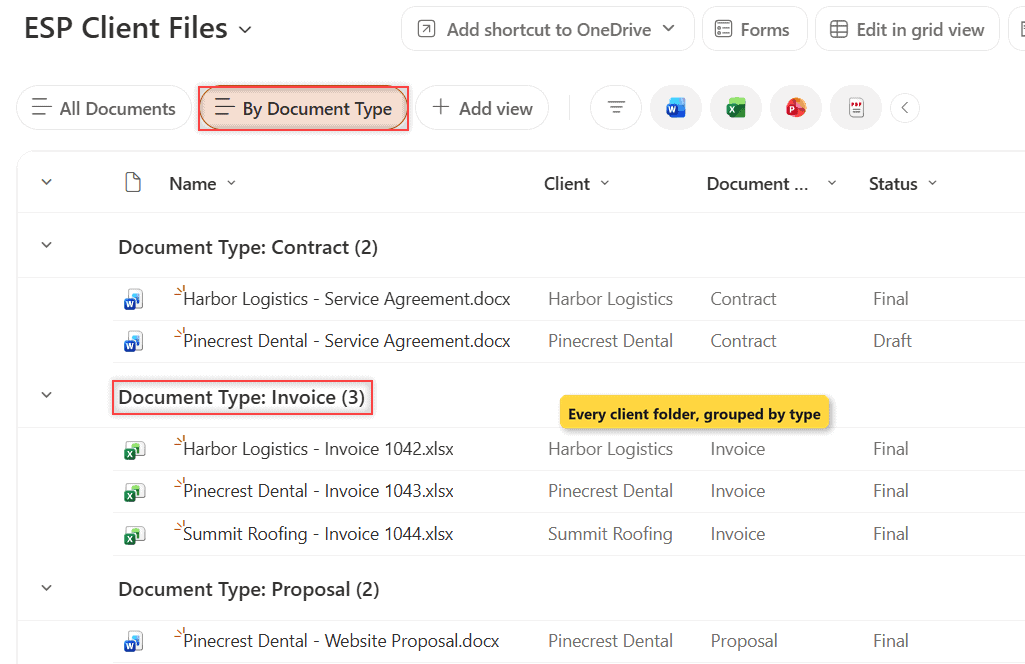
Here’s what we’re building, the ESP Client Files library grouped by document type:
- Folders for the one thing that never changes per file: the client.
- Metadata columns for document type, status and date.
- Folder default values, so the Client column fills itself in on upload.
- Views that group and filter across every folder at once.
Before You Start
You need Edit or Owner rights on the site to create a library, add columns and change views. Everyone else only needs Read. If libraries are new to you, start with what a SharePoint document library is.
Plan the structure before you upload anything. Ask two questions: what never changes for a file (that can be a folder), and what people filter by (that should be a column). Here’s the plan I used:
| Name | Type | Notes |
|---|---|---|
| Client (folder) | Folder, one level | Harbor Logistics, Pinecrest Dental, Summit Roofing |
| Client | Choice | Filled in automatically from the folder |
| Document Type | Choice | Contract, Invoice, Proposal, Report |
| Status | Choice | Draft or Final |
| Document Date | Date only | The date on the document, not the upload date |
These are some of the nine sample files, all dated November 2026:
| File | Folder | Document Type | Status |
|---|---|---|---|
| Harbor Logistics – Service Agreement.docx | Harbor Logistics | Contract | Final |
| Harbor Logistics – Invoice 1042.xlsx | Harbor Logistics | Invoice | Final |
| Pinecrest Dental – Website Proposal.docx | Pinecrest Dental | Proposal | Final |
| Pinecrest Dental – Service Agreement.docx | Pinecrest Dental | Contract | Draft |
| Summit Roofing – Invoice 1044.xlsx | Summit Roofing | Invoice | Final |
| Summit Roofing – Project Proposal.docx | Summit Roofing | Proposal | Draft |
Step 1: Create a Library for One Kind of Content
One library per kind of content keeps permissions and columns simple. Client files get their own library instead of sharing the default Documents library. Not sure whether you need a list or a library? See SharePoint list vs library.
- On the site home page or Site contents, select + New > Document library.
- In Create new document library, choose Blank library.
- Name it ESP Client Files, add a short description, and select Create. Clear Show in site navigation if it shouldn’t appear in the left menu.
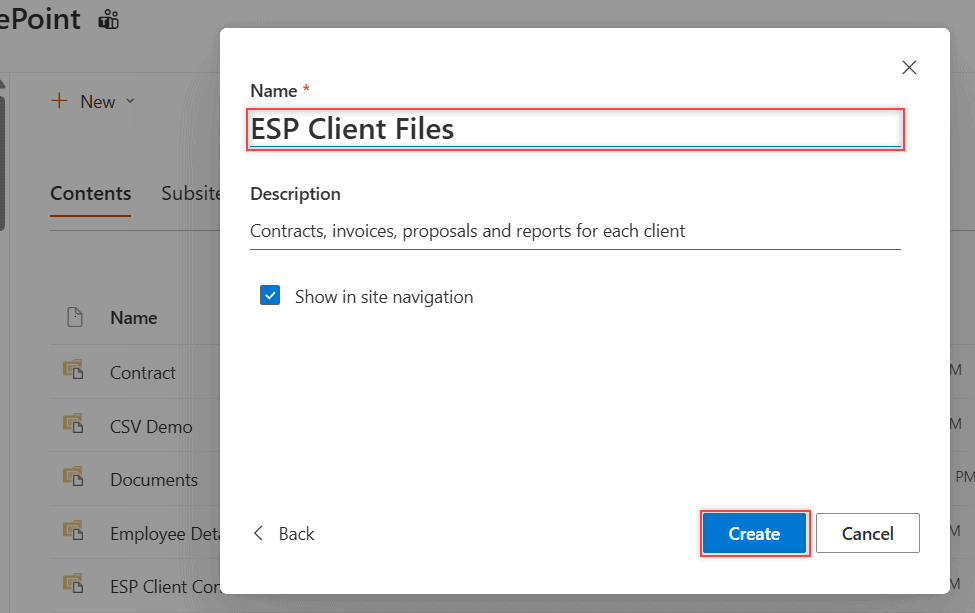
Checkpoint: the new library opens empty, with only the Name, Modified and Modified By columns.
Step 2: Add a Shallow Folder Structure
Folders still have a job: they group files that share permissions or a fixed owner. Keep them to one or two levels, because every level makes the path longer and the files harder to find.
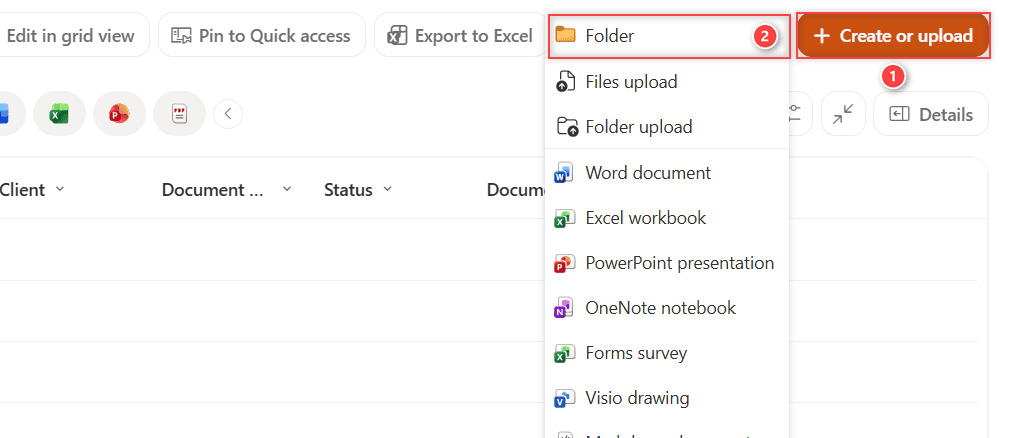
- In the library, select + Create or upload > Folder. Older libraries show + New instead.
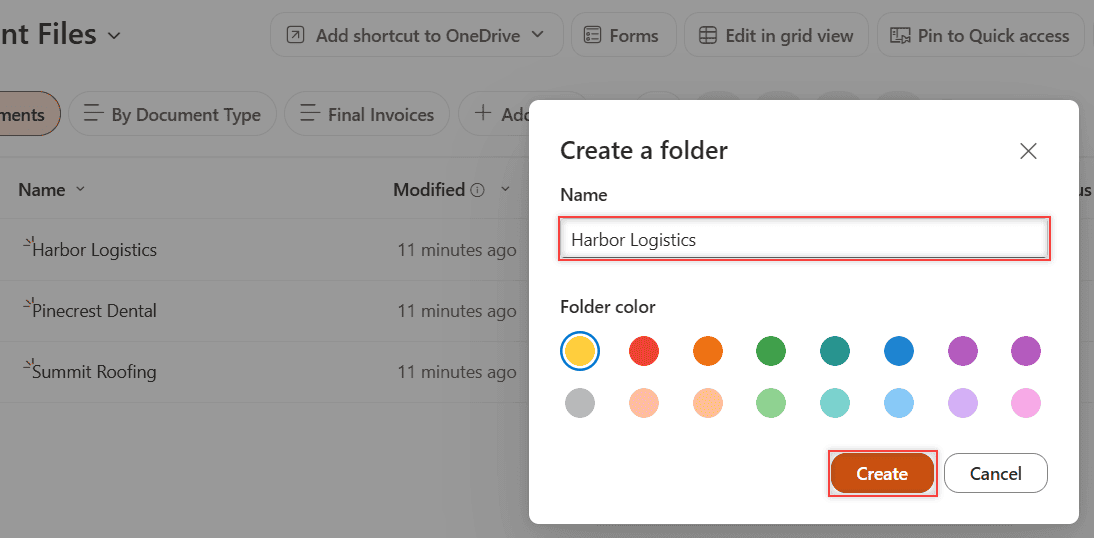
- Type Harbor Logistics in the Create a folder dialog. The folder color is optional.
- Select Create.
- Repeat for Pinecrest Dental and Summit Roofing.
Pick a naming convention and write it down. I use “Client – Document name” for files and plain client names for folders, with no dates or version numbers in folder names (SharePoint keeps the versions for you).
Important: the whole decoded path, folder names plus file name, can’t be longer than 400 characters. Deep trees hit that limit fast, especially when people sync the library. My SharePoint limits and boundaries guide lists the other caps.
Checkpoint: the library shows three folders and nothing else.
Step 3: Add Metadata Columns
Columns are where the real organizing happens. A file can only sit in one folder, but it can have as many tags as you need. The SharePoint column types cheat sheet explains every type if you want more than Choice and Date.
- Select + Add column to the right of the last column, choose Choice, and select Next.
- In the Create a column panel, name it Document Type and replace Choice 1-3 with Contract, Invoice and Proposal. Select + Add Choice for Report.
- Open More options if you want to turn on Require that this column contains information, then select Save.
- Repeat for Client (the three client names) and Status (Draft, Final).
- Add a Date and time column named Document Date with Include Time set to No.
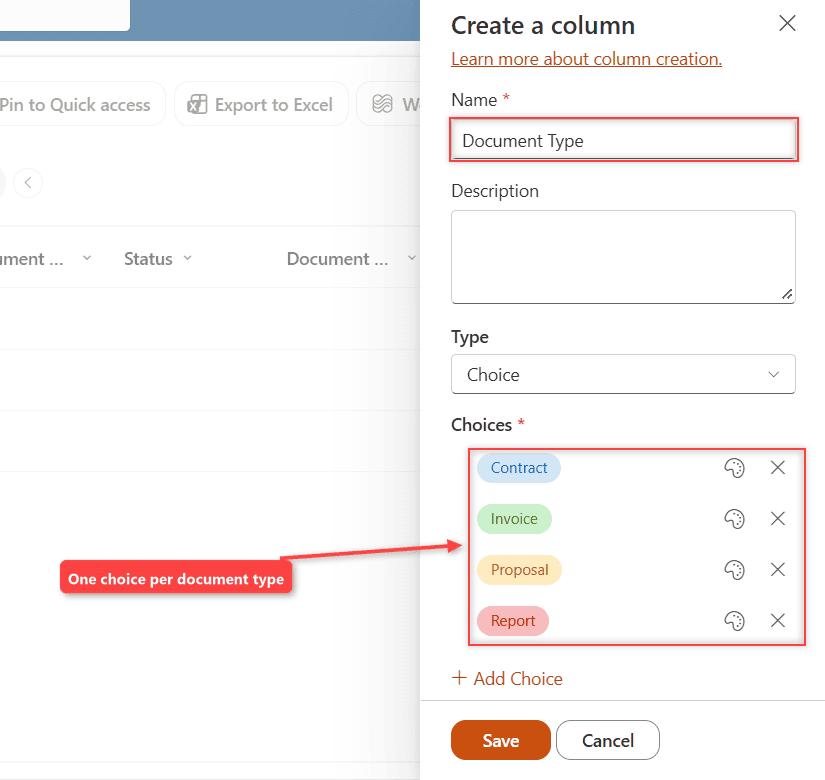
Choice columns beat free text here. Nobody can type “Invoce” by mistake, and every filter and group works on clean values.
Checkpoint: the library header now shows Client, Document Type, Status and Document Date.
Step 4: Set a Default Value for Each Folder
This is the step most guides skip. A column default value tied to a folder fills in the Client column for every file dropped into that folder, so nobody has to tag it by hand.
- Select Settings (the gear icon) > Library settings, then More library settings in the panel.
- Select Column default value settings. The Change Default Column Values page opens.
- Pick the Harbor Logistics folder under Location to configure.
- Select the Client column, choose Use this default value, type Harbor Logistics, and select OK.
- Repeat for the other two folders.
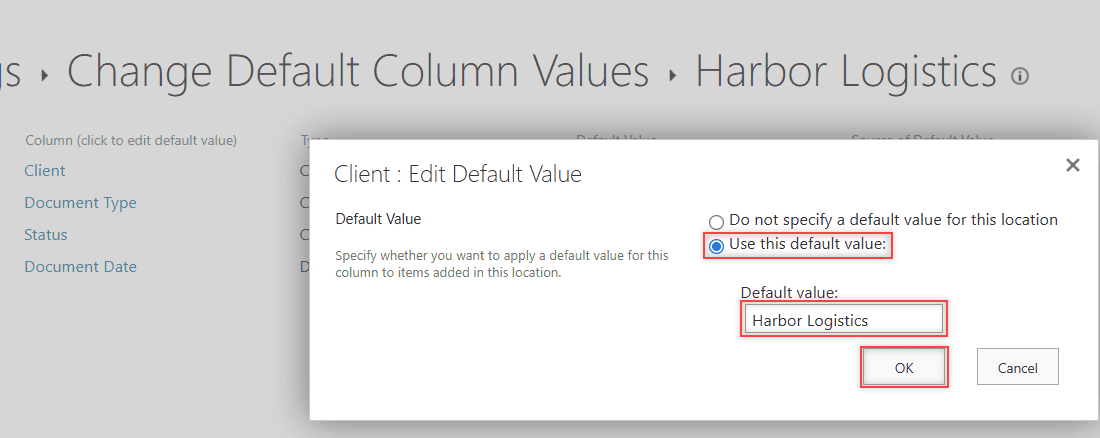
Checkpoint: each folder icon in the tree gets a small green marker, and the Client row shows Harbor Logistics with This folder as the source of the default value.

Step 5: Upload and Tag the Files
Now the files go in. Drag each client’s files into its folder, then fill in the remaining columns in one pass. If people keep files in OneDrive, sync or Add shortcut to OneDrive lets them work on the same library from File Explorer.
- Open a folder and drag the files onto the page, or select Upload > Files.
- Select Edit in grid view on the command bar. Inside a folder, it’s in the Options menu (the sliders icon on the right).
- Set Document Type, Status and Document Date for each row. Changes save as you leave each cell.
- Select Options > Exit grid view when you’re done.
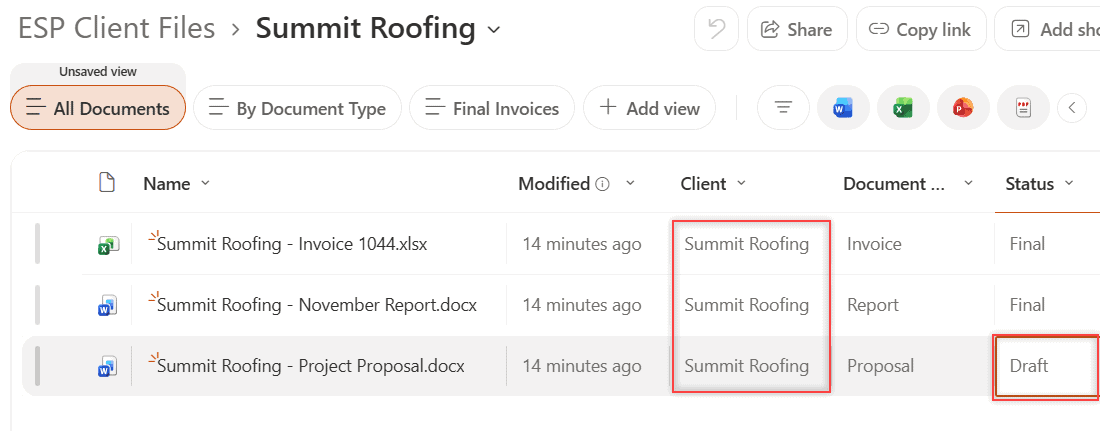
Checkpoint: I never typed a client name, yet all nine files show the right Client. The folder defaults did that work.
Step 6: Create Views That Group and Filter
Views are saved ways of looking at the same files. They let one library answer many questions without moving anything. For a deeper look at view settings, see my complete guide to SharePoint views.
First, a view that ignores folders and groups every file by type. Until you flatten it, the three folders sit in an Unassigned group, because folders have no document type:
- Select the Document Type column header and choose Group by Document Type.
- Select the All Documents view button, choose Save view as…, name it By Document Type, and select Save.
- Select Options (the sliders icon) > Edit view. The classic Edit View page opens.
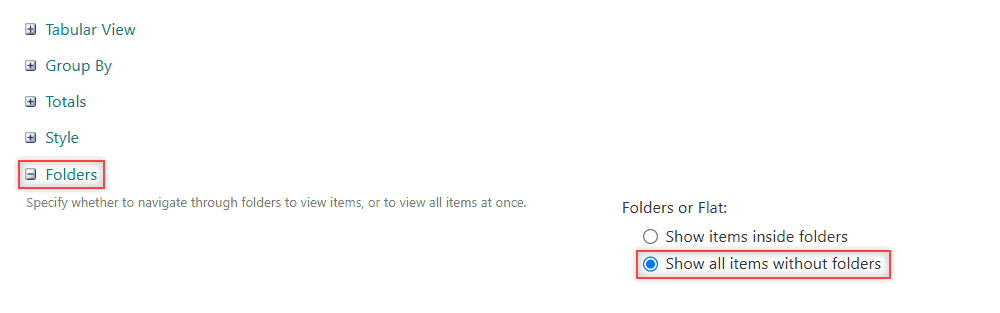
- Expand Folders, select Show all items without folders, and select OK.
Then a filtered view for the finance team:
- Select Filter (the funnel icon) to open the filters pane.
- Under Document Type, check Invoice. Under Status, check Final.
- Select the view button, choose Save view as…, and name it Final Invoices.
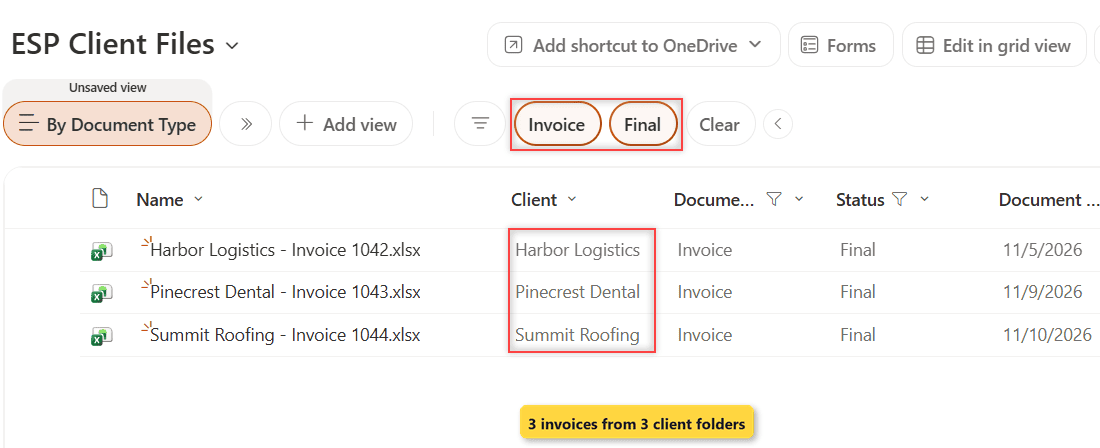
Checkpoint: Final Invoices shows three files from three different folders: invoices 1042, 1043 and 1044.
Step 7: Make the Best View the Default
People land on the default view, so pick the one that answers the most common question. For this team, that’s By Document Type.
- Switch to By Document Type.
- Select Options (the sliders icon) > Set current view as default.
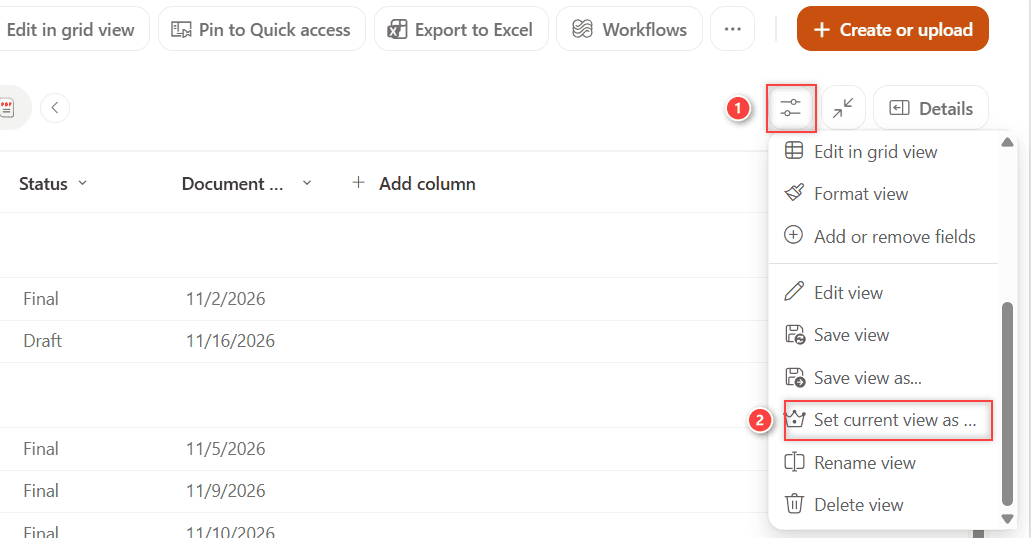
Note: only a public view can be the default. Personal views stay visible to the person who made them.
Test the Library
To test the setup, I uploaded a new file, Summit Roofing – December Invoice 1045.xlsx, into the Summit Roofing folder and set only Document Type to Invoice and Status to Final.
The Client column showed Summit Roofing the moment the upload finished, and Final Invoices grew from three files to four. Before that upload, the three November invoices totaled $13,345.50: $4,850.00, $2,375.50 and $6,120.00.
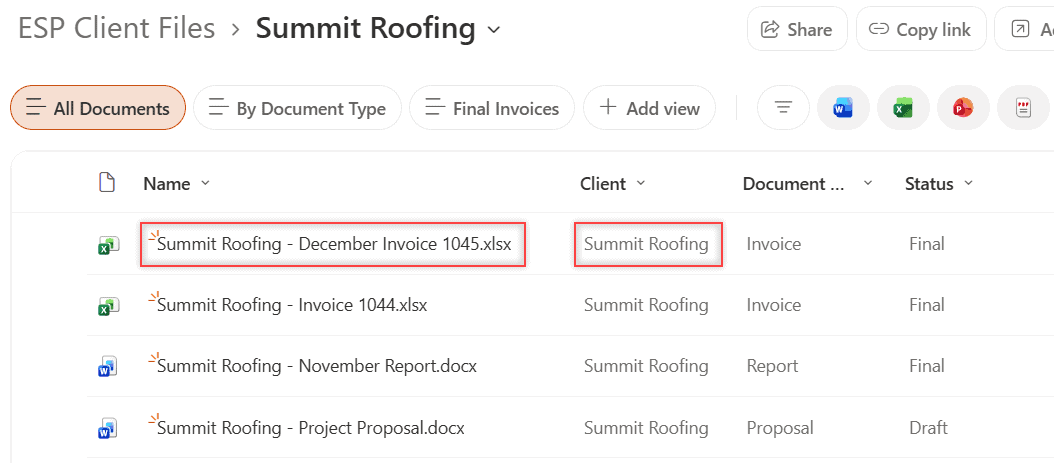
That’s the payoff. Folders keep each client’s files together, and the views find any file in two clicks no matter which folder it sits in.
Same Library with Content Types or Document Sets
When different documents need different columns, a contract needs a renewal date while a report doesn’t, use content types instead of piling every column onto one library. My guide to SharePoint content types walks through it.
Document sets go one step further. They group related files, like everything for one project, into a single item with shared metadata. They’re great for case files, but they add setup, so I only reach for them when a plain folder plus columns isn’t enough.
Make It Production-Ready
- Set permissions on the site or library, not on individual folders. Microsoft recommends staying under 5,000 unique permissions per library, and SharePoint permissions are much easier to audit that way.
- Make key columns required in the column settings, so files can’t be saved without a Document Type.
- Write the folder and naming rules on a page and show them to the team in a short training session.
- Review the library every quarter: archive old files, remove unused choices, and check that check-out and check-in rules still fit.
- Once a library passes 100,000 items, you can’t break permissions inheritance on it or its folders, so plan the structure early.
Troubleshooting
- Folder is missing from + Create or upload: in Library settings > Advanced settings, set Make “New Folder” command available to Yes.
- The Client column stays blank after upload: the default is set on a different folder, or the file was uploaded to the library root. Check the folder tree in Column default value settings.
- A grouped view still shows folders: the view isn’t set to show items without folders. Edit the view and change the Folders setting.
- A file won’t upload or sync: the path is probably over 400 characters. Shorten the folder or file names.
Where to Take It Next
Put the By Document Type view on a page with the Document library web part, so the team sees it on the home page. If contracts need sign-off before they count as Final, turn on content approval in the library.
More ways to get more out of your SharePoint libraries:
Frequently Asked Questions
Should I use folders or metadata in SharePoint?
Use both. Keep one or two levels of folders for things that never change per file, like the client or permissions boundary, and use metadata columns for everything people filter or group by.
How many folder levels should a SharePoint library have?
One or two. Each level lengthens the path, which is capped at 400 characters, and makes files harder to find and sync.
Can SharePoint fill in metadata automatically?
Yes. Column default value settings let you set a default per folder, so every file uploaded to that folder gets the value without anyone typing it.
How do I show all files without folders in a SharePoint view?
Edit the view and choose Show all items without folders under Folders, then save it. Microsoft explains the view settings in Create, change, or delete a view of a list or library.

I have worked with Microsoft technologies for more than 18 years, including SharePoint, Microsoft 365 and the Power Platform (Power Apps, Power Automate and Power BI), at companies like HP, TCS and KPIT. I started EnjoySharePoint in 2011 to share the solutions I build in real projects with readers in the United States, Canada, the United Kingdom, Australia, New Zealand and beyond. Microsoft has recognized this work with the Microsoft MVP award 13 times since 2014.