
Maria Torres in HR pinged me on a Monday morning: the benefits enrollment deadline had moved to December 4, and the intranet page still said November 20. She also wanted a big Enroll now button so nobody had to hunt for the portal link.
In this tutorial, I’ll show you how to edit a SharePoint page from start to finish: change text, add a web part and a section, publish, and roll back a bad edit with version history.
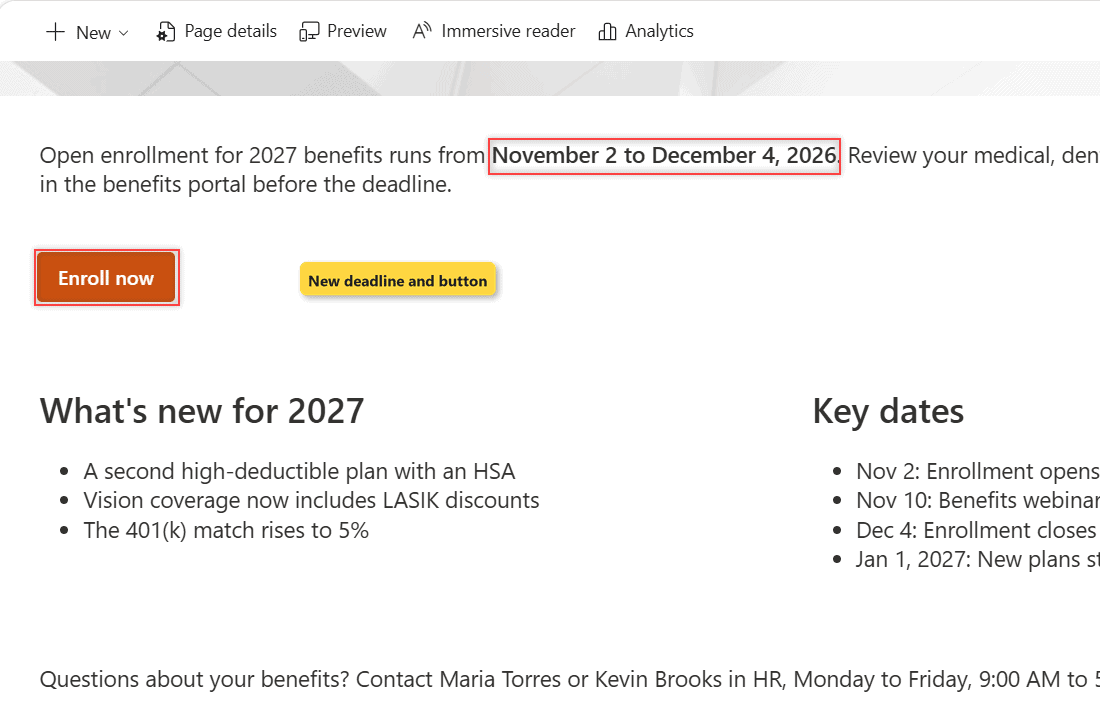
Here’s what we’re building, the updated, published page:
Before You Start
You need edit rights on the site. On a team site, members can edit pages by default; on a communication site, only owners and people with Edit permission can. My team site vs communication site comparison explains the difference.
This tutorial covers modern pages in SharePoint in Microsoft 365. Here’s the sample page I’ll edit:
| Part | Before | After |
|---|---|---|
| Intro text | Enrollment closes November 20, 2026 | Enrollment closes December 4, 2026 |
| Section 1 | One column, intro text | Same, plus an Enroll now button |
| Section 2 | Two columns: What’s new, Key dates | Key dates updated |
| Section 3 | None | New one-column section with HR contacts |
Step 1: Open the Page in Edit Mode
- Open the page. If you can’t find it, go to Site contents > Site Pages.
- Select Edit at the top right of the page.
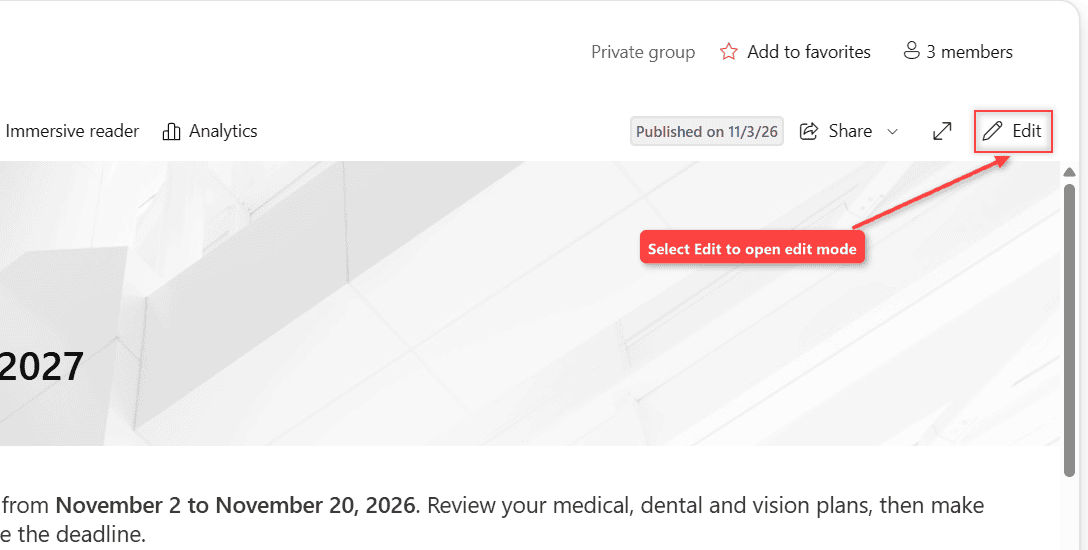
The same steps work on the site home page, which I cover in customizing a SharePoint home page with web parts.
Checkpoint: the command bar now shows Save and exit, Discard edits and Publish changes, and the Toolbox pane opens on the right.
Step 2: Change the Text
- Click inside the Text web part you want to change.
- Select the old date and type the new one, December 4, 2026.
- Use the formatting toolbar for bold, headings, lists or links.
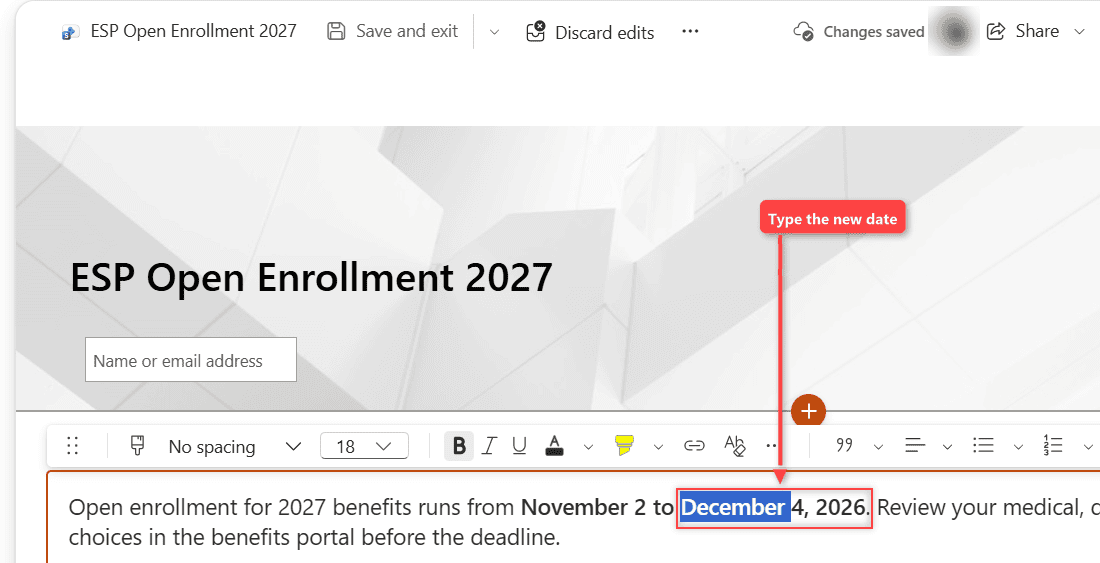
I also changed Nov 20 to Dec 4 in Key dates. SharePoint autosaves as you type (the bar says Changes saved), and Ctrl+Z undoes a slip. My Text web part guide covers formatting.
Step 3: Add a Web Part
Next, the Enroll now button. Every piece of a modern page is a web part, including buttons.
- Select the intro Text web part, so the new part lands below it.
- In the Toolbox, type Button in Search web parts and select Button.
- Select Edit properties (the slider icon) on the web part toolbar.
- Enter Enroll now in Button text and paste the portal address in Link.
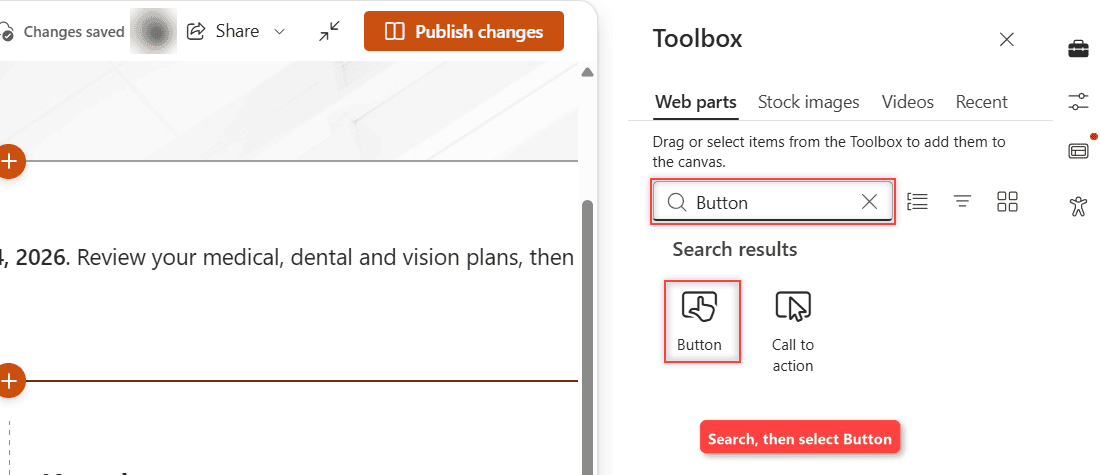
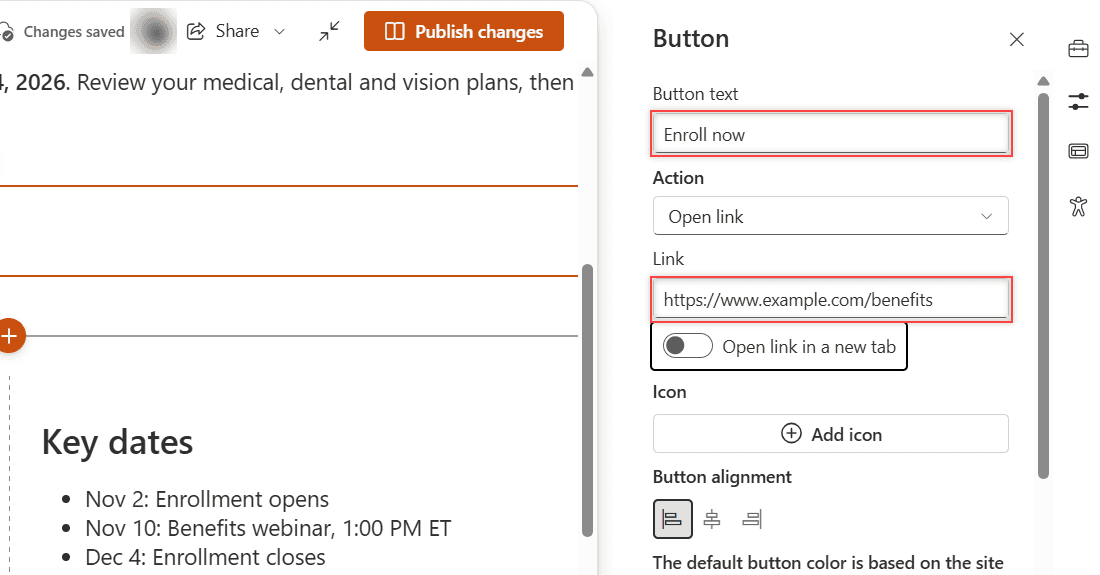
Checkpoint: an orange Enroll now button sits under the intro text. To move a web part, drag its move handle; to remove it, select the trash icon. See my Button web part tutorial for styling.
Step 4: Add a New Section
Sections hold the layout. Each one can have up to three columns, so this is where you decide what sits side by side.
- Hover over the bottom border of the last section and select the circled + (Add a new section).
- Choose One column. Flexible, Two columns, Three columns, One-third left, One-third right and Vertical section are the others.
- Select the new section, then Text in the Toolbox, and type the HR contacts.
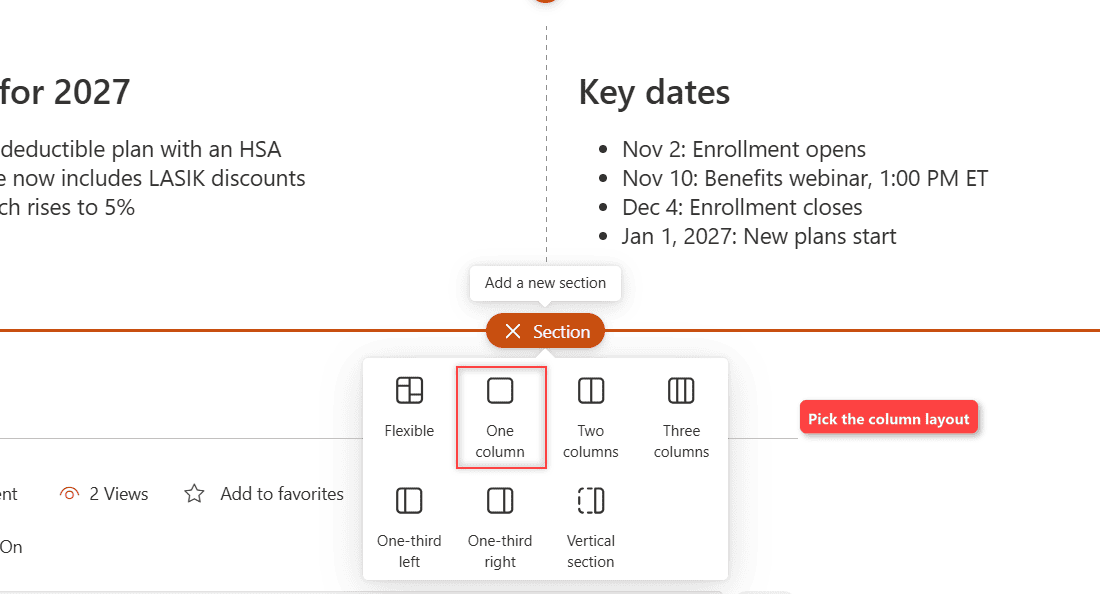
To change a section, select it and choose Edit properties to switch columns, add a background or make it collapsible. Reuse a layout with SharePoint page templates.
Step 5: Publish Your Changes
Readers can’t see any of this yet. Your edits sit in a draft that only people with edit rights can see.
- To finish later, select Save and exit. Sites without co-authoring show Save as draft instead.
- When you’re done, select Publish changes at the top right. Microsoft’s docs call it Republish.
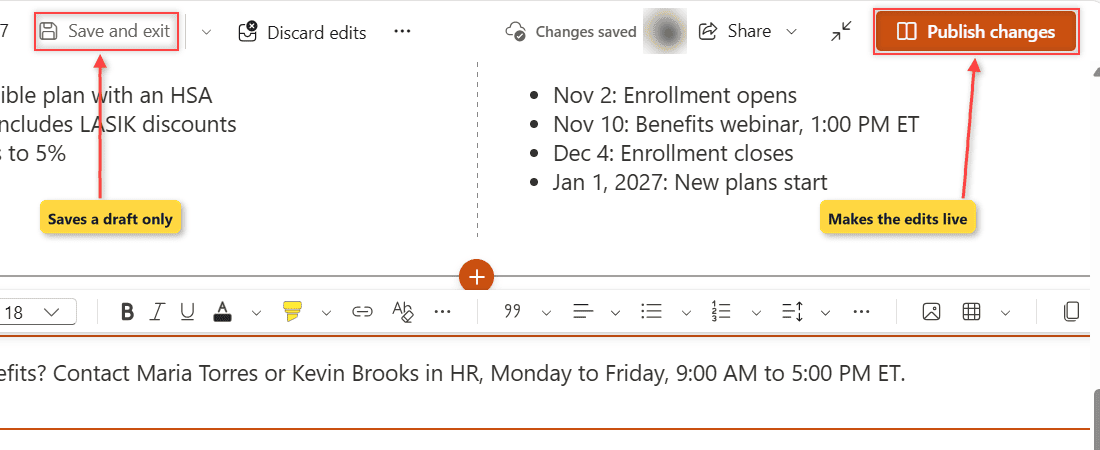
With page approval turned on, you’ll see Submit for approval instead, which works like content approval in a document library.
Checkpoint: a Page published. message appears and the page leaves edit mode.
Test the Changes
After publishing, the page showed the December 4 deadline, the Enroll now button and the new HR contacts line, the view in the screenshot at the top.
Then I checked the history: Page details > More details > Version history.
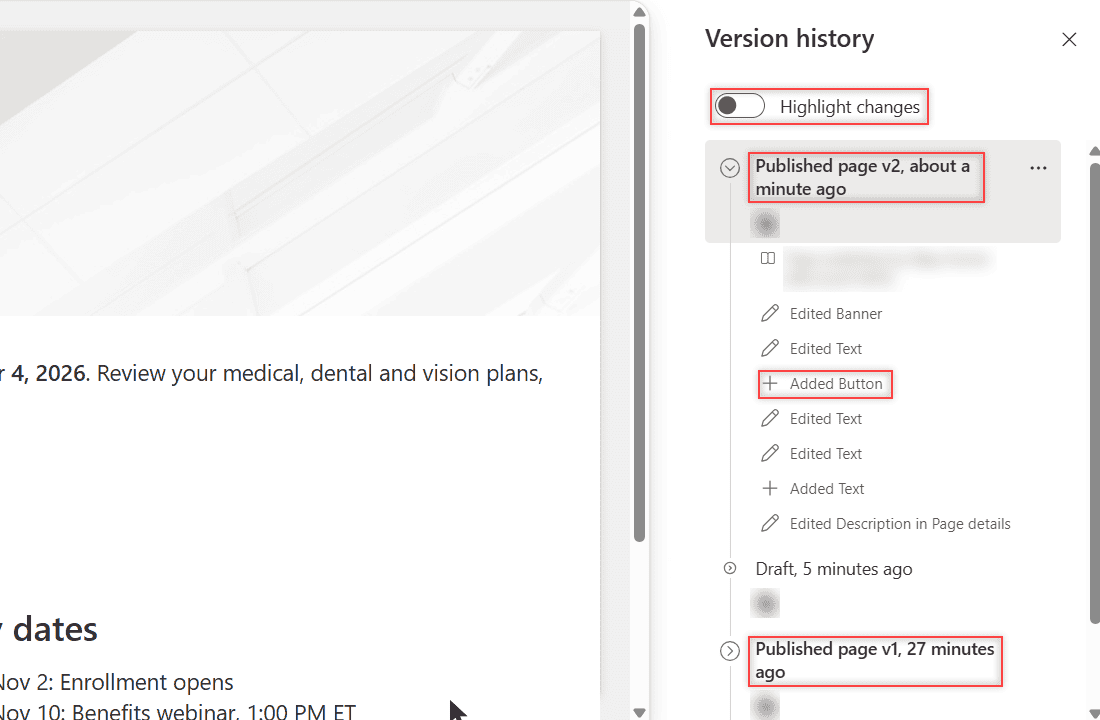
Mine showed Published page v2 with each change listed (Edited Text, Added Button, Added Text), then a draft, then Published page v1.
Undo a Bad Edit: Restore an Earlier Version
Someone deleted a section and published it? You don’t have to rebuild it.
- Open Page details > Version history.
- Turn on Highlight changes to see what changed in each version.
- Select the … next to the good version and choose Restore.
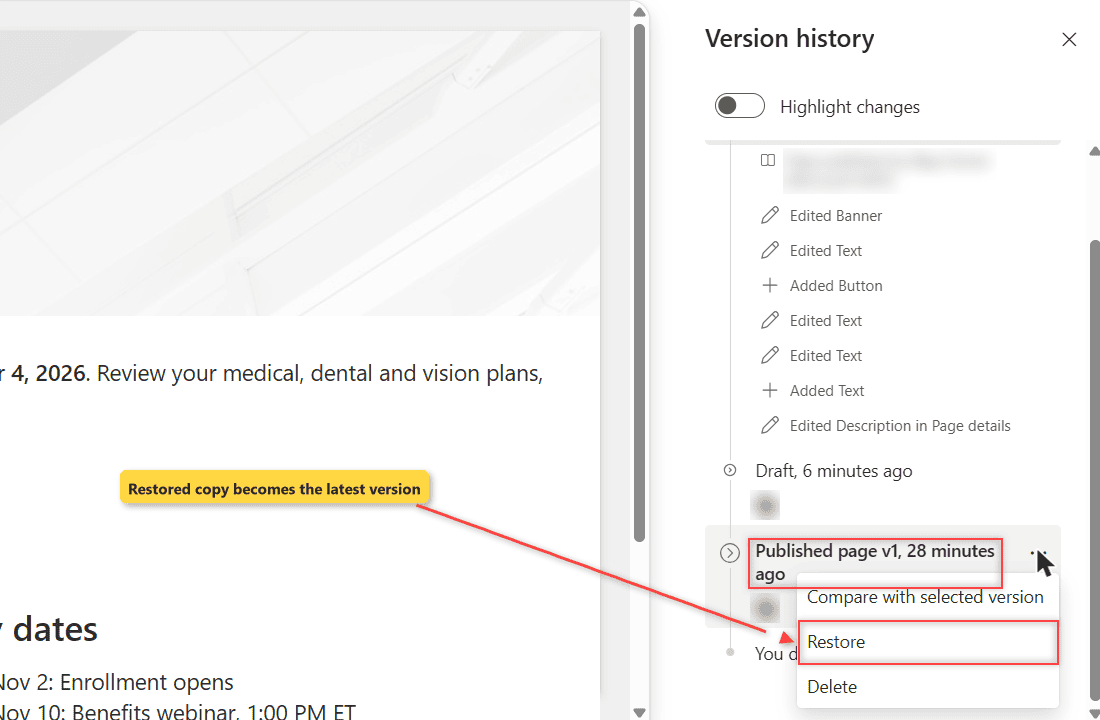
The restored copy becomes the latest version, and the newer versions stay in the history. I kept v2 live, so I only opened the menu.
Troubleshooting
- No Edit button: you don’t have edit permission on the site. Ask a site owner to add you to the Members group.
- The page is locked by someone else: on sites without co-authoring, the page is checked out to whoever is editing. The lock ends when they save or discard, or after 5 minutes of inactivity. See how SharePoint check in and check out works.
- Readers still see the old text: you selected Save and exit but never Publish changes.
- You can’t change the page URL: the URL comes from the original title and can’t be changed.
Important: Discard edits throws away your unpublished changes, so use it only for a clean start.
Where to Take It Next
Once you’re comfortable editing, add a row of shortcuts with the Quick Links web part, or use a Call to action web part for a bigger banner-style button.
More ways to make your SharePoint pages better:
Frequently Asked Questions
Why can’t I edit a SharePoint page?
You need edit permission on the site. On a communication site, only owners and people with Edit permission can edit pages, so ask a site owner for access.
Can two people edit a SharePoint page at the same time?
Yes, when co-authoring is turned on for the site. Without it, the page is checked out to the first editor until they save, discard, or stay idle for 5 minutes.
Do readers see my edits before I publish them?
No. Your changes stay in a draft that only people with edit rights can see until you select Publish changes.
How do I undo changes to a SharePoint page?
While editing, press Ctrl+Z. After publishing, restore an earlier version from Page details > Version history. Microsoft covers editing in Create and use modern pages on a SharePoint site.

I have worked with Microsoft technologies for more than 18 years, including SharePoint, Microsoft 365 and the Power Platform (Power Apps, Power Automate and Power BI), at companies like HP, TCS and KPIT. I started EnjoySharePoint in 2011 to share the solutions I build in real projects with readers in the United States, Canada, the United Kingdom, Australia, New Zealand and beyond. Microsoft has recognized this work with the Microsoft MVP award 13 times since 2014.