
Our sales team saved client contracts next to meeting notes, and nobody could tell which files needed a renewal date. The fix wasn’t a new library; it was teaching SharePoint what a contract is.
In this tutorial, I’ll explain what a sharepoint content type is, then we’ll build one for client contracts, attach it to a document library, and share it with other sites through the content type gallery.
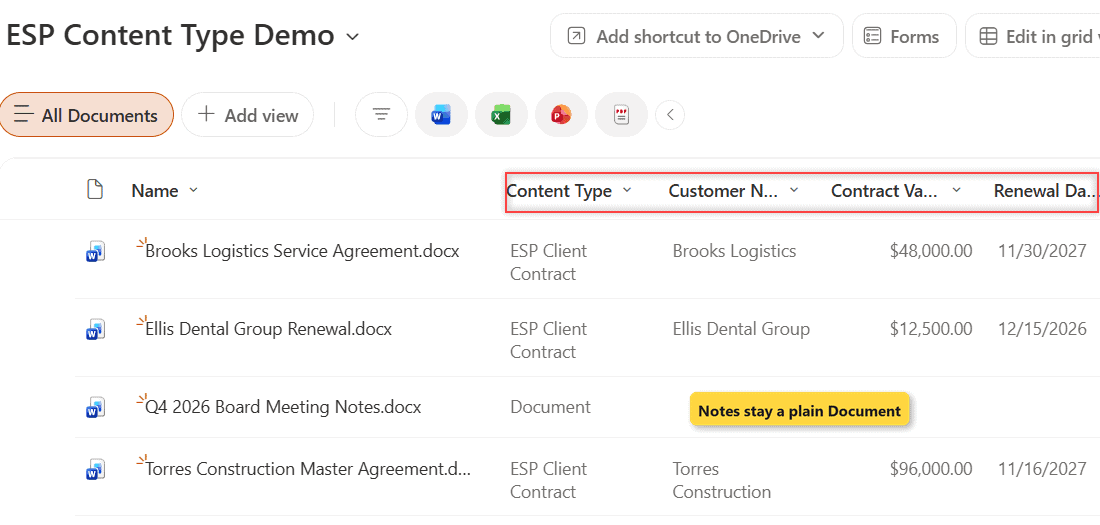
Here’s what we’re building: a library where every contract carries its customer, value and renewal date.
What Is a Content Type in SharePoint?
A content type is a reusable definition for one kind of item. It bundles columns (metadata), an optional document template and settings, so every contract gets the same fields wherever it’s stored.
Files use the built-in Document type; list rows use Item. A custom content type is a child of one of these (it inherits the parent’s columns and adds its own). New to libraries? Start with my introduction to SharePoint document libraries.
| Level | Where it lives | Who can use it |
|---|---|---|
| List content type | One list or library | That list only |
| Site content type | Site settings of one site | Any list or library on that site |
| Published (hub) content type | Content type gallery, stored at /sites/ContentTypeHub | Every site in the organization |
Before You Start
You need Full Control to create a site content type and Design permission to attach it. Publishing tenant-wide needs a SharePoint admin.
I created three site columns first, in a group called ESP Content Types. A site column is defined once per site and reused everywhere. The SharePoint column types cheat sheet explains each type.
| Name | Type | Notes |
|---|---|---|
| Customer Name | Single line of text | Client company on the contract |
| Contract Value | Currency | Annual value in USD |
| Renewal Date | Date and time | When the contract renews |
The demo library, ESP Content Type Demo, holds three contracts and one set of meeting notes:
| File | Customer Name | Contract Value | Renewal Date |
|---|---|---|---|
| Brooks Logistics Service Agreement | Brooks Logistics | $48,000 | 11/30/2027 |
| Ellis Dental Group Renewal | Ellis Dental Group | $12,500 | 12/15/2026 |
| Torres Construction Master Agreement | Torres Construction | $96,000 | 11/16/2027 |
| Q4 2026 Board Meeting Notes | – | – | – |
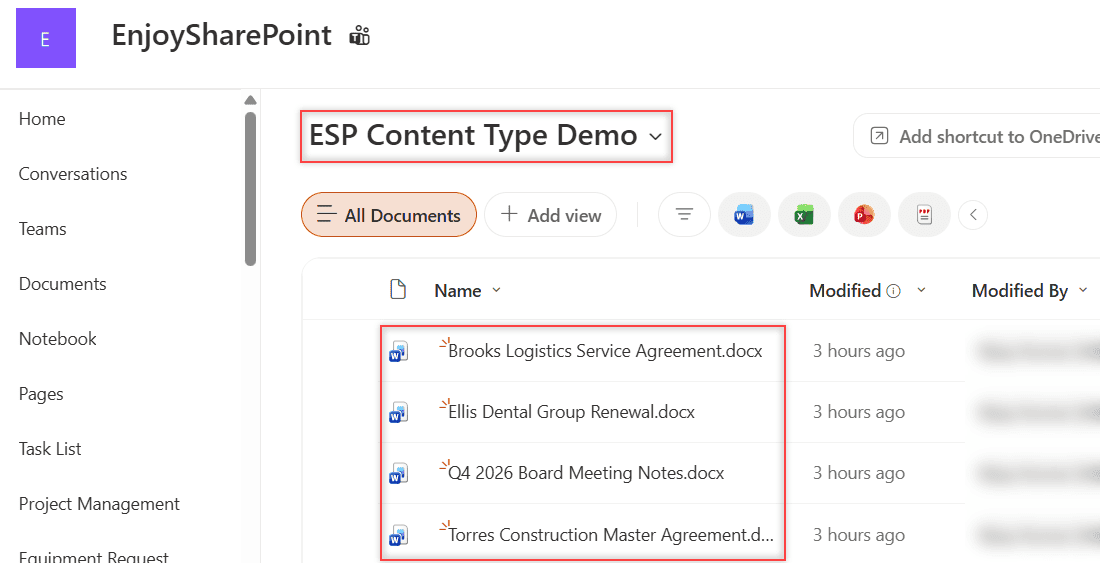
Step 1: Create the Site Content Type
A site-level type works in every library on the site.
- Select Settings (the gear) > Site information > View all site settings.
- Under Web Designer Galleries, select Site content types. It opens the modern Content type gallery for your site.
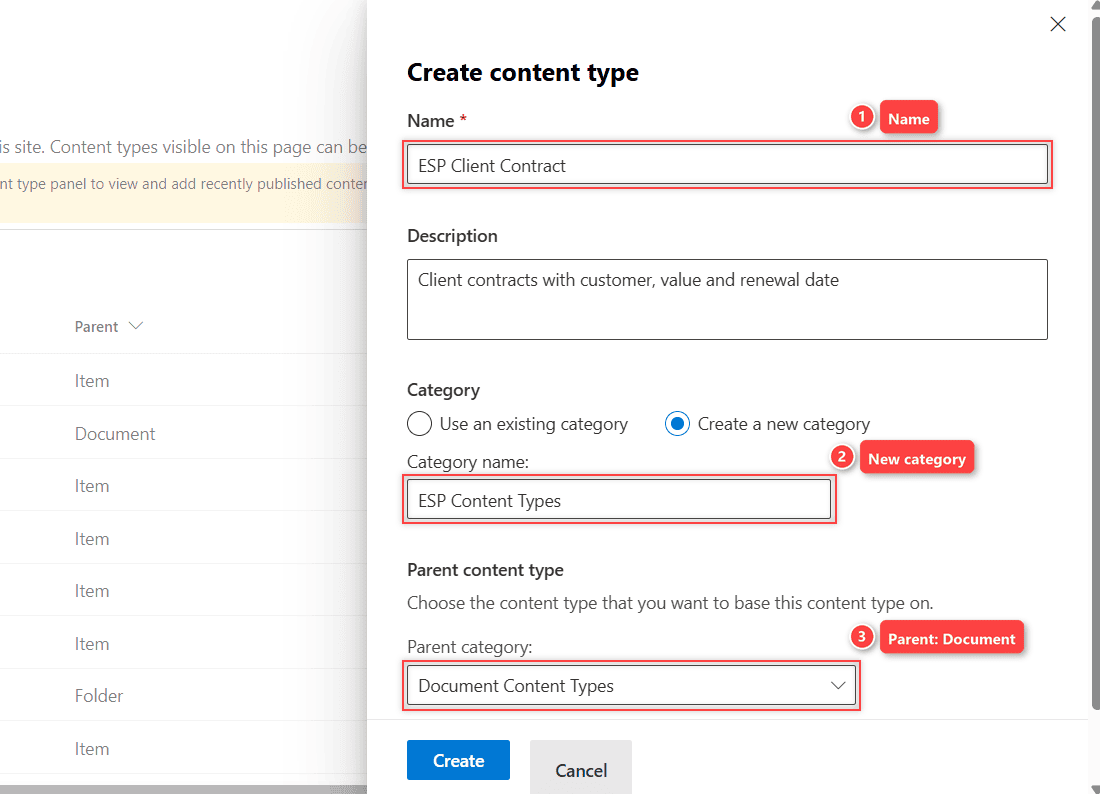
- Select Create content type.
- Name it ESP Client Contract and add a short description.
- Under Category, create a new category called ESP Content Types.
- Under Parent content type, pick Document Content Types > Document (so it behaves like a file), then select Create.
Checkpoint: SharePoint opens the ESP Client Contract page. It shows the new Content Type ID and two inherited columns, Name and Title.
Step 2: Add Site Columns to the Content Type
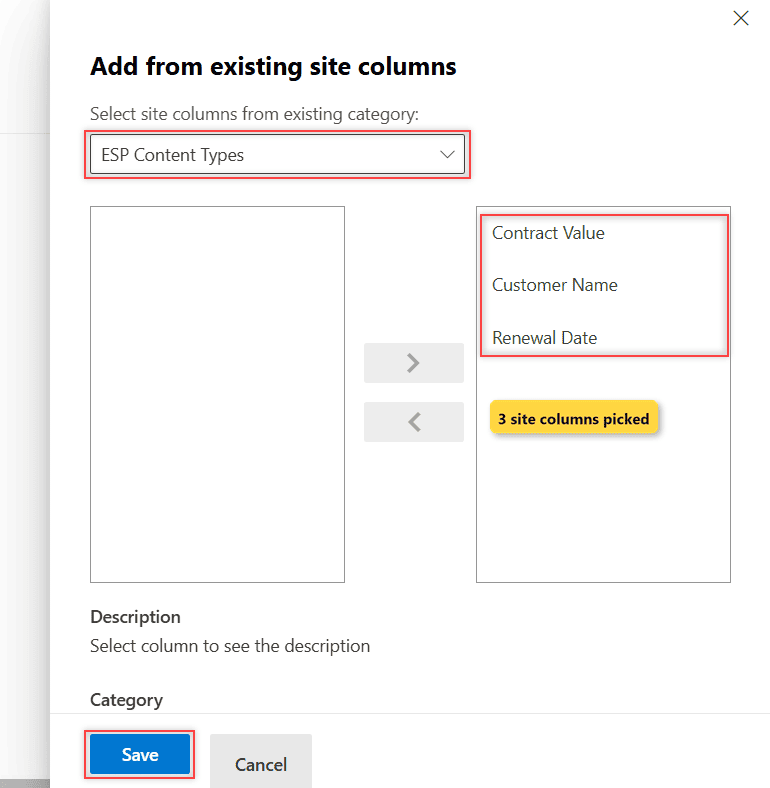
- On the ESP Client Contract page, select Add site column > Add from existing site columns.
- Set the category to ESP Content Types, then move Customer Name, Contract Value and Renewal Date to the right box with the > button.
- Select Save.
You can also create a new site column there. For a column that pulls values from another list, see how to create a SharePoint lookup column.
Checkpoint: the content type now lists five site columns: Name, Title, Customer Name, Contract Value and Renewal Date.
Step 3: Turn On Content Type Management in the Library
Management was off in my new library. Microsoft now points you to Add column > Add a content type in the library, which turns it on for you.
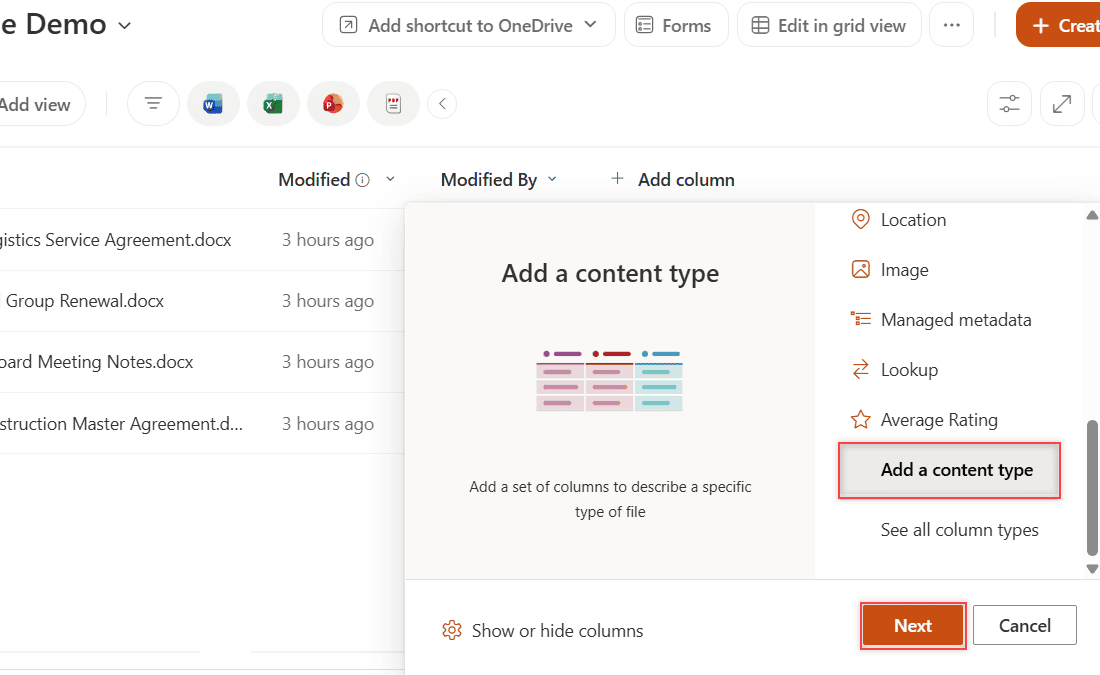
In my tenant, its Choose content type list stayed empty, so I used the classic switch:
- Open the library, select Settings > Library settings > More library settings.
- Select Advanced settings.
- Under Allow management of content types?, choose Yes, then select OK.
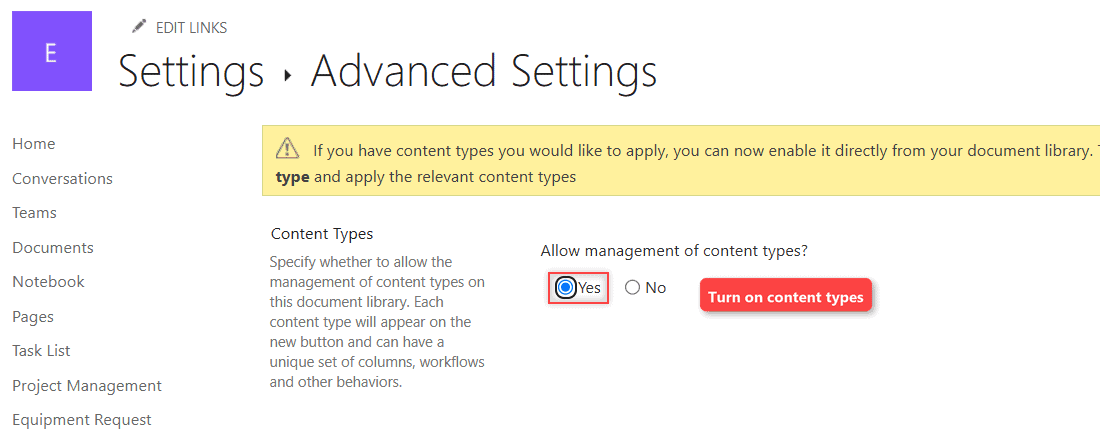
Checkpoint: back on the settings page, a new Content Types section lists Document as the default.
Step 4: Add the Content Type to the Library
With management on, the library settings page can attach any site content type.
- In Library settings, under Content Types, select Add from existing site content types.
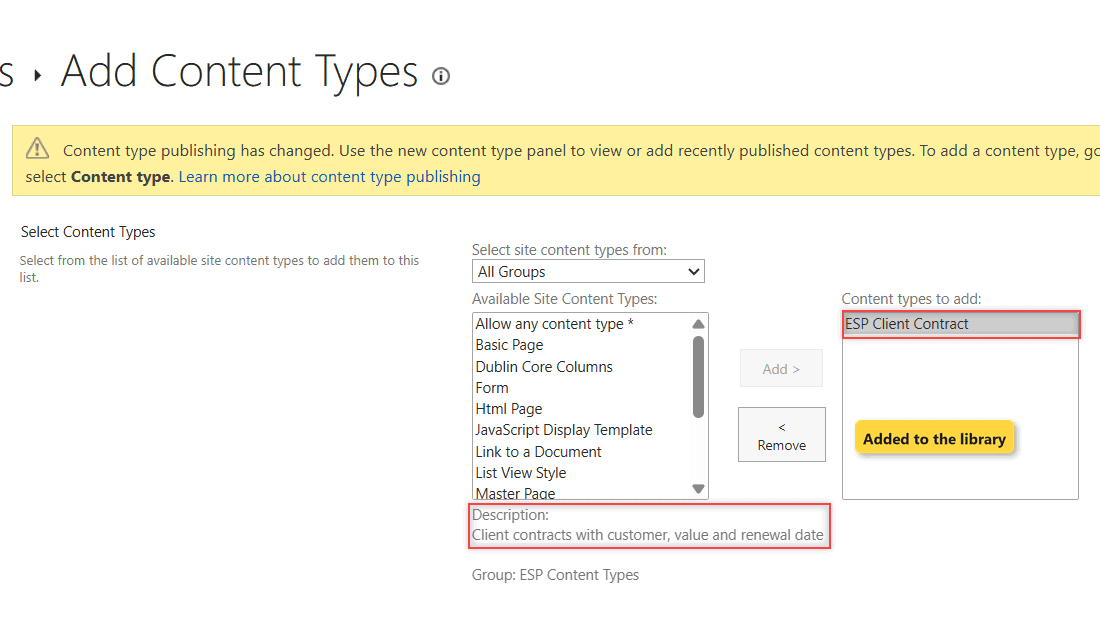
- In Available Site Content Types, pick ESP Client Contract and select Add.
- Select OK.
To arrange the new columns, see my guide to SharePoint list views.
Checkpoint: the settings page lists ESP Client Contract. Its columns aren’t added to the view, so add them with Add column > Show or hide columns.
Step 5: Make It the Default Content Type
Most new files here are contracts, so they should default to ESP Client Contract.
- In Library settings, under Content Types, select Change new button order and default content type.
- Set ESP Client Contract to position 1 (the first visible type is the default).
- Keep Document visible and select OK.

Checkpoint: the content type order is now ESP Client Contract, then Document.
Test the Content Type
I set each contract’s Content Type to ESP Client Contract and filled in its fields. The Brooks Logistics details pane shows 48,000 and 11/30/2027.
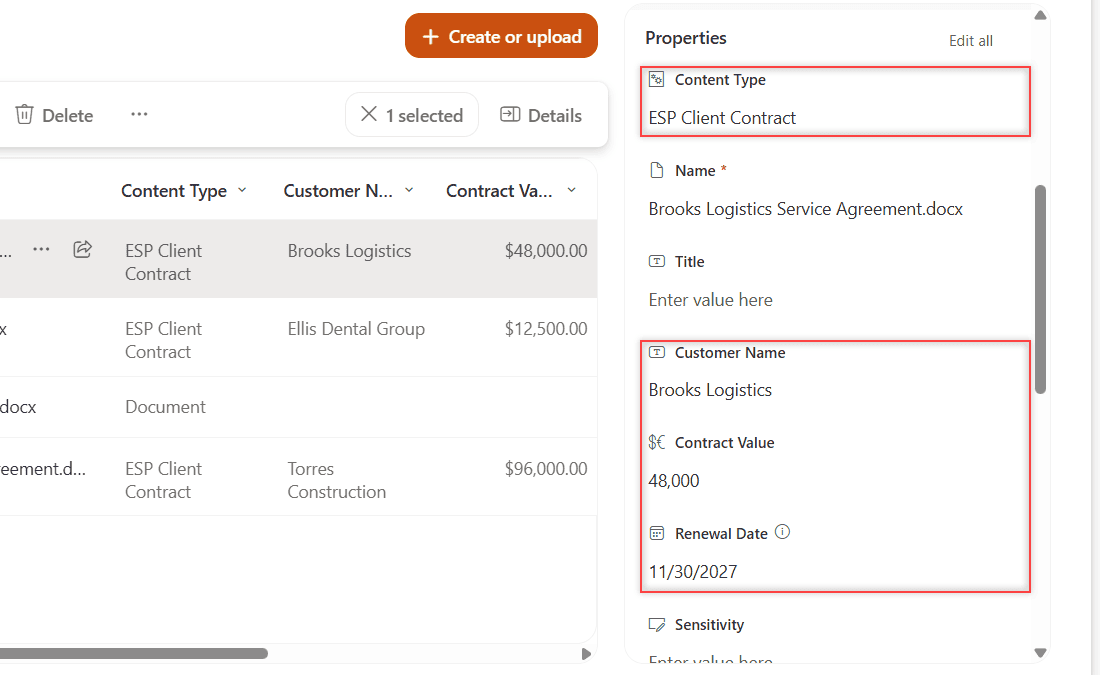
The board meeting notes stayed as Document, with no contract fields. In the view, the contracts show $48,000.00, $12,500.00 and $96,000.00.
Need sign-off first? Add content approval in a SharePoint document library.
Share It Across Sites with the Content Type Gallery
To share a content type with every site, a SharePoint admin creates it in the Content type gallery of the SharePoint admin center, which stores it in the content type hub at /sites/ContentTypeHub.
- In the SharePoint admin center, go to Content services > Content type gallery.
- Select Create content type, enter the name, category and parent, then select Create.
- Add site columns to it, the same way as Step 2.
- Select Publish, choose Publish in the Manage Publishing panel, and select Save.
- On any site, open the library and select Add column > Add a content type to pull it in.
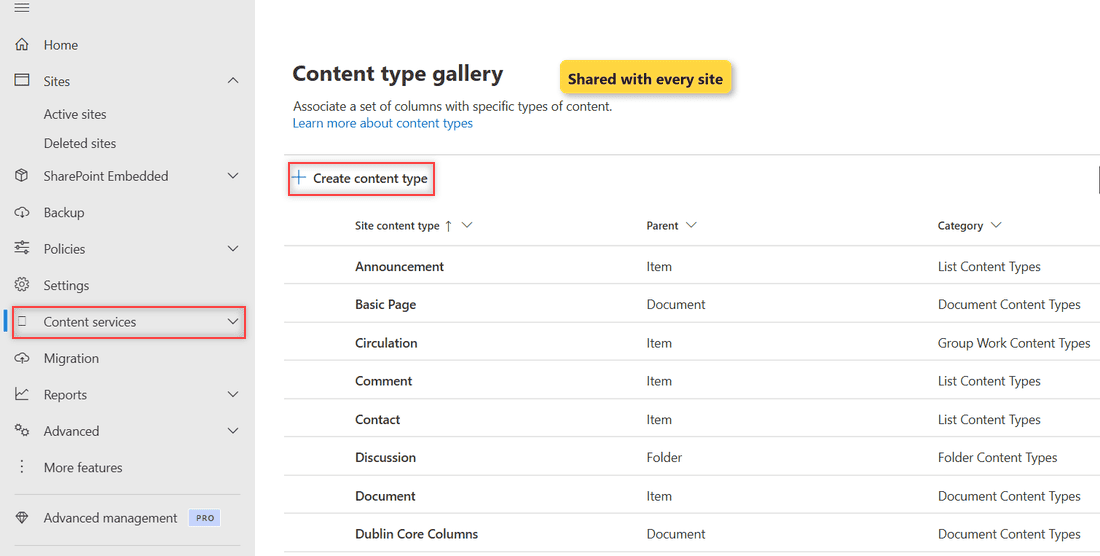
After a change, select Republish. Unpublish stops sharing it, and copies on sites become local content types.
To automate it, create a content type with Power Automate and create site columns with Power Automate.
Troubleshooting
- Choose content type list is empty: use Add from existing site content types in library settings (Step 4).
- A published type isn’t on a site: add it from the library with Add column > Add a content type.
Note: you can’t delete a content type while a library still uses it.
Where to Take It Next
Highlight upcoming renewals with SharePoint list view JSON formatting, or read my SharePoint list vs library comparison.
More ways to organize SharePoint lists and libraries:
Content types usually live inside document libraries, so it helps to know the different SharePoint library types and which one to use before you add one.
Frequently Asked Questions
What is a content type in SharePoint?
It’s a reusable definition of a kind of file or item: its columns, optional template and settings.
What is the difference between a site content type and a list content type?
A site content type can be added to any list on its site. Adding it creates a list content type, a child copy owned by that one list.
Where is the content type hub in SharePoint Online?
It’s the site at /sites/ContentTypeHub. You manage it from the Content type gallery in the SharePoint admin center, as described in Create or customize a content type.

I have worked with Microsoft technologies for more than 18 years, including SharePoint, Microsoft 365 and the Power Platform (Power Apps, Power Automate and Power BI), at companies like HP, TCS and KPIT. I started EnjoySharePoint in 2011 to share the solutions I build in real projects with readers in the United States, Canada, the United Kingdom, Australia, New Zealand and beyond. Microsoft has recognized this work with the Microsoft MVP award 13 times since 2014.