
Megan Bowen manages our Boston, Chicago and Seattle offices, and she wanted an email every time someone logs a facilities request in SharePoint. That took me about five minutes, because the template gallery already has a flow for exactly that job.
Power Automate templates are ready-made flows: the trigger, the actions and the connections are already wired, so you only point them at your site and list and adjust the details.
In this tutorial, I’ll use power automate templates to build one real flow, from finding the template to a successful test run, and show you the one template quirk worth fixing.
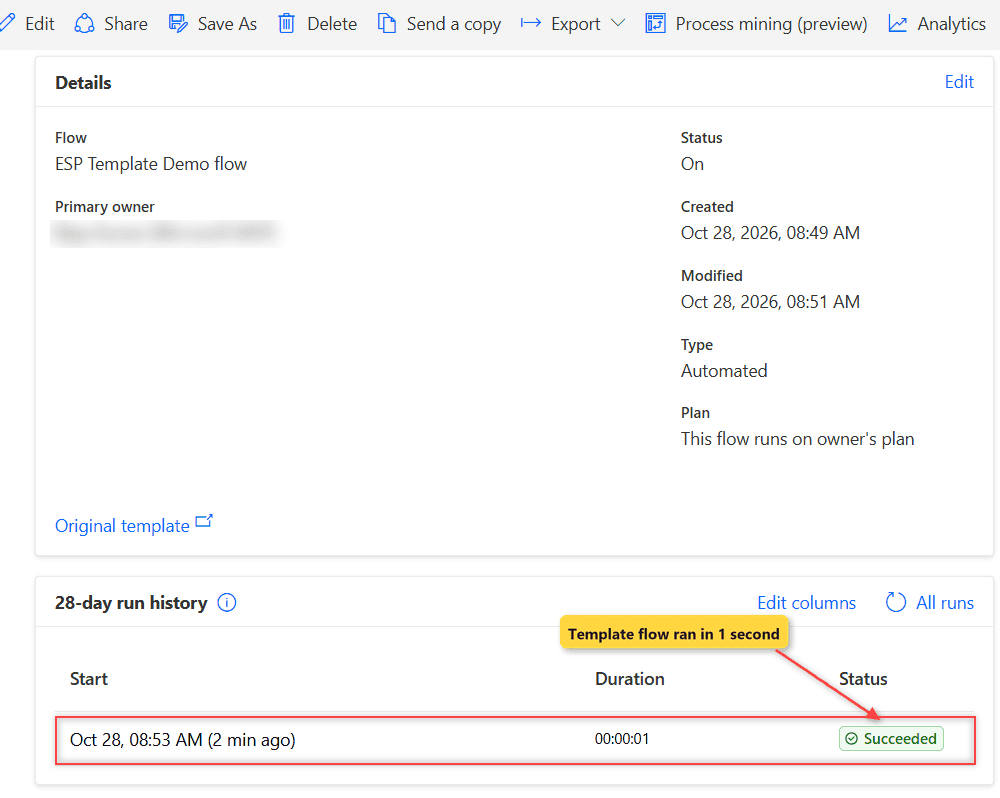
Here’s what we’re building: a three-step flow (new item trigger, Get my profile, Send Email) that emails you a request summary. This is its first real run:
Before You Start
You need a Microsoft 365 work account that includes Power Automate, plus edit rights on a SharePoint list. Templates create the same cloud flows you’d build by hand, so my guide to creating an automated cloud flow applies to everything here.
I made a small list called ESP Template Demo with these columns:
| Name | Type | Notes |
|---|---|---|
| Request | Single line of text | The renamed Title column |
| Requested By | Single line of text | Who filed the request |
| Office | Choice | Boston, Chicago, Seattle |
| Priority | Choice | Low, Normal, High |
| Due Date | Date and time | Date only |
It started with three requests, such as “Replace badge reader at the front door” from Megan Bowen in Boston, due 11/2/2026.
Step 1: Find the Template in the Gallery
The gallery holds hundreds of Microsoft and community flows, so search beats scrolling.
- Sign in to make.powerautomate.com and select Templates in the left pane.
- Type SharePoint list item email in the Search templates box and press Enter.
- Select Send a customized email when a new SharePoint list item is added.
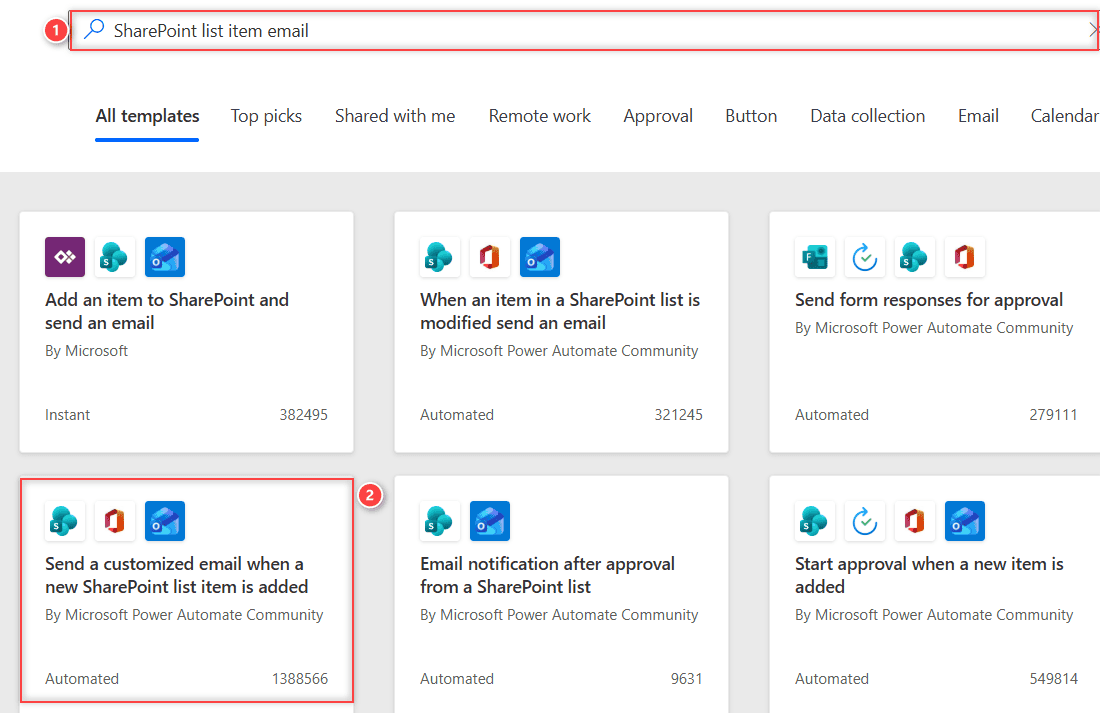
Each card shows its connectors, who published it and its type: Automated, Instant or Scheduled. An Instant card works like an instant cloud flow you start with a button.
Checkpoint: the details page opens with the description “Send yourself or someone else a customized email whenever a new item is added to a selected SharePoint list.”
Step 2: Check the Connections and Continue
A template can’t run until every connector it uses has a signed-in connection, so this screen matters more than it looks.
- Scroll to This flow will connect to. This template lists SharePoint, Office 365 Users and Office 365 Outlook.
- If a connector shows Sign in, select it and sign in with your work account.
- When all three show a green check mark, select Continue.
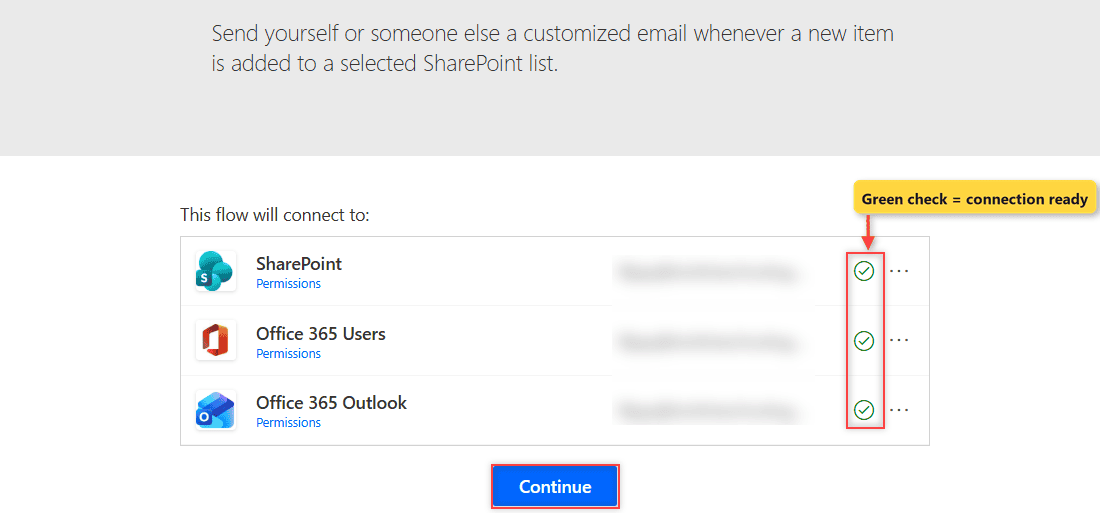
If a connection shows a warning instead, fix it before you go on. My failed to create connection for connection ID fix covers the usual causes.
Step 3: Pick Your Site and List, Then Create
This template asks for its settings before it builds the flow, so you never see an empty trigger.
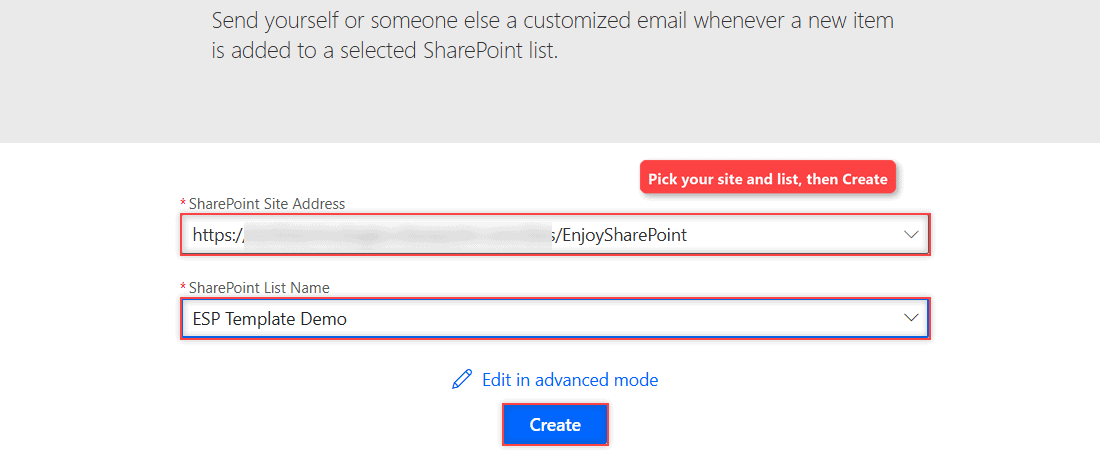
- Open SharePoint Site Address. If your site isn’t in the list, select Add a custom item and paste the site URL.
- Pick ESP Template Demo under SharePoint List Name.
- Select Create. (Edit in advanced mode opens the designer first instead.)
Checkpoint: a “Your flow is ready to go” box says the flow is turned on and will trigger on new list items.
Important: the flow is live the moment you select Create, so finish the next step before people add items.
Step 4: Customize the Email
Select Edit to open the flow. It has three steps: When a new item is created, Get my profile (V2) and Send Email. The defaults are generic, so I rewrote the subject and added the request details.
- Select Send Email. To already holds the Mail token from Get my profile, which is your own address.
- Replace the Subject “New item added” with New facilities request: and insert the Request token (the lightning icon opens dynamic content).
- In Body, add a line with Office Value, Priority Value and Requested By.
- Select the flow name at the top, rename it ESP Template Demo flow, and select Save.
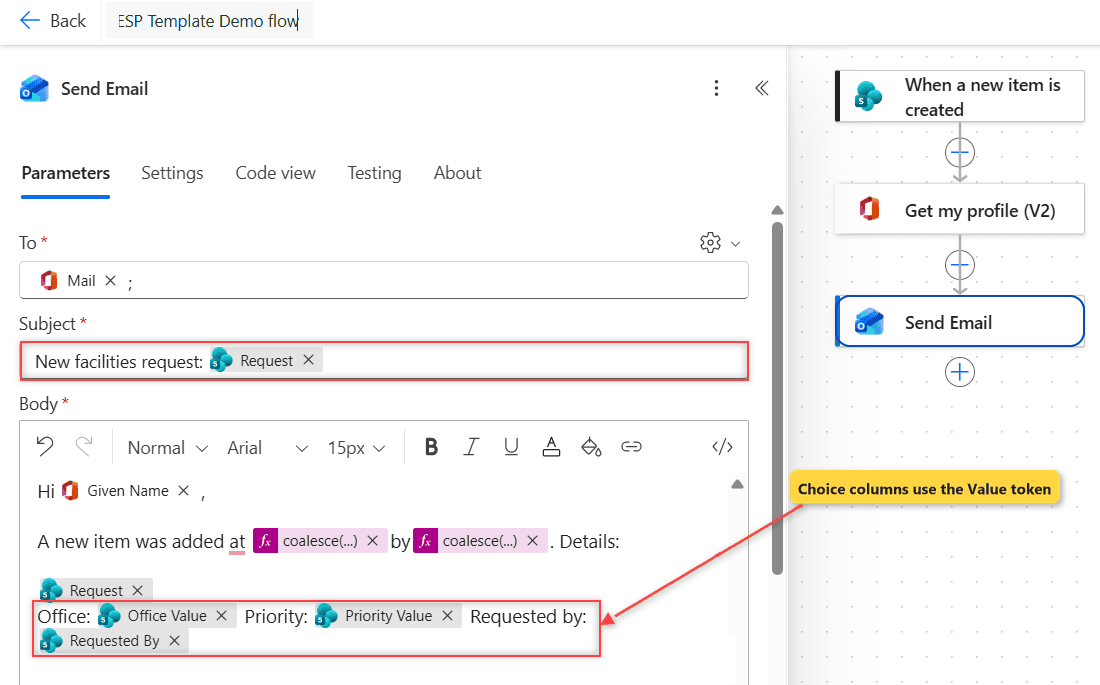
After saving, Code view shows what those tokens became. Choice columns use the /Value path, or you’d get the whole choice object:
"emailMessage/Subject": "New facilities request: @{triggerBody()?['Title']}",
"emailMessage/Body": "... Office: @{triggerBody()?['RequestOffice/Value']} Priority: @{triggerBody()?['RequestPriority/Value']} Requested by: @{triggerBody()?['RequestedBy']} ..."
Need CC, importance or attachments? My Send an email (V2) action guide covers every field.
Checkpoint: a green banner reads “Your flow is ready to go. We recommend you test it.”
Test the Flow
Same list, one new request. I selected Test > Manually > Test, and the designer waited with “To see it work now, add a new list item”. Then I added this item:
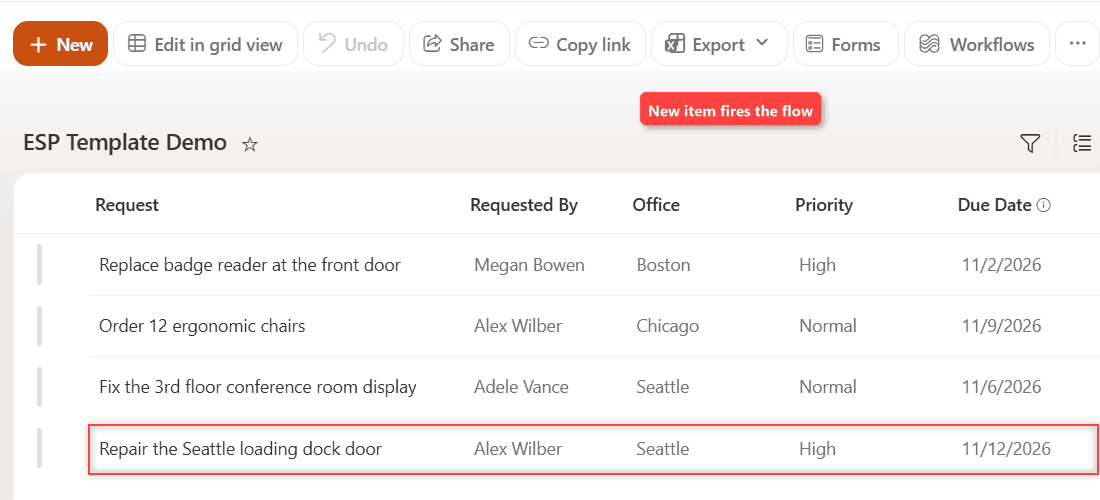
I added it at 8:52:35 AM, and the run started at 8:53:12. That gap is normal, because the SharePoint trigger checks the list on a schedule instead of reacting instantly.
All three steps succeeded in 0.3, 0.6 and 0.5 seconds. The Send Email inputs show exactly what went out:
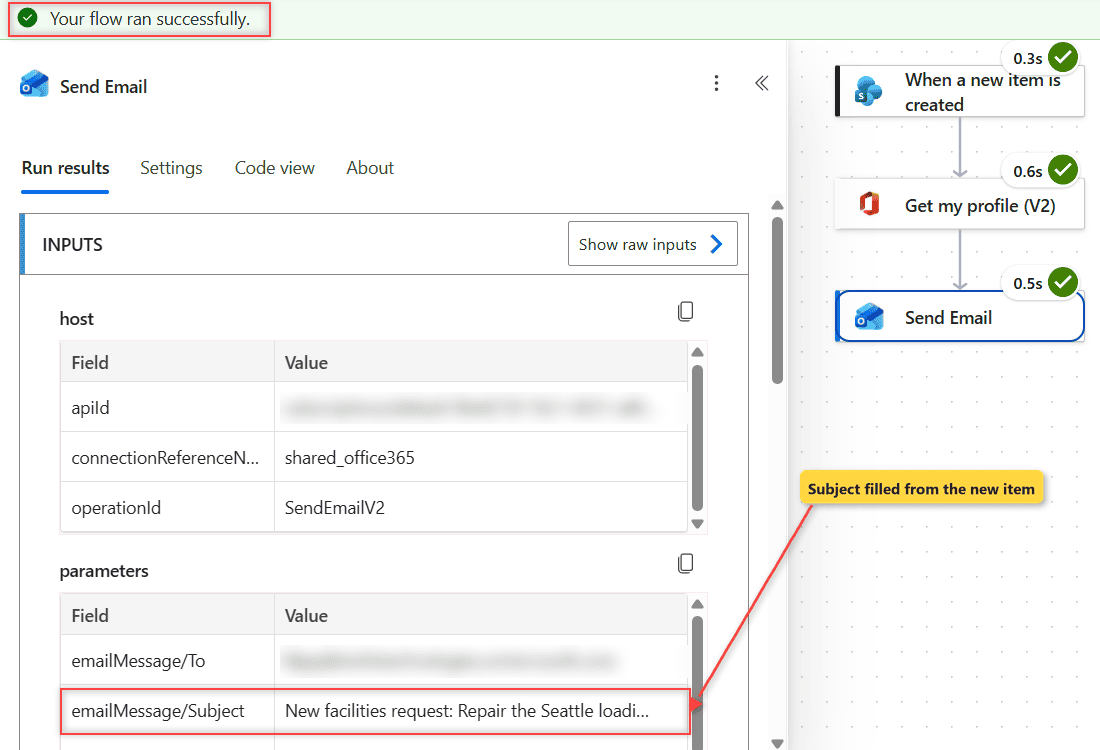
Subject: New facilities request: Repair the Seattle loading dock door
Office: Seattle Priority: High Requested by: Alex Wilber
Fix the Template’s Missing Spaces
The real run showed one flaw in the template’s own text. Its greeting rendered as “Hi” glued to my name, and the date ran straight into “by”, because the template has no spaces around those tokens.
- Click right after Hi in the body and type a space.
- Add a space before and after by, between the two coalesce tokens.
- The date prints as raw UTC, such as 2026-10-28T03:22:36Z. Wrap it in
formatDateTime()if your readers need a friendly time.
For readable dates, see my utcNow() and date format examples. Always read a template’s text in one test email before you trust it.
More Templates Worth Trying
The same steps work for any template. Here are three more I use, all covered in the older version of this post:
| Template idea | Trigger | Good for |
|---|---|---|
| Send an email when a new message is added in Microsoft Teams | Teams channel message | People who live in Outlook |
| Post a message to Teams when an email arrives | Office 365 Outlook email | Shared inbox alerts |
| Create a Planner task from an Outlook calendar event | Calendar event created | Turning meetings into tasks |
Before going live, swap the Mail token for a shared mailbox, and add a trigger condition on the SharePoint trigger if only High priority items need an email.
Troubleshooting
- Your site isn’t in the Site Address list: the list shows recent sites only. Use Add a custom item and paste the URL.
- The email shows a JSON blob for Office: you picked the column, not its Value. Insert the Value token instead.
- An Invalid connection banner: follow my fix for the invalid connection error in Power Automate.
Note: when the test was done, I selected Turn off on the flow’s details page, so later test items don’t keep sending mail.
Where to Take It Next
Once you’ve built one flow from a template, building from scratch feels familiar. Try a scheduled cloud flow for a weekly summary, or describe the flow in plain English and let Copilot build the flow for you.
A few more SharePoint list flows you can build next:
Frequently Asked Questions
Where do I find Power Automate templates?
Sign in to make.powerautomate.com and select Templates in the left pane. You can search or browse by category, as Microsoft explains in Get started from a template.
Are Power Automate templates free?
The templates are free to use. The flow they create still needs the right license, and templates with premium connectors need a premium plan.
Can I edit a flow created from a template?
Yes. It’s a normal cloud flow, so you can change, add or remove any trigger or action after it’s created.
Is a flow from a template turned on right away?
In my test, yes. The flow was on as soon as I selected Create, so customize and test it before people start adding items.

Preeti Sahu is a Microsoft MVP for Power Apps with over six years of experience working with SharePoint Online and the Power Platform. She is the co-author of the book Microsoft Power Platform: A Deep Dive. As a Power Platform developer, she has built various tools with Power Apps and Power Automate, and she makes Microsoft 365 videos for YouTube.