
Jordan Ellis, a marketing lead in our Chicago office, pinged me on a Monday morning. She needed the holiday campaign brief in front of the sales team and a whole folder of banner drafts in front of a freelance designer by noon.
Her first instinct was to attach everything to an email. That works once, but by Wednesday there are four copies of the brief, nobody knows which one is current, and the designer’s edits never make it back to SharePoint.
In this tutorial, I’ll show you how to share files in SharePoint the way I set it up for Jordan: one file with specific people, a copied link for a Teams chat, a full folder, someone outside the company, and how to take access back afterward.
Quick answer: Open the document library, select the circle next to the file or folder, and select Share at the top. Type names or email addresses in Add people, pick Can edit or Can view, add a short message and select Share. To share without an email, select Copy link instead and paste it into Teams or Outlook. To undo it later, open Share again and choose Remove access next to the person.
Before you share: what sharing actually does
Sharing gives someone access to one file or folder, not to the whole site. Jordan’s designer will see the folder she shares and nothing else in the library. If a person needs everything on the site, it’s cleaner to add them to the SharePoint site as a member instead.
On a team site, owners and members can share files and folders by default. The site owner and your admin can limit that, so some options may be grayed out.
For the demo, I created a library called ESP File Sharing with three files and a Holiday Campaign Assets folder. I’ll use it in every section below.
Share a file with specific people
I use this most, because only the people you name can open the file. Here’s how Jordan shared the brief:
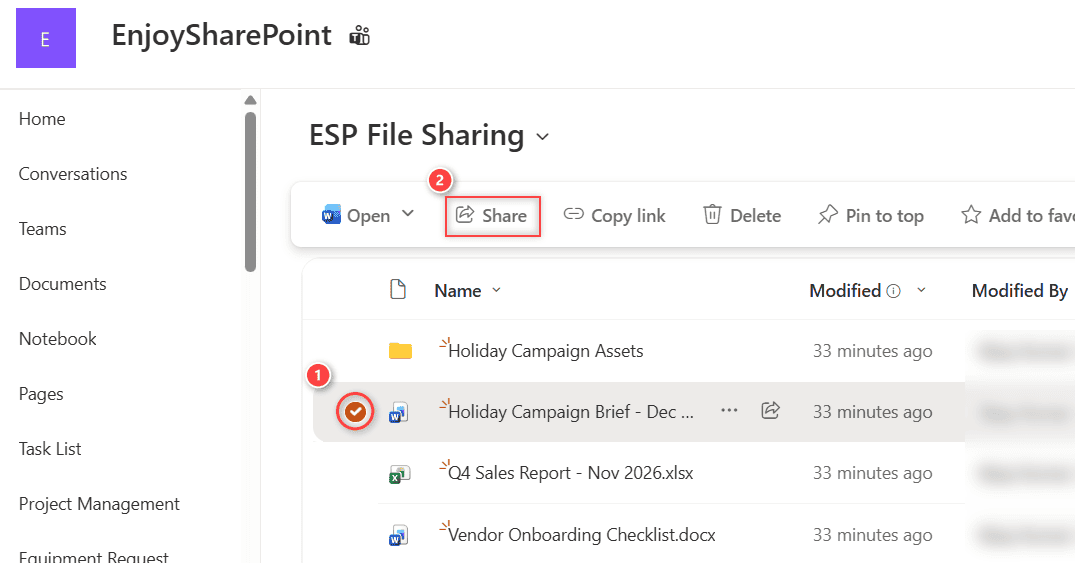
- Select the circle to the left of Holiday Campaign Brief – Dec 2026.docx (don’t open the file).
- Select Share in the command bar.
- In Add people, type a name, a Microsoft 365 group or an email address, and pick the person from the suggestions.
- The Add people panel opens. Select the access drop-down (it starts at Can edit) and choose what they can do.
- Type a short message such as “Final brief for the Nov 18 review” so the email doesn’t look like spam, then select Share. Clear Send email notification first if you’d rather tell them yourself.
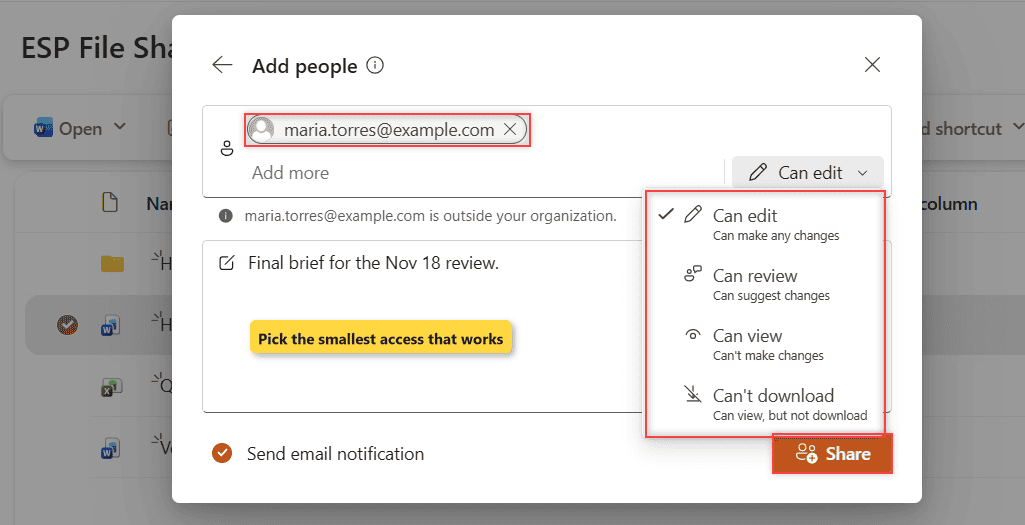
The access choices mean different things, so pick the smallest one that does the job:
| Access | What the person can do | I use it for |
|---|---|---|
| Can edit | Open, change and, on a folder, rename or delete items | Co-authors and team members |
| Can review | Suggest changes as tracked edits (Word files only) | Legal or manager sign-off |
| Can view | Open and read, but not change | Reports and finished documents |
| Can’t download | View in the browser only, with no download or print | Sensitive drafts |
Each person gets an email with a link to the file and your message. Their name then shows in the file’s access list.
If a coworker can see the file but you want them to lock it while they edit, read how to check files in and out in SharePoint before you send it.
Copy a link instead of sending an email
Sometimes you just want a link to drop into a Teams chat or a meeting invite. The Copy link button does that without SharePoint emailing anyone.
- Select the file and select Share.
- Under File link settings, check who the link works for. On our tenant the default is Only people added to the file have access, which grants nothing by itself.
- Select Change and pick People in your org, then set the access to Can view.
- Select Copy link and paste it wherever you need it.
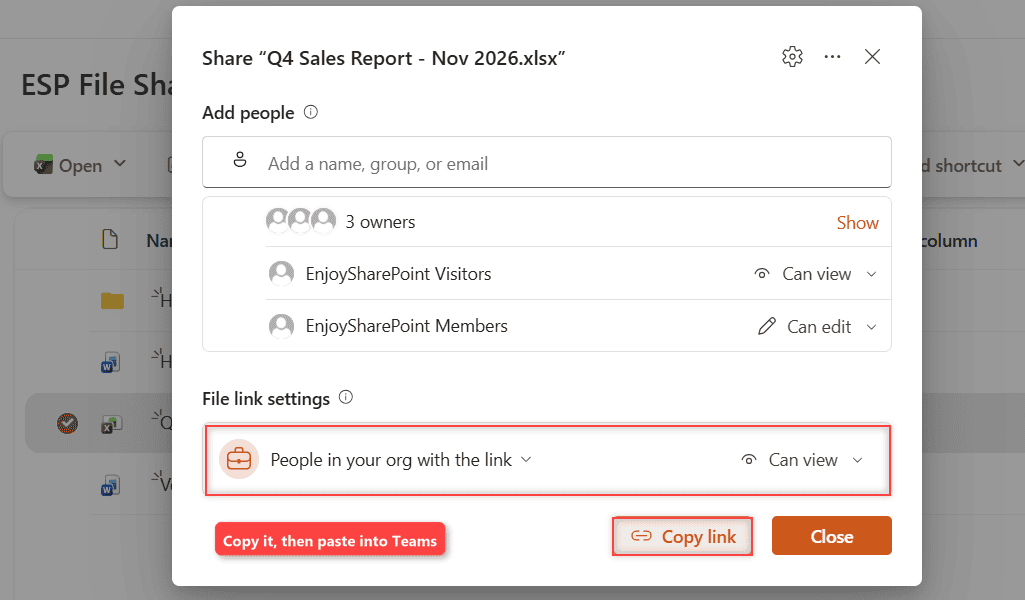
Jordan pasted the Q4 sales report link into the sales channel chat, and everyone in the company who clicked it could read it. People outside the company can’t use that kind of link. For a closer look at each option, see the four SharePoint sharing link types.
Share a whole folder at once
You can’t select five files and share them in one go. The fix is to put them in a folder and share the folder, which is exactly what Jordan did for the designer.
Select the circle next to Holiday Campaign Assets, select Share, and add people the same way. The dialog now says Folder link settings, and files inside, including ones added later, get the same access.
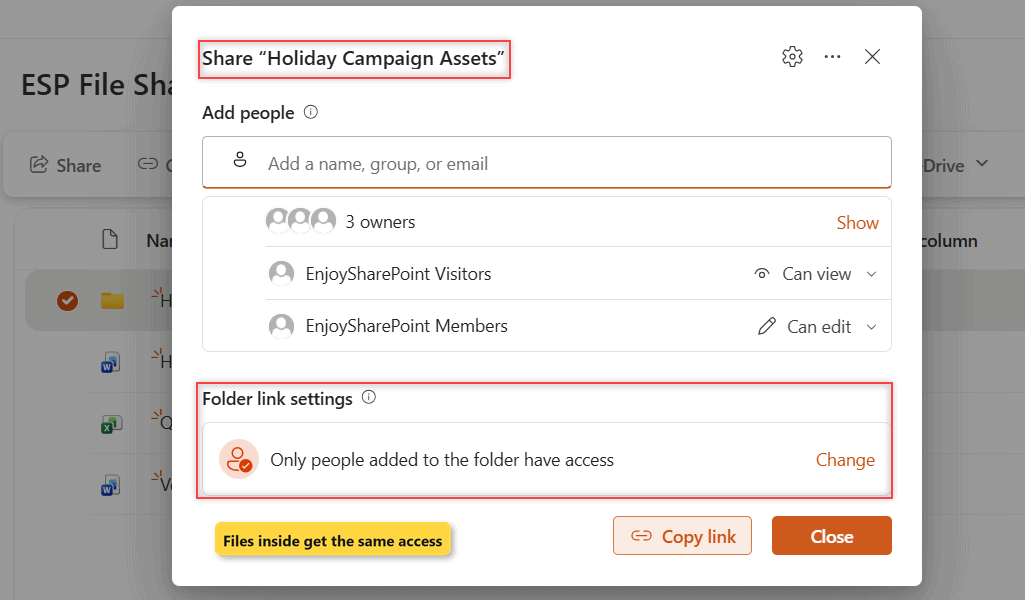
Be careful with Can edit on a folder. Microsoft notes that it lets people copy, move, rename, share and delete the items inside. People using a link can’t upload new files, though.
If the folder needs different access than the rest of the library long term, set it up properly with unique permissions on a SharePoint library instead of one-off shares.
Share files with people outside your organization
The designer works for a small studio in Denver, so she isn’t in our Microsoft 365 tenant. For her, Jordan used a specific people share with the designer’s work email address.
As soon as Jordan picked the address, SharePoint asked Share outside of your organization?. Select Continue to keep going, or Cancel if you typed the wrong address.
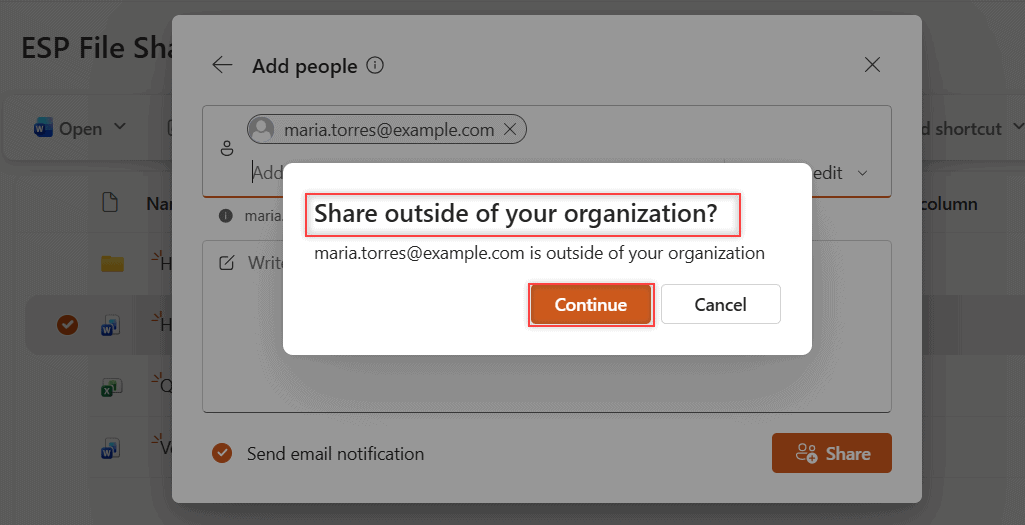
The designer then gets an email invitation and signs in as that exact address to open the folder, so a forwarded copy won’t work for anyone else.
Whether this is possible depends on the site’s external sharing level. Our EnjoySharePoint site allows new and existing guests but blocks Anyone links, so the Anyone option never appears. To open up a whole site to outsiders, follow the guide to share a SharePoint site with external users.
Important: Guests who share a folder can see each other’s names in its access list, so give each vendor its own folder.
Share from Teams, OneDrive or File Explorer
Files in a Teams channel live in a SharePoint library, so the same Share dialog opens there. In the channel’s Files tab, select … next to the file and choose Share.
If you’ve synced the library to your PC, right-click the file in File Explorer and select Share. Not sure whether to sync or add a shortcut? See SharePoint sync vs add shortcut to OneDrive.
See who has access and stop sharing
Once the campaign went live, Jordan wanted the designer’s access gone. In the new dialog, you check and remove access in the same Share window:
- Select the file or folder, then select Details at the right end of the command bar. Under Has access, select Manage access.
- The Share dialog opens with every person and group that has access, plus the file link.
- To remove someone, open the access drop-down next to their name and choose Remove access.
- To take back a link, select Change in the link settings and pick Only people added.
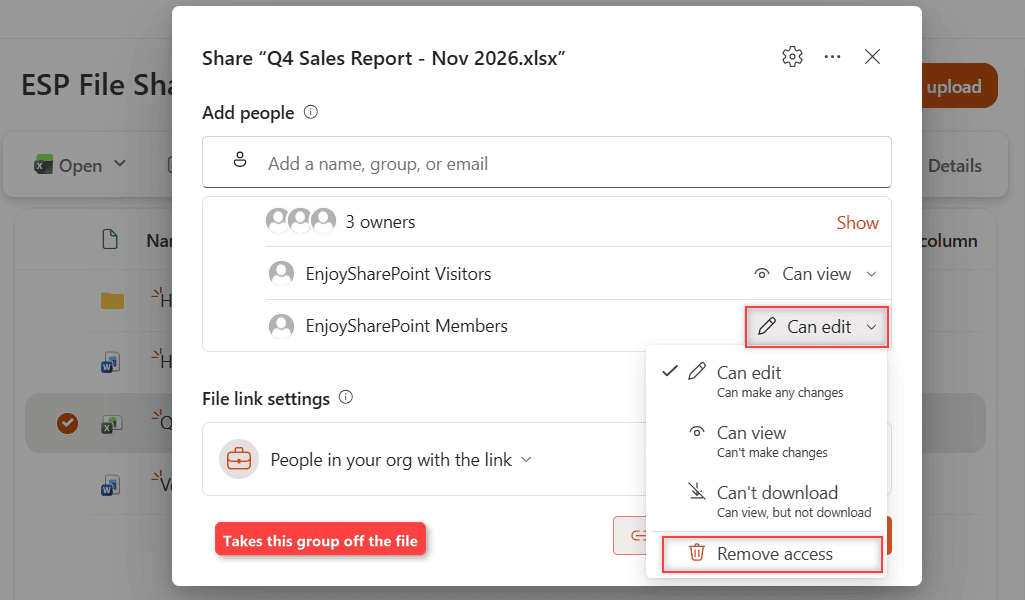
If the link has already been forwarded around, select the gear icon at the top of the dialog. Its Settings page has Reset link, which deletes the current link and creates a new one set to Only people added.
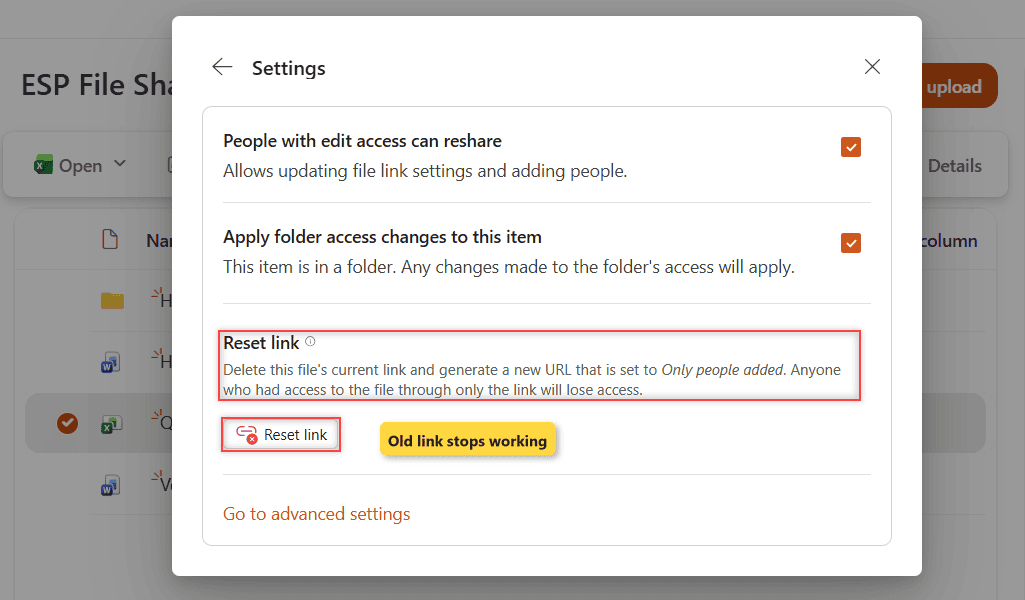
Anyone who reached the file only through the old link loses access. People with access through the site keep it, and the same page lets you stop editors from resharing.
For temporary access, it’s easier to set an expiration date on a sharing link so it shuts off without you remembering.
Common errors and how to fix them
- “Sharing is limited on this item.” The site owner or admin restricted who can share. Work through the fixes in Sharing is limited on this item in SharePoint.
- The recipient sees “You need permission to access this item.” They clicked a People in your org link but they’re a guest. Share with them as a specific person instead.
- The Anyone option is missing or grayed out. The site or tenant doesn’t allow anonymous links. That’s an admin decision, not a bug.
- Someone asks for access you never gave. They’re sending an access request. Here’s how to approve or decline SharePoint access requests.
- You can’t select multiple files to share. SharePoint shares one item at a time. Move the files into a folder and share the folder.
Once your files are shared, these guides help you keep the library tidy:
Frequently Asked Questions
Does sharing a file give someone access to the whole SharePoint site?
No. Sharing a file or folder gives access to that item only. The person can’t browse the rest of the library or site unless you also add them to the site or share other items with them.
Can I share a SharePoint file with someone outside my company?
Yes, if your admin and the site allow external sharing. Share it with the person’s email address, and they’ll sign in as that address to open it. If the option is blocked, ask your SharePoint admin to review the site’s sharing level.
Will the person get an email when I share a file?
Yes when you use Add people and select Send. No when you select Copy link, because you paste the link yourself. Microsoft covers both options in Share SharePoint files or folders.
Can I change a sharing link from edit to view?
For the main file link, yes. In the Share dialog, open the access drop-down next to the link settings and pick Can view. Microsoft says older extra links can’t be switched, so delete those and create a new one.
How do I see everything I’ve shared?
Select a file or folder, select Details, and then Manage access to see who has it. For a list across files, open OneDrive on the web and go to Shared, then By you.

I have worked with Microsoft technologies for more than 18 years, including SharePoint, Microsoft 365 and the Power Platform (Power Apps, Power Automate and Power BI), at companies like HP, TCS and KPIT. I started EnjoySharePoint in 2011 to share the solutions I build in real projects with readers in the United States, Canada, the United Kingdom, Australia, New Zealand and beyond. Microsoft has recognized this work with the Microsoft MVP award 13 times since 2014.