
In this tutorial, I will explain how to use the File and Media web part in SharePoint Online, with examples.
What is the File and Media Web Part?
The File and Media Web Part is a powerful tool for displaying files and media content directly on SharePoint pages without requiring users to download them. I was working with a client who wanted their employees to access important files like presentations, documents, and spreadsheets while viewing them inline on the intranet—this eliminated the need for downloads and improved productivity.
The SharePoint File and Media Web Part allows you to:
- Display files from any location within your organization (Site, OneDrive, or external links)
- View document content directly on the page
- Display specific ranges from Excel files with interactive features
- Provide live preview functionality
- Create a more engaging intranet experience
Key Benefits:
- Improved User Experience: Users view content without downloading files
- Reduced Storage: No need to create local copies
- Real-Time Updates: Changes to source files reflect immediately
- Security: Control who can access content at the SharePoint level
Features & Capabilities
Supported File Types:
- Word documents (.docx, .doc)
- Excel spreadsheets (.xlsx, .xls)
- PowerPoint presentations (.pptx, .ppt)
- PDF files
- Videos (MP4, WebM, Ogg)
- Audio files (MP3, WAV)
- Images (.jpg, .png, .gif, .bmp)
Important Limitations:
- ❌ Image files cannot be displayed directly (use Image Web Part instead)
- ❌ Audience targeting is NOT supported
- ❌ Large files (>100MB) may have performance issues
- ✅ Mobile responsive viewing
- ✅ Real-time document updates
- ✅ Version history support
Permission Requirements:
- Must have at least View permissions on the file location
- Web Part can be added by users with Edit permissions on the page
- File visibility depends on your organization’s access control
Check out SharePoint Online News Web Part
How to Add the File and Media Web Part
Here are the step-by-step instructions to add the file and media web part in SharePoint Online.
- Navigate to your SharePoint page and click Edit at the top
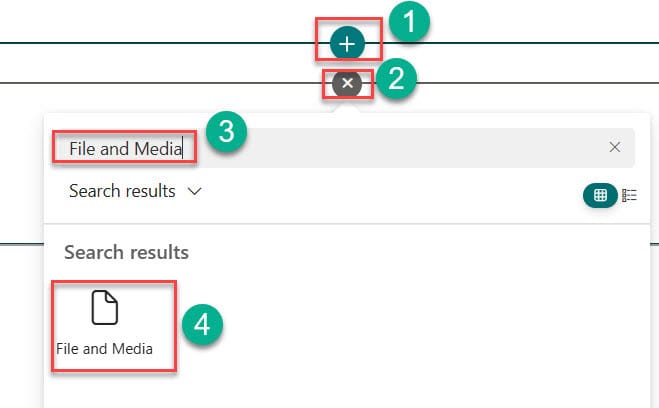
- Add a section by clicking the + icon, then select New Section
- Click the + icon within the section to add a web part
- Search for “File and Media” in the search box
- Select the File and Media web part from the results
- Click “Add a File” in the web part

- Choose your file source:
- Recent: Displays recently accessed documents
- Site: Files from your current site’s document libraries
- OneDrive: Your personal OneDrive files
- Upload: Upload a file from your computer
- From a Link: Provide direct URLs to organizational files
- Select your file and click Add
- Republish the page to save changes
- Here, I have uploaded a document from the Site. On my site, I have two document libraries. From there, I selected a document, which is displayed in the SharePoint Online Files and Media web part, as shown in the screenshot below.

In this way, we can use the file and media web part in SharePoint Online.
Check out SharePoint Quick Links Web Part
Dynamically View Files From File and Media Web Part
Instead of manually selecting a single file, you can connect the File and Media Web Part to a SharePoint Document Library Web Part, allowing users to select files for display dynamically.
Here is how to set up:
- Add both web parts on your page side-by-side:
- Left: Document Library Web Part (showing available documents)
- Right: File and Media Web Part (for preview)

After adding these two web parts, I will show how to connect this document library to the File and Media web part.
Please follow the instructions below to connect the sources in the File and Media web part.
- Edit the SharePoint Online File and Media web part. On the properties pane, click on three dots (…). Then click on Connect to source.

- Then select the source Documents below “Connect to source“. Then click on Republish.

- Once you click on Republish, you can see the SharePoint Online Files and Media web part as shown in the screenshot below. Here you can also see I already added the document library web part besides the SharePoint Online Files and Media web part.

- Users can now click files in the Document Library, and they’ll preview in the File and Media Web Part. You can see in the screenshot below:

Read Events Web Part in SharePoint Online
Displays Ranges in an Excel File In a File and Media Web Part
Rather than displaying an entire spreadsheet, you can show a specific range with formatting, sorting, and filtering options. Please follow the instructions below:
How to Display a Range:
- Upload an Excel file to your File and Media Web Part. Here, I have already uploaded an Excel file, as shown in the screenshot.

- Edit the web part and expand Range settings
- Enter these details:
- Sheet Name: The exact sheet name (e.g., “Sales Data”)
- Starting Cell: Where your range begins (e.g., A1)
- Ending Cell: Where your range ends (e.g., E6)
- Enable optional features:
- Show grid lines – For table formatting
- Allow sorting and filtering columns – For interactivity

- Once you click Republish, you can see the Excel sheet range from A1 to E6, as shown in the screenshot below.

Important Points
- Image Files are not supported in the SharePoint Online File and Media web part.
- Audience targeting is not implemented in the SharePoint Online File and Media web Part.
Conclusion
SharePoint Online File and Media web helps to easily display essential files directly on a SharePoint site page. It also allows users to view content quickly without downloading files. By allowing users to view files inline without downloads, you can build more engaging intranets and improve overall productivity.
You may also like the following tutorials:
- SharePoint Highlighted Content Web Part
- SharePoint Online Weather Web Part
- SharePoint Group Calendar Web Part

I have worked with Microsoft technologies for more than 18 years, including SharePoint, Microsoft 365 and the Power Platform (Power Apps, Power Automate and Power BI), at companies like HP, TCS and KPIT. I started EnjoySharePoint in 2011 to share the solutions I build in real projects with readers in the United States, Canada, the United Kingdom, Australia, New Zealand and beyond. Microsoft has recognized this work with the Microsoft MVP award 13 times since 2014.
Can I put a default document to be previewed into the File Viewer, before any selection?
How do I CONVERT FILES, IN OTHER WORDS, how do I get the film from the 1-file-viewer ???