
You build a canvas app, and before long, the same formula shows up in five different places. You copy a LookUp once, then again for another label, then again for a visibility rule. A week later, you need to change that logic, and now you have to hunt through the whole app to fix it.
That is exactly where Power Apps Named Formulas help. Think of them like reusable formulas you define once at the app level and then use anywhere in your app.
In a help desk app, for example, you might want to reuse the logged-in user’s profile, the user’s role, company branding, dashboard counts, or today’s date across multiple screens without repeating the same formula each time.
Power Apps Named Formulas
Now, I’ll show you 5 ways to do Power Apps Named Formulas in Power Apps.
Method 1 – Power Apps Named Formulas for Logged-in User Information
Use this method when you need the same user profile details on multiple screens. It works well for apps that show employee details, approver info, or profile-based labels across forms and dashboards.
Step 1: Open the Named Formulas area
Go to Power Apps Studio → App → Formulas.
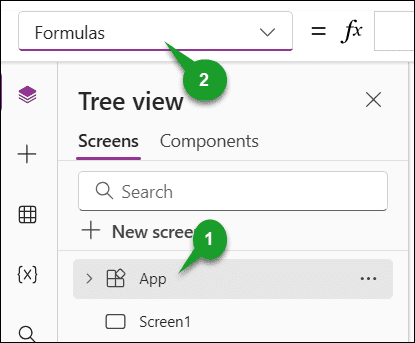
Step 2: Create a named formula for the current user profile
Add this formula in the Formulas property: (First, you must add the Office365Users connection to your app)
CurrentUser = Office365Users.MyProfileV2();
How does this formula work?
This creates a named formula called CurrentUser. It calls the Office365Users.MyProfileV2() function once as a reusable app-level formula, so you can reference the user’s profile anywhere in the app.
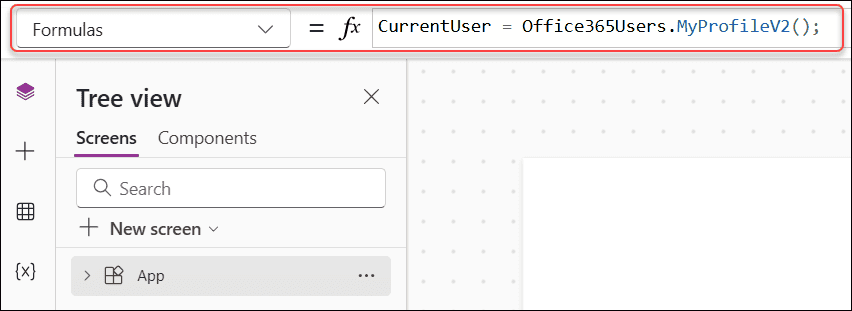
Step 3: Add labels to show user details
Go to Power Apps Studio → Insert → Text and add a few modern labels to your screen.
Step 4: Use the named formula in label properties
Set the Text property of each label to one of these formulas:
CurrentUser.displayName
How does this formula work?
This reads the DisplayName field from the CurrentUser record.
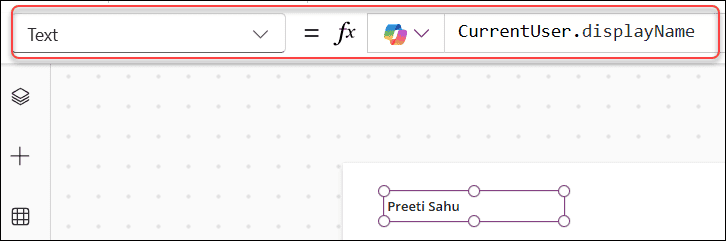
CurrentUser.mail
How does this formula work?
This returns the user’s email address from the same reusable profile record.
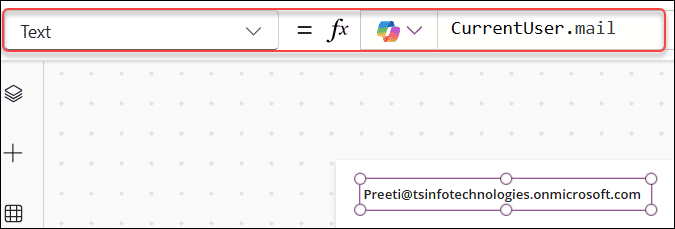
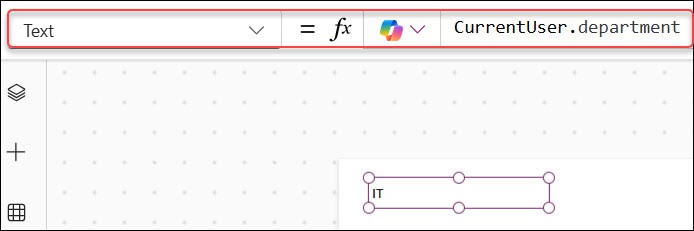
CurrentUser.department
How does this formula work?
This pulls the department value from the logged-in user’s profile.
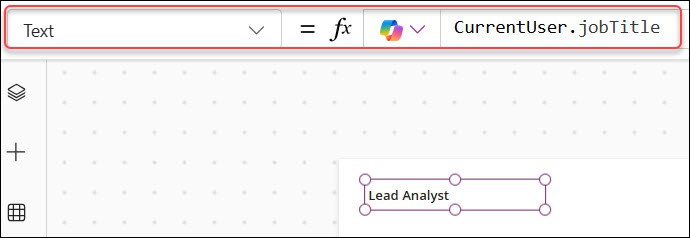
CurrentUser.jobTitle
How does this formula work?
This returns the job title field from the user profile record.
Pro Tip: This method works best when the same employee details appear on a home screen, profile screen, and approval form. You define the profile once and reuse it everywhere.
Method 2 – Power Apps Named Formulas for Current User Role
We can use this method when you want role-based behavior without repeating the same LookUp formula in multiple controls. It fits apps where admins, managers, and standard users should see different buttons or screens.
Step 1: Create a user role data source
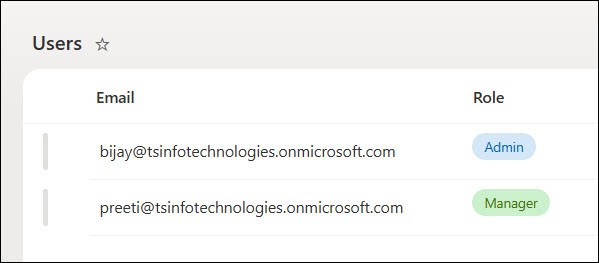
Create a data source named Users with columns such as Email and Role. This could be a SharePoint list or a Dataverse table.
Example data:
- [email protected] → Admin
- [email protected] → Manager
- [email protected] → User
In the table below, Email is my SharePoint Title column, and Role is a Choice column.
Step 2: Add the named formula
Go to Power Apps Studio → App → Formulas and enter: (Make sure to connect the SharePoint datasource (Users) connection to the app)
CurrentRole = LookUp(Users, Title = User().Email, Role.Value);
How does this formula work?
LookUp searches the Users data source for the record where the Email column matches User().Email. It then returns the Role value (choice column) from that record and stores it as the named formula CurrentRole.
If your Role column is a single text value, you can write Role directly in the formula above.

Step 3: Use the role to control visibility
Select an admin-only button or container. Then set its Visible property to:
CurrentRole = "Admin"
How does this formula work?
This checks whether the reusable CurrentRole value equals “Admin”. If it does, the control shows. If not, it stays hidden.
If the CurrentRole value equals “Manager”, the button will be visible as below:

Step 4: Use the same role in other places
You can also use the same named formula in labels, screens, or navigation logic.
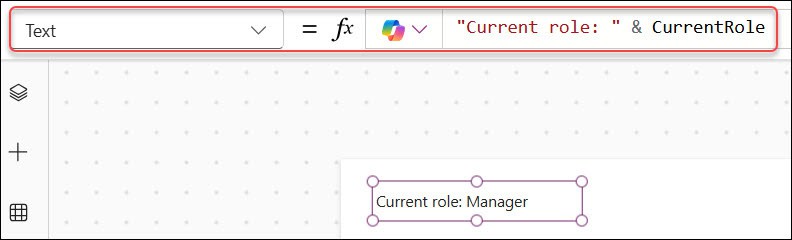
"Current role: " & CurrentRole
How does this formula work?
This joins plain text with the CurrentRole value, which is useful for testing or showing role-based status in the app.
Pro Tip: This is a clean pattern for role-based security in the UI. It reduces repeated LookUp calls and makes the app easier to maintain.
Method 3 – Power Apps Named Formulas for Company Branding
Use this method when you want consistent branding across all screens. It is especially useful for internal apps where you want the same company name, colors, and labels reused in headers, buttons, and cards.
Step 1: Open the app formulas
Go to Power Apps Studio → App → Formulas.
Step 2: Add branding-named formulas
Enter these formulas:
CompanyName = "TSInfo Technologies";
PrimaryColor = ColorValue("#0078D4");

How does this formula work?
CompanyName stores a reusable text value. PrimaryColor uses ColorValue to convert a hex color into a color value that Power Apps can use in properties like Fill or Color.
Step 3: Use the company name in a header
Insert a modern text from Power Apps Studio → Insert → Text and set its Text property to:
CompanyName
How does this formula work?
This displays the reusable text value stored in CompanyName.
Step 4: Use the color in buttons or containers
Select a modern button or container and set its Fill property to:
PrimaryColor
How does this formula work?
This applies the reusable brand color to the selected control. If you change the color once in App → Formulas, every control using PrimaryColor updates.

Pro Tip: Store shared labels, brand colors, and reusable text values as named formulas. This makes rebranding much faster later.
Method 4 – Power Apps Named Formulas for Dashboard Statistics
Use this method when you need read-only metrics on a home screen or dashboard. It is a strong fit for help desk, sales, inventory, and project apps where summary counts appear in cards and headers.
For this example, I will use a help desk table called HelpDeskTickets with columns like TicketID, Title, Status, Priority, and AssignedTo.
Step 1: Open the app formulas
Go to Power Apps Studio → App → Formulas.
Step 2: Create a named formula for open tickets
Add this formula:
MediumTickets = CountRows(Filter(colHelpDesk, Priority.Value = "Medium"));
How does this formula work?
colHelpDesk is my Collection name that contains all the info from the SharePoint list (IT Help Desk). Filter returns only the records where Priority.Value equals “Medium”. Then CountRows counts those filtered records and stores the result in MediumTickets.

Step 3: Show the metric in a card or label
Insert a modern label or card title and set the Text property to:
MediumTickets
How does this formula work?
This displays the reusable number returned by the named formula.
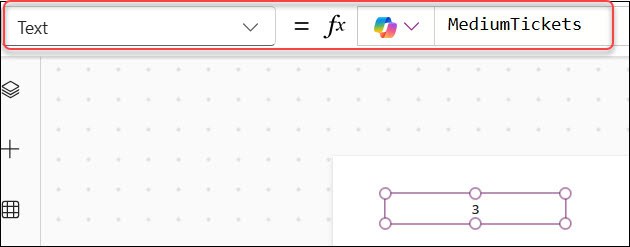
Pro Tip: This method is best for dashboard values that are read often in several places. On large data sources, always check whether your filtering logic is delegable before you rely on the result.
Method 5 – Power Apps Named Formulas for Current Date
Use this method when you need the current date in forms, headers, or reports across the app. It keeps your date logic consistent and avoids having to type the same function repeatedly.
Step 1: Open the formulas property
Go to Power Apps Studio → App → Formulas.
Step 2: Create the date formula
Add this formula:
CurrentDate = Today();
How does this formula work?
Today() returns the current date based on the user’s session. Saving it as CurrentDate gives you one reusable app-level date formula.

Step 3: Show the date on a form or report
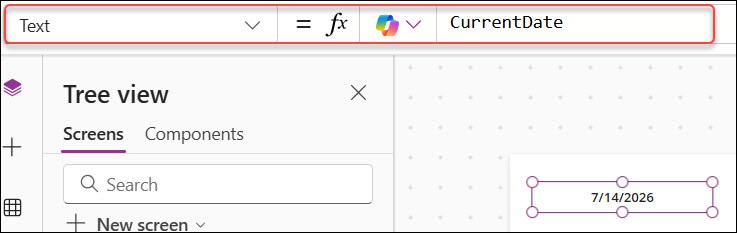
Insert a modern label from Power Apps Studio → Insert → Text and set the Text property to:
CurrentDate
How does this formula work?
This displays the current date value returned by Today().
Step 4: Format the date for users
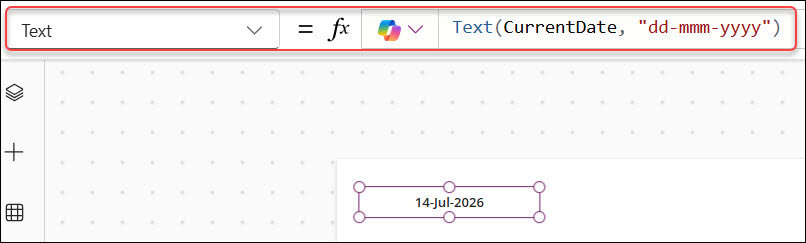
If you want a cleaner display, set the Text property to:
Text(CurrentDate, "dd-mmm-yyyy")
How does this formula work?
Text converts the date into a formatted text string. In this example, a date like July 13, 2026 displays as 13-Jul-2026.
Pro Tip: Use this method when the same date appears in screen headers, printable summaries, and review forms. It keeps formatting and reuse simple.
Things to Keep in Mind
- Named formulas are not variables. Use named formulas when you want a value to recalculate automatically and stay reusable. Use Set() for global state that changes because of a user action, and use UpdateContext() for screen-level state.
- Use named formulas for read-only logic. Named formulas are great for reusable values like profile info, colors, counts, and dates. They are not the right choice for button-click actions or formulas that need side effects.
- Watch delegation on large data sources. A formula like CountRows(Filter(HelpDeskTickets, …)) may not behave as expected on large SharePoint lists if part of the query is non-delegable. Always test with real data volume, not just a small sample.
- Know the difference between Filter(), Search(), and LookUp(). Use Filter() when you need a table of records, Search() when users type text to find matches, and LookUp() when you want one record or one value, such as a user’s role.
- Canvas apps use named formulas, not model-driven apps. Named formulas are part of the canvas app authoring experience. If you work in model-driven apps, the pattern and configuration approach are different.
- Use modern controls consistently. When you apply named formulas to labels, buttons, and containers, stick with modern controls so the app stays visually consistent and aligned with the current Power Apps experience.
- Power Apps IsMatch() Function
- Power Apps GroupBy Function
- Power Apps Component Event Property
- Power Apps Create Function
You learned five practical ways to use Power Apps Named Formulas for user info, roles, branding, dashboard metrics, and dates. We can use named formulas for reusable, always-available logic, and switch to Set() or UpdateContext() only when you need to change app or screen-level state. I hope you found this article helpful.

Preeti Sahu is a Microsoft MVP for Power Apps with over six years of experience working with SharePoint Online and the Power Platform. She is the co-author of the book Microsoft Power Platform: A Deep Dive. As a Power Platform developer, she has built various tools with Power Apps and Power Automate, and she makes Microsoft 365 videos for YouTube.