
A blank dropdown selection looks harmless until it creates a bad record in a business app. I have seen this happen in HR apps where a coordinator filters employees by department, leaves the filter empty, and suddenly assumes the gallery has no records.
In a recent Canvas app for a 200-employee company, the HR team used an Employees SharePoint list to manage staff details. They needed one dropdown to filter employees by department, but they also wanted a blank option that meant “show every employee.” That small requirement affects the control’s Items, Default, AllowEmptySelection, gallery filter, validation, and reset behavior.
This practical guide shows how to add, remove, check, reset, filter, and save Power Apps dropdown blank values without confusing users or breaking your SharePoint data.
What blank values mean in Power Apps dropdowns
A Dropdown control lets users select one value from a short list. In a typical HR app, that list might include IT, HR, Finance, Marketing, and Operations.
A blank value can mean different things depending on where you use it:
- No choice has been made yet
- The user intentionally cleared a filter
- Show all records in a Gallery
- The field is optional
- The app should not write a value to the data source
- The user must select a value before submitting a form
The important point is this: blank is not always the same as an empty string. In Power Apps, a blank value often means Blank(), while an empty string means "". They may look identical on screen, but formulas can treat them differently.
For example, this checks whether a dropdown has no selected value:
IsBlank(ddDepartment.Selected.Value)
This checks whether the selected value is an empty text string:
ddDepartment.Selected.Value = ""
For most business apps, I prefer IsBlank() because it clearly states what I am testing. You can learn more about checking missing values in this guide on the Power Apps IsBlank function.
Pro Tip: I avoid using a single space such as
" "as the blank item unless I have a specific display reason. A space looks blank, but Power Apps does not always treat it as blank. It can cause confusing validation and filtering behavior later.
Build the Employee dropdown example
Let’s use the Employees SharePoint list shown in the example. It contains columns such as:
- Full Name
- Employee ID
- Department
- Office
- Status
- Joining Date
- Salary
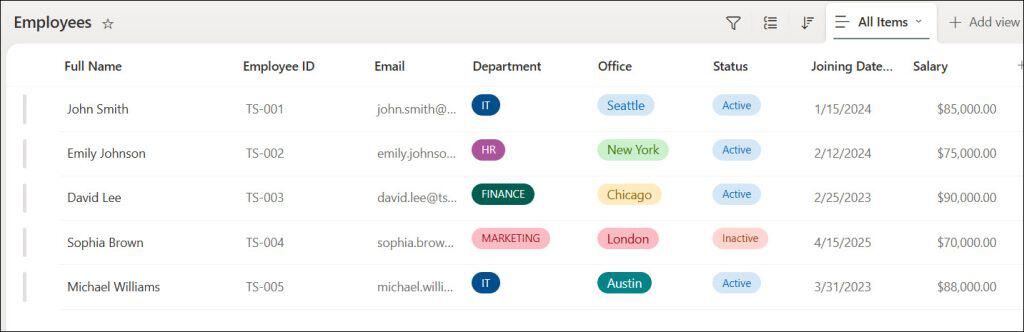
For this example, the Department column stores values such as IT, HR, Finance, and Marketing. The Status column stores Active or Inactive.
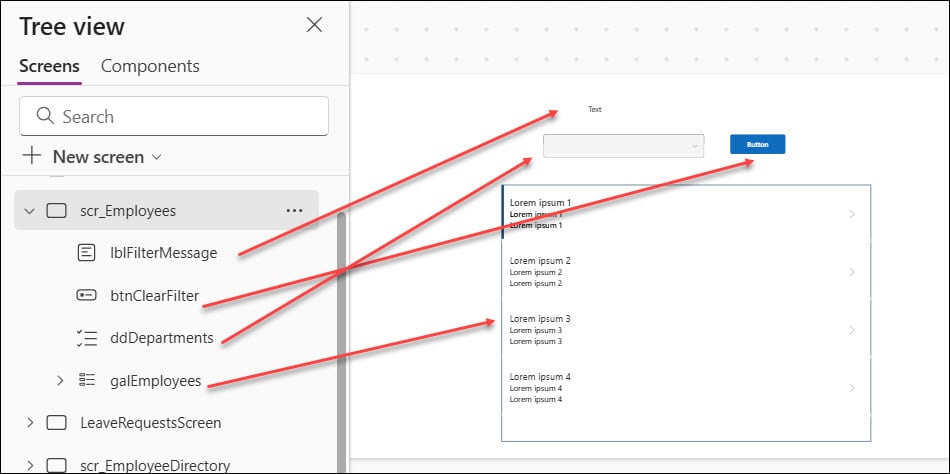
Create a blank Canvas app or add this functionality to an existing HR management app. Then add the following controls to one screen:
- A Dropdown control named ddDepartments
- A Gallery control named galEmployees
- A Button control named btnClearFilter
- A Label control named lblFilterMessage
If you need the full setup process, start with this walkthrough on how to create a Canvas app from a SharePoint list. For a broader look at building forms and screens, see how to create a form in Power Apps.
Add the Employees SharePoint list as a data source. Then set the Gallery control’s Items property to:
Employees
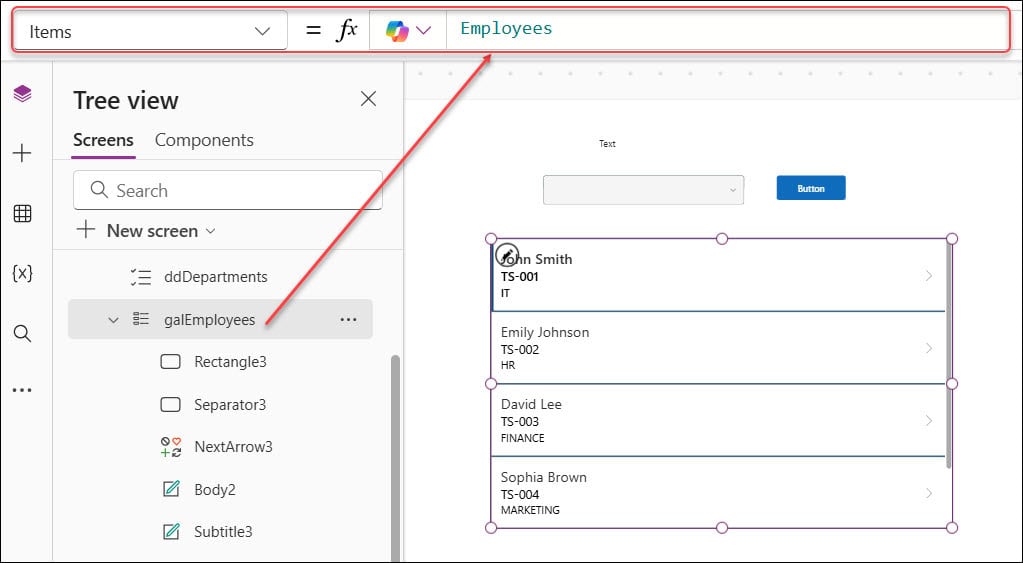
At this stage, the gallery should display all employee records.
Create a unique department list
If you directly bind the dropdown to the Employees list, you will see repeated department names. Five IT employees will produce five IT entries. This makes the filter feel unprofessional.
Set the Dropdown control’s Items property to this formula:
Sort(
    Distinct(
        Filter(
            Employees,
            !IsBlank(Department)
        ),
        Department
    ).Value,
    SortOrder.Ascending
)
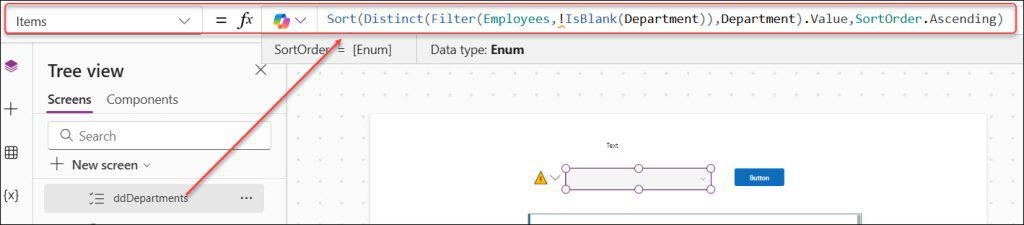
This formula does three useful jobs:
Filter(Employees, !IsBlank(Department))excludes employees with an empty Department fieldDistinct(..., Department)returns one record for each departmentSort(..., Value, SortOrder.Ascending)sorts the department names alphabetically
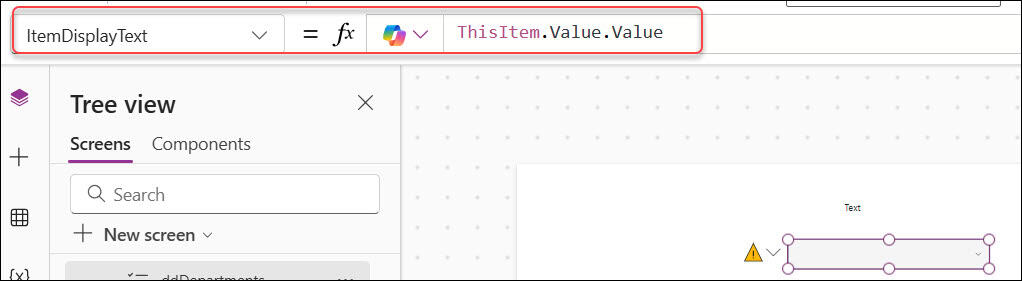
The Distinct function returns a single-column table. In modern Power Apps, that returned column is commonly named Value. Therefore, use this property on the dropdown:
ItemDisplayText = ThisItem.Value.Value
If you run into duplicate values in your app, follow this detailed guide on how to remove duplicates in a Power Apps dropdown.
Add a blank option for “All Departments”
A blank choice works especially well for a filter. In our HR example, it means the user has not chosen a department and wants to see everyone.
Do not rely only on the dropdown’s blank state when users need a clear “all records” option. Instead, add a readable option named All Departments. Users understand it immediately, and your formula becomes easier to support.
Set the Items property of ddDepartments to:
Table(
    {Value: "All Departments"}
) &
Sort(
    Distinct(
        Filter(Employees, !IsBlank(Department)),
        Department
    ),
    Value,
    SortOrder.Ascending
)

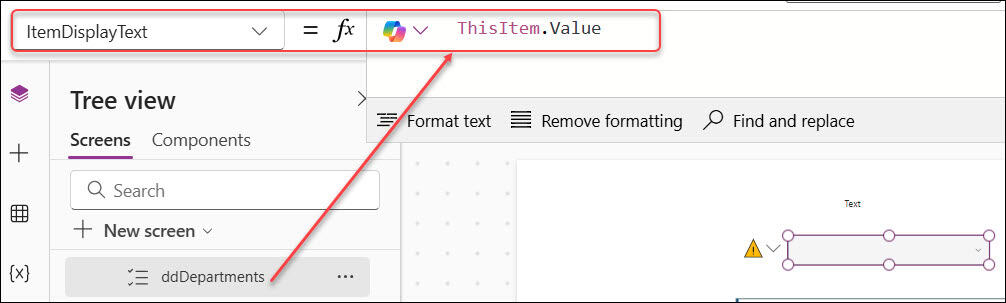
Set the dropdown’s ItemDisplayText field to:
ThisItem.Value
Now the dropdown shows:
- All Departments
- Finance
- HR
- IT
- Marketing
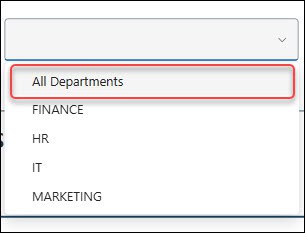
This approach is better than displaying a visually blank first item because every user can understand what it does. It also supports screen readers and reduces mistakes on mobile devices.
Filter the Employee gallery
Next, set the Items property of galEmployees to:
If(
    ddDepartments.Selected.Value = "All Departments" || IsBlank(ddDepartments.Selected.Value),
    Employees,
    Filter(
        Employees,
        Department.Value = ddDepartments.Selected.Value
    )
)
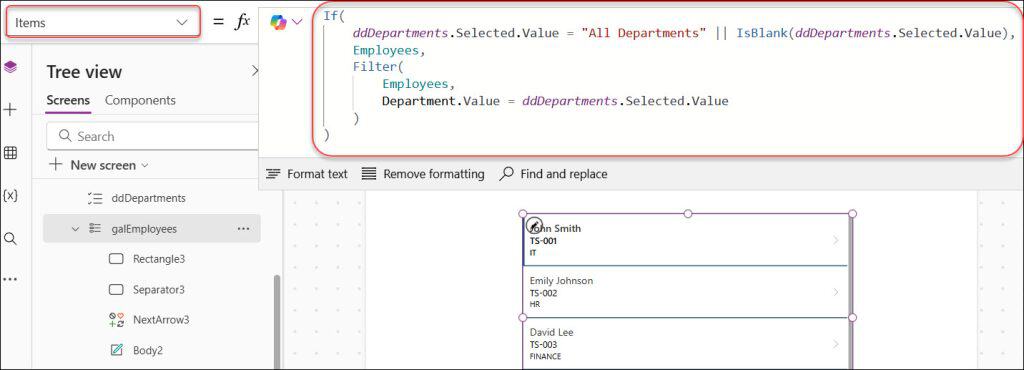
Here is what happens:
- If the user selects All Departments, the gallery displays every employee
- If the dropdown is blank, the gallery also displays every employee
- If the user selects IT, the gallery only shows IT employees
- If the user selects Finance, the gallery only shows Finance employees
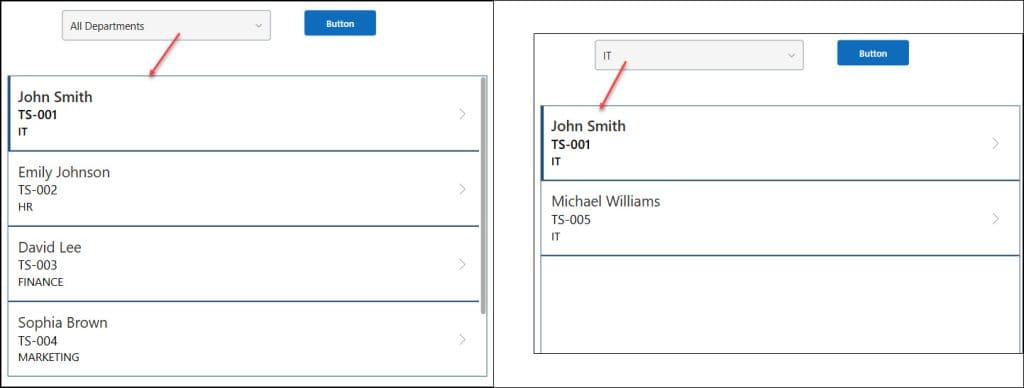
For example, if the Employees list contains John Smith and Michael Williams in IT, choosing IT shows only those two records. Choosing All Departments brings back John, Emily, David, Sophia, Michael, and every other employee.
For more gallery scenarios, see this guide on Power Apps gallery filters and this practical article on filtering a Power Apps gallery with multiple dropdowns.
Pro Tip: In client apps, I label the first filter option “All Departments” rather than leaving it blank. A blank field leaves users wondering whether the app failed to load, while a named option tells them exactly what the filter will do.
Use AllowEmptySelection correctly
The AllowEmptySelection property decides whether users can clear the selection in a classic Dropdown control.
By default, the dropdown often selects the first item. That behavior causes trouble when the first item represents a real value, such as Finance. A user may submit or filter data without making a deliberate choice.
To allow a blank selection, set the dropdown’s AllowEmptySelection property to:
true
Then set its Default property to:
Blank()
This setup is useful when the dropdown is optional. For example, the HR team may use an optional Office filter. Leaving it blank should show employees from all offices.
For a required field, do not treat a blank selection as valid. Instead, let the field start blank, then validate it when the user clicks Submit.
Use a blank selection in a form
Suppose your HR app contains a leave request form named frmLeaveRequest. Employees must choose a leave type before submitting a request.
You may populate a dropdown named ddLeaveType with:
["Annual Leave", "Sick Leave", "Work From Home", "Unpaid Leave"]
Set these properties:
AllowEmptySelection = true
Default = Blank()
A blank initial value forces users to make an intentional choice. It is useful when an incorrect default could trigger a wrong approval workflow.
If your dropdown sits inside a Form data card, make sure the card’s Update property returns the right value. For a plain text field, use:
ddLeaveType.Selected.Value
For a SharePoint Choice column, use:
{
    Value: ddLeaveType.Selected.Value
}
The exact formula depends on the column type. SharePoint Choice columns return records, while plain text columns expect text. If you receive an “expected record value” error, this guide on fixing expected record value errors in Power Apps will help.
Reset a Power Apps dropdown to blank
Users often need a quick way to clear filters. In the HR app, a coordinator may select Finance, review that team, and then want to return to all employees.
Add a Button control with the text:
Clear filter
Set the button’s OnSelect property to:
Reset(ddDepartments)
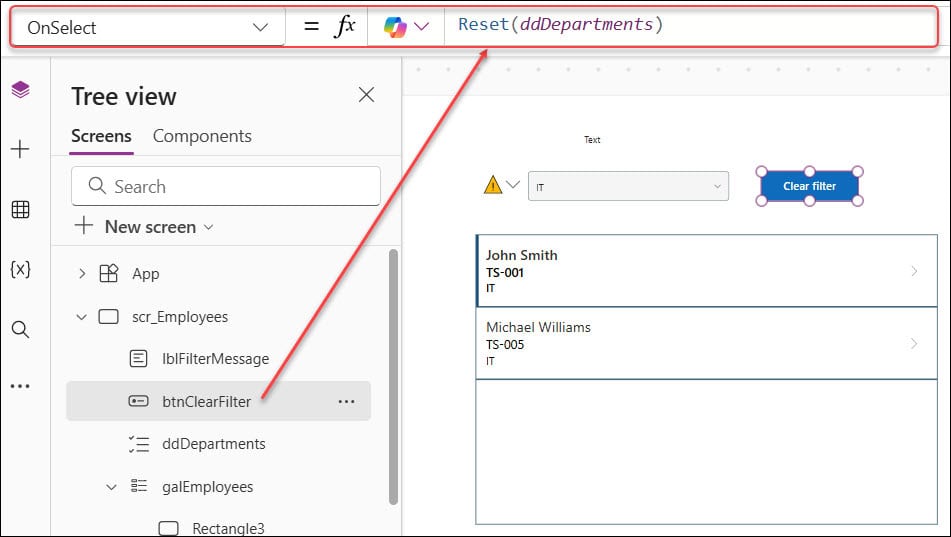
For Reset() to return the dropdown to blank, use these properties:
AllowEmptySelection = true
Default = Blank()
The Reset function makes the control return to its configured default. It does not automatically mean blank. If the Default property says "IT", then Reset(ddDepartment) returns the selection to IT.
You can also reset the dropdown when the user opens or returns to a screen. Set the screen’s OnVisible property to:
Reset(ddDepartments)
Use this carefully. If you reset a filter every time the screen becomes visible, users may lose a selection while navigating between screens. I generally reset filters only when the user clicks a clear button or starts a new session.
If the reset behavior does not work, review this article about fixing the Power Apps Reset function.
Reset with a variable
For more control, use a variable. On the clear button, set OnSelect to:
Set(varSelectedDepartment, Blank());
Reset(ddDepartment)
Then set the dropdown’s Default property to:
varSelectedDepartment
This pattern becomes useful when several controls depend on the same selection. For example, you can clear Department, Office, and Status filters together before resetting each control.
To reset three filters at once, use:
Set(varSelectedDepartment, Blank());
Set(varSelectedOffice, Blank());
Set(varSelectedStatus, Blank());
Reset(ddDepartment);
Reset(ddOffice);
Reset(ddStatus)
Variables store values while the app runs. If you are new to this concept, read this practical guide on Power Apps variables.
Validate a blank dropdown before saving
Not every blank value is acceptable. In leave management, Department may be optional for filtering, but Leave Type should be mandatory before HR sends an approval request.
Use the Button control’s OnSelect property to validate the dropdown before you submit:
If(
    IsBlank(ddLeaveType.Selected.Value),
    Notify(
        "Select a leave type before submitting your request.",
        NotificationType.Error
    ),
    SubmitForm(frmLeaveRequest)
)
This formula works in two steps:
IsBlank(ddLeaveType.Selected.Value)checks whether the employee selected a leave typeNotify()shows an error if the field is blank; otherwise,SubmitForm()saves the form
The Notify function gives users immediate feedback without moving them to another screen. Use a short, specific message that tells them how to fix the problem.
You can also change the Submit button’s DisplayMode property to prevent invalid submission:
If(
    IsBlank(ddLeaveType.Selected.Value),
    DisplayMode.Disabled,
    DisplayMode.Edit
)
This technique is helpful when the entire form needs only one or two required fields. For larger forms, I prefer a visible error message because users should understand why a button is unavailable.
For a more complete validation pattern, see Power Apps form field validation on submit and how to validate a Power Apps dropdown control.
Pro Tip: I always validate critical dropdowns in the save formula, even if I disable the button. A user can sometimes reach a save path through navigation, a hidden control, or future app changes. Server-side and formula-level checks protect the data better.
Save an optional blank value to SharePoint
Now let’s look at an optional field. Imagine HR lets managers update an employee’s Office location from a dropdown. The Office column may be a plain single-line text field, and leaving it blank should clear the Office value.
Use the Patch function to update the selected employee record:
Patch(
    Employees,
    galEmployees.Selected,
    {
        Office: If(
            IsBlank(ddOffice.Selected.Value),
            Blank(),
            ddOffice.Selected.Value
        )
    }
)
The Patch function updates only the fields you specify. In this example:
Employeesis the SharePoint listgalEmployees.Selectedidentifies the selected employeeOfficeis the SharePoint text columnIf()savesBlank()when the dropdown is empty
For a SharePoint Choice column, the same update needs a record:
Patch(
    Employees,
    galEmployees.Selected,
    {
        Status: If(
            IsBlank(ddStatus.Selected.Value),
            Blank(),
            {Value: ddStatus.Selected.Value}
        )
    }
)
This distinction matters. Sending text to a Choice column causes a type mismatch. Sending {Value: ...} to a text field also causes an error.
If you want a deeper practical walkthrough, see how to save a Power Apps dropdown selected value to a SharePoint list and how to update a SharePoint list item with the Power Apps Patch function.
Handle blank values in a data card
When you use an Edit form, Power Apps creates a data card for each SharePoint field. Unlock the relevant data card only when you need custom behavior.
For a text column, select the data card and set its Update property to:
If(
    IsBlank(ddOffice.Selected.Value),
    Blank(),
    ddOffice.Selected.Value
)
For a SharePoint Choice column, use:
If(
    IsBlank(ddStatus.Selected.Value),
    Blank(),
    {Value: ddStatus.Selected.Value}
)
Then keep the form submission formula simple:
SubmitForm(EditForm1)
The form reads each card’s Update property and saves the values to SharePoint. This keeps your app easier to maintain than writing a large Patch formula for every field.
Remove blank values from a dropdown
Sometimes you do not want a blank option at all. For example, an HR manager should always select a department when creating a new employee record.
If your Employees list includes blank Department values, filter them out in the dropdown’s Items property:
Sort(
    Distinct(
        Filter(
            Employees,
            !IsBlank(Department)
        ),
        Department
    ),
    Value,
    SortOrder.Ascending
)
Then stop users from clearing the selection:
AllowEmptySelection = false
Finally, choose a deliberate default. You might use:
First(
    Sort(
        Distinct(
            Filter(Employees, !IsBlank(Department)),
            Department
        ),
        Value,
        SortOrder.Ascending
    )
).Value
However, be careful with defaults for data entry. Automatically selecting Finance does not mean the employee belongs to Finance. For required entry fields, I prefer a blank initial state plus validation rather than a random first option.
If you need to set a known default based on business logic, such as the logged-in manager’s department, read how to set a default value in a Power Apps dropdown.
Handle a Power Apps dropdown blank in gallery filters
A common requirement is: “If the dropdown is blank, show all employees. If the user selects a value, filter the gallery.”
Here is a clean formula for the Gallery control’s Items property:
Filter(
    Employees,
    IsBlank(ddDepartments.Selected.Value) ||
    Department.Value = ddDepartments.Selected.Value
)
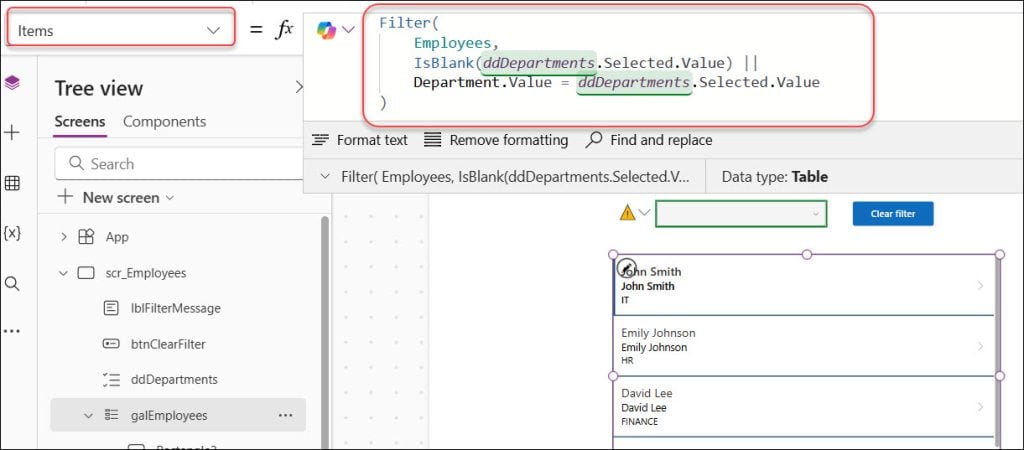
This formula is compact and easy to read:
- When
ddDepartmentis blank, the first condition is true, so every record remains visible - When a department is selected, the first condition is false, so Power Apps checks the Department match
You can extend this pattern for multiple filters. For example, add Office and Status dropdowns:
Filter(
    Employees,
    IsBlank(ddDepartments.Selected.Value) ||
    Department = ddDepartments.Selected.Value,
    IsBlank(ddOffice.Selected.Value) ||
    Office = ddOffice.Selected.Value,
    IsBlank(ddStatus.Selected.Value) ||
    Status.Value = ddStatus.Selected.Value
)
Each filter becomes optional. A blank dropdown means “do not filter by this field.”
This approach works well for a modest SharePoint list. For a large list, always test delegation. Delegation means Power Apps sends the filter query to SharePoint instead of downloading a limited set of records first. A formula that is not delegable may appear correct during testing but miss employees in a large production list.
Read Power Apps delegation warnings before deploying a large HR directory. You can also review detailed examples for filtering SharePoint lists in Power Apps.
Key Points
- Use meaningful blank options: Choose “All Departments” for filters instead of a visually empty item whenever users need a clear action.
- Match the SharePoint column type: Send plain text to text columns,
{Value: ...}records to Choice columns, andBlank()only when the target field permits empty values. - Validate required fields: Set
AllowEmptySelectionto true when necessary, but validate business-critical selections beforeSubmitForm()orPatch()runs. - Watch delegation warnings: Functions such as
Distinct()often work best for small reference lists or locally loaded collections. Test carefully when the Employees list grows beyond the delegation limit. - Avoid accidental defaults: The first dropdown item can look like an approved user choice. Start required fields blank and require a deliberate selection.
- Reset intentionally: Do not place
Reset()inOnVisibleunless you truly want to erase a user’s filters every time they return to the screen.
Frequently Asked Questions
How do I add a blank value to a Power Apps dropdown?
Set the Dropdown control’s AllowEmptySelection property to true, then set its Default property to Blank(). For filters, I recommend adding a readable option such as “All Departments” instead of showing a completely blank entry.
Why does my Power Apps dropdown select the first item automatically?
The dropdown does this when it does not allow an empty selection or when the Default property points to a value. Set AllowEmptySelection to true and use Blank() as the Default to start without a selected item.
How do I show all gallery records when a dropdown is blank?
Use this formula in the gallery’s Items property:
Filter(
Employees,
IsBlank(ddDepartment.Selected.Value) ||
Department = ddDepartment.Selected.Value
)
It shows every Employees list item when the dropdown has no selection.
How do I reset a Power Apps dropdown to blank?
Set AllowEmptySelection to true and Default to Blank(). Then use Reset(ddDepartment) in a button’s OnSelect property to return the dropdown to its blank default.
How do I save a blank dropdown value to SharePoint?
For a text column, use Blank() when the selected value is blank. For a Choice column, use an If() formula that returns Blank() or a Choice record such as {Value: ddStatus.Selected.Value}.
Why do I get an expected record value error with a dropdown?
You likely passed text into a SharePoint Choice column. A Choice field expects a record, so use {Value: ddStatus.Selected.Value} rather than only ddStatus.Selected.Value.
You may also like:
- Power Apps Dropdown Control With SharePoint
- Filter Power Apps Data With a Date Picker
- Get a Dropdown Selected Value in Power Apps
- Power Apps Gallery Dropdown
- Power Apps Dropdown Values Not Showing
Blank values become easy to manage when you decide whether blank means “no selection,” “show all,” or “clear this stored value.” Use readable filter options, validate required selections, and match your Patch or form update formula to the actual SharePoint column type. I hope you found this article helpful.

Preeti Sahu is an expert in Power Apps and has over six years of experience working with SharePoint Online and the Power Platform. She is the co-author of Microsoft Power Platform: A Deep Dive book. As a Power Platform developer, she has worked on developing various tools using Power Apps and Power Automate. She also makes Microsoft 365 videos and shares them on YouTube.


I was implementing the last explained scenario but with Dataverse choice column and it is giving the error. What should i do .