
Imagine you’re building an Employee Leave Request app where employees submit leave requests for vacation, sick leave, etc. Before they submit the form, they need to enter details like their work email, employee ID, and phone number.
But users type anything they want, and your SharePoint list fills up with messy data. This is where the Power Apps IsMatch() function comes in. It lets you check whether a text value matches a specific pattern before the form is submitted.
You can use built-in patterns to validate email addresses and phone numbers, or create your own pattern for employee IDs and other business-specific formats. If the value doesn’t match, you can display a helpful error message, disable the Submit button, or stop the record from being saved until the user fixes the input.
Power Apps IsMatch() Function
In this article, I’ll show you 5 ways to use the Power Apps IsMatch() function.
Method 1 – Validate an Email Address with Power Apps IsMatch()
This is the most common use of the Power Apps IsMatch() function. Use it whenever users enter an email address before submitting a form.
Step 1: Add a Text Input control
Open Power Apps Studio → Insert → Input → Text Input.
Rename the control to txtEmail.
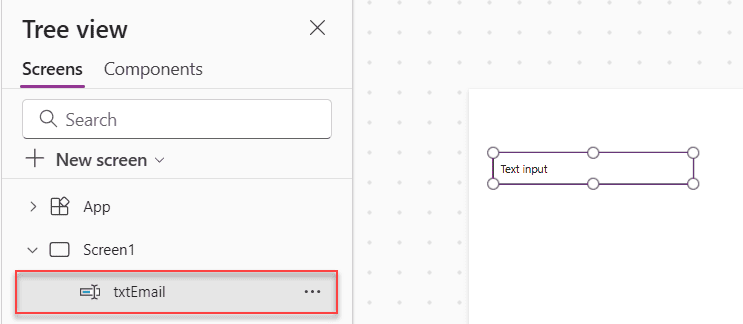
Step 2: Add a Label to display the validation result
Insert a Label control.
Set its Text property to:
If(
    IsMatch(
        txtEmail.Text,
        Match.Email
    ),
    "Valid email address",
    "Invalid email address"
)
How does this formula work?
The IsMatch() function checks whether the value inside txtEmail.Text matches the built-in Match.Email pattern. If the text follows a valid email format, the formula returns true. Otherwise, it returns false, and the If() function displays an error message.
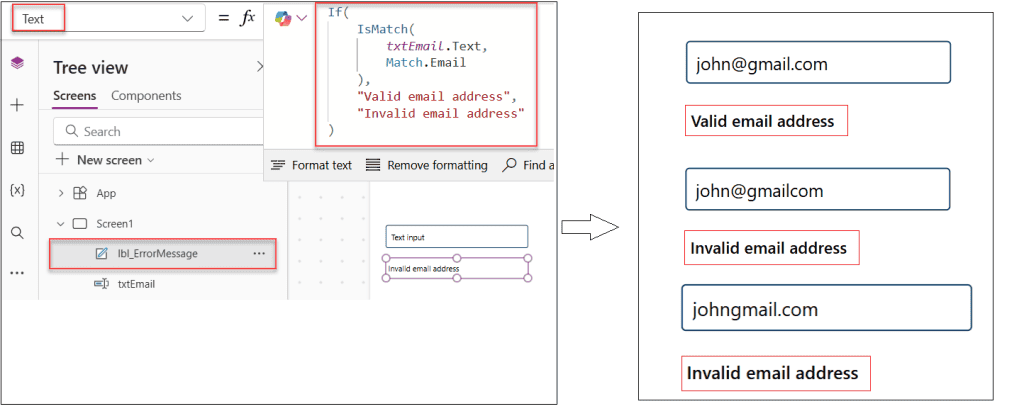
Pro Tip: Always validate email addresses before calling SubmitForm(). It prevents unnecessary errors and improves the user experience.
Method 2 – Validate a Phone Number
Phone numbers often need a consistent format before you save them into Dataverse or a SharePoint list. This method checks whether users enter a valid phone number.
Step 1: Insert another Text Input control
Go to Power Apps Studio → Insert → Input → Text Input.
Rename it to txtPhone.
Step 2: Validate the phone number
Set a Label’s Text property to:
If(
    IsMatch(
        txtPhone.Text,
        "^\(?([0-9]{3})\)?[-.\s]?([0-9]{3})[-.\s]?([0-9]{4})$"
    ),
    "Valid phone number",
    "Invalid phone number"
)
How does this formula work?
The IsMatch() function checks whether the value in txtPhone.Text follows the specified regular expression.
Here’s what the pattern means:
^– Start of the text.\(?– An opening parenthesis is optional.([0-9]{3})– Exactly three digits (the area code).\)?– A closing parenthesis is optional.[-.\s]?– An optional separator. It can be a hyphen (-), period (.), or space.([0-9]{3})– The next three digits.[-.\s]?– Another optional separator.([0-9]{4})– The final four digits.$– End of the text.
The formula returns “Valid phone number” only if the entered value matches one of the supported US phone number formats.
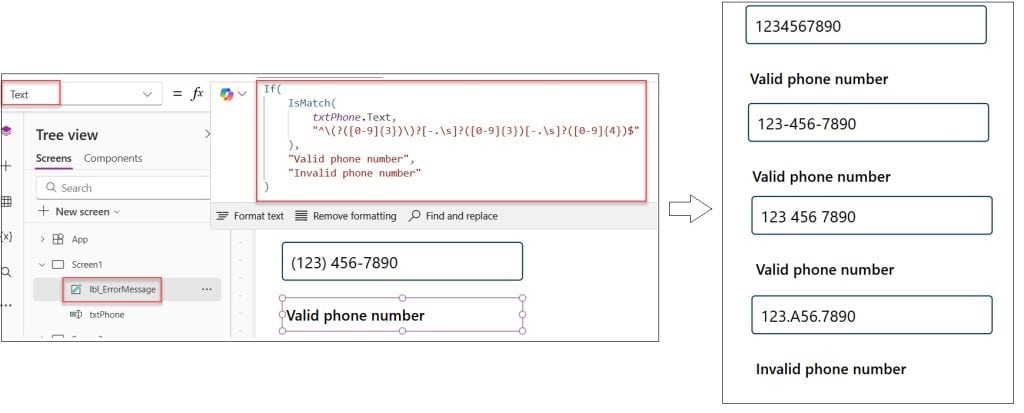
Pro Tip: If your app is used in multiple countries, avoid hardcoding a US phone number format. Instead, create different regex patterns based on the selected country or validate the number using a service such as Microsoft Power Automate or an external API.
Method 3 – Validate an Employee ID with a Custom Pattern
Many businesses use employee IDs such as EMP-1001. The built-in patterns cannot validate these formats, so you can create your own.
We’ll use the same employee onboarding app throughout this article.
Step 1: Add an Employee ID input
Go to Power Apps Studio → Insert → Input → Text Input.
Rename it to txtEmployeeID.
Step 2: Create the custom validation formula
Set the Label Text property to:
If(
    IsMatch(
        txtEmployeeID.Text,
        "^EMP-[0-9]{4}$"
    ),
    "Employee ID is valid",
    "Employee ID is invalid"
)
How does this formula work?
The pattern checks for:
- ^ – start of the text
- EMP- – required prefix
- [0-9]{4} – exactly four numbers
- $ – end of the text
Only values such as EMP-1001 pass validation.
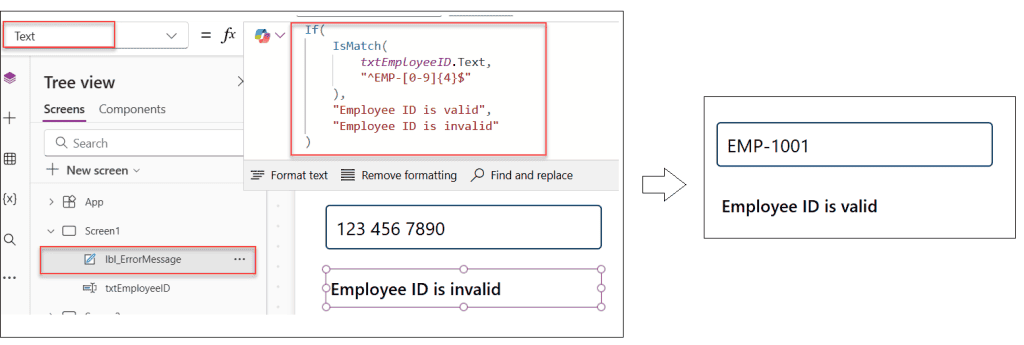
Pro Tip: Keep your custom patterns simple whenever possible. Complex regular expressions become difficult to maintain later.
Method 4 – Prevent Invalid Form Submission
Sometimes showing an error message isn’t enough. You may want to stop users from saving invalid information.
Step 1: Select the Submit button
Select your Button control.
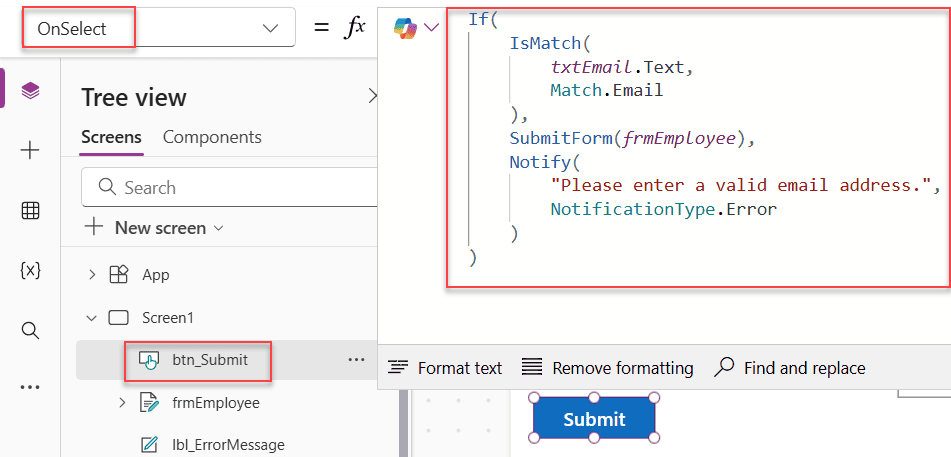
Step 2: Update the OnSelect property
If(
    IsMatch(
        txtEmail.Text,
        Match.Email
    ),
    SubmitForm(frmEmployee),
    Notify(
        "Please enter a valid email address.",
        NotificationType.Error
    )
)
How does this formula work?
The formula first validates the email address. If the value is valid, SubmitForm() saves the record. Otherwise, Notify() displays an error and the form stays open.
Pro Tip: Validate important fields before every submission, even if you already display validation messages elsewhere.
Method 5 – Validate Multiple Fields Before Saving
Most business forms contain several fields that require validation. Instead of checking only one field, you can validate all required inputs together.
Step 1: Update the Submit button formula
If(
    IsMatch(txtEmail.Text, Match.Email) &&
    IsMatch(txtPhone.Text, Match.Phone) &&
    IsMatch(txtEmployeeID.Text, "^EMP-[0-9]{4}$"),
    SubmitForm(frmEmployee),
    Notify(
        "Please correct the highlighted fields.",
        NotificationType.Error
    )
)
How does this formula work?
Each IsMatch() call returns either true or false. The && operator means every validation must return true before the form submits.
Pro Tip: This approach works well in employee onboarding, customer registration, and inventory management apps where several fields must meet business rules.
Things to Keep in Mind
- Use built-in match patterns first. Built-in patterns like Match.Email are easier to read and maintain than custom regular expressions.
- IsMatch() is non-delegable. When you use IsMatch() inside Filter() against large SharePoint lists or Dataverse tables, Power Apps evaluates only the client-side data limit. Avoid using it to search large remote datasets.
- Validate before writing data. The best place to use IsMatch() is in control validation or a button’s OnSelect property before calling SubmitForm() or Patch().
- Modern controls behave consistently. Modern Fluent UI-based Text Input controls work the same with IsMatch(), but always verify the correct control’s Text property when building formulas.
- Choose named formulas for reusable patterns. If multiple screens use the same custom regular expression, store it as a named formula instead of repeating the string throughout your app. This makes future updates much easier.
- Combine with other validation functions. Use IsBlank(), Len(), and IsMatch() together to ensure users enter required values in the correct format.
Conclusion
I hope you found this article helpful. You learned five practical ways to use the Power Apps IsMatch() function, from validating email addresses to checking multiple fields before submitting a form.
Use built-in match patterns whenever they fit your scenario, and switch to custom regular expressions when your business requires specific formats such as employee IDs.
Also, you may like:
- Power Apps Create Function: (Patch, Collect & User Defined Functions)
- Filter Data by the Current User in Power Apps
- Patch Power Apps Date Picker [SharePoint, Excel]
- Power Apps ForAll Function: Real-World Examples
- Power Apps Date and Time Functions

Preeti Sahu is a Microsoft MVP for Power Apps with over six years of experience working with SharePoint Online and the Power Platform. She is the co-author of the book Microsoft Power Platform: A Deep Dive. As a Power Platform developer, she has built various tools with Power Apps and Power Automate, and she makes Microsoft 365 videos for YouTube.