
An HR coordinator opens a leave request form and needs to assign an employee’s manager as the approver. Typing an email address into a text box works at first, but it quickly creates problems. Someone enters the wrong address, another person uses an old name, and the approval workflow goes to the wrong person.
I have solved this in many HR leave management and request-tracking Canvas apps by using a Power Apps combo box with Office 365 users. It gives users a familiar people-picker experience. They can type a few letters, find a colleague, see their name and email, and save the correct person into a SharePoint list.
This guide walks through a practical HR Leave Request app where employees select an approver, managers review requests, and Power Automate sends approvals to the right people.
Why Use a Power Apps Combo Box with Office 365 Users?
A Combo box is a Power Apps input control that lets users search and select one or more items. It differs from a standard Dropdown because it supports search, richer display fields, and multi-select choices.
The Office 365 Users connector lets a Canvas app search people in your Microsoft 365 organization. It retrieves useful profile details such as:
- Display name
- Email address
- Job title
- Department
- Office location
- User ID
In a leave request app, the combo box can help users select:
- Their reporting manager
- An HR representative
- A leave approver
- A backup approver
- A colleague for a handover request
For our example, we will use a SharePoint list called Leave Requests with these columns:
| Column name | SharePoint type | Purpose |
|---|---|---|
| Title | Single line of text | Leave request reason |
| Employee | Person or Group | Requesting employee |
| Approver | Person or Group | Selected manager or approver |
| Leave Type | Choice | Sick, Casual, Annual |
| Start Date | Date only | Leave start date |
| End Date | Date only | Leave end date |
| Status | Choice | Draft, Pending, Approved, Rejected |
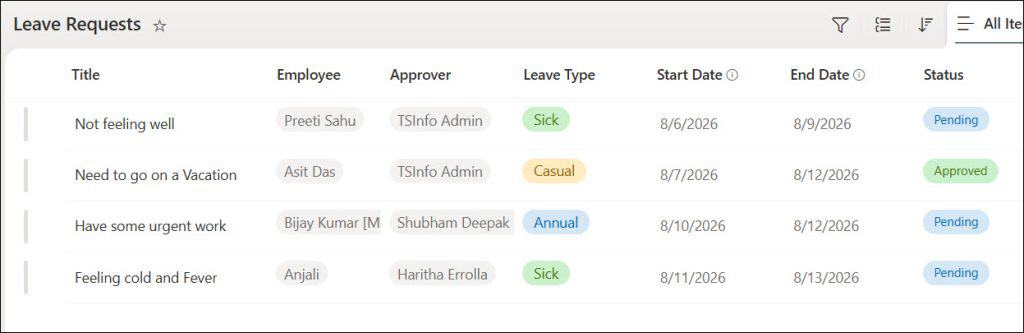
The Approver column is important. A SharePoint Person or Group column stores a person record, not just an email address. That record contains details SharePoint needs to display the selected user and work correctly with other Microsoft 365 tools.
If you are starting the data layer from scratch, review this guide on setting up a SharePoint list before building the Canvas app.
Pro Tip: I use a Combo box instead of a text input whenever the app needs an employee, manager, or owner. Searching the directory prevents spelling errors and gives Power Automate a reliable email address for later steps.
Set Up the HR Leave Request App
Create a blank Canvas app in the correct Power Platform environment. An environment is a workspace that holds apps, flows, connections, Dataverse tables, and security settings.
Choose the environment carefully. For a real HR app, build and test in a development environment first. Then move the finished solution to a test or production environment. Avoid connecting a development app directly to a live HR SharePoint list.
Add the Leave Requests SharePoint list as a data source:
- Open the Canvas app in Power Apps Studio.
- Select Data from the left navigation.
- Select Add data.
- Search for SharePoint.
- Select the SharePoint site that hosts your list.
- Select
Leave Requests. - Select Connect.
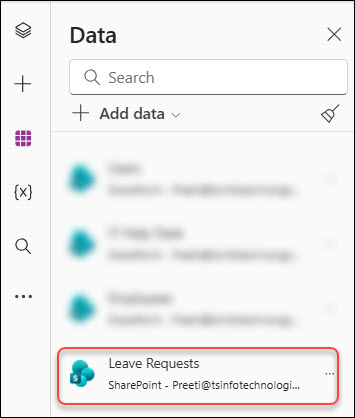
Next, insert an Edit form:
- Select Insert.
- Select Forms.
- Select Edit form.
- Rename it to
frmLeaveRequest. - Set the form’s DataSource property to:
'Leave Requests'
Set the form’s Item property to:
Defaults('Leave Requests')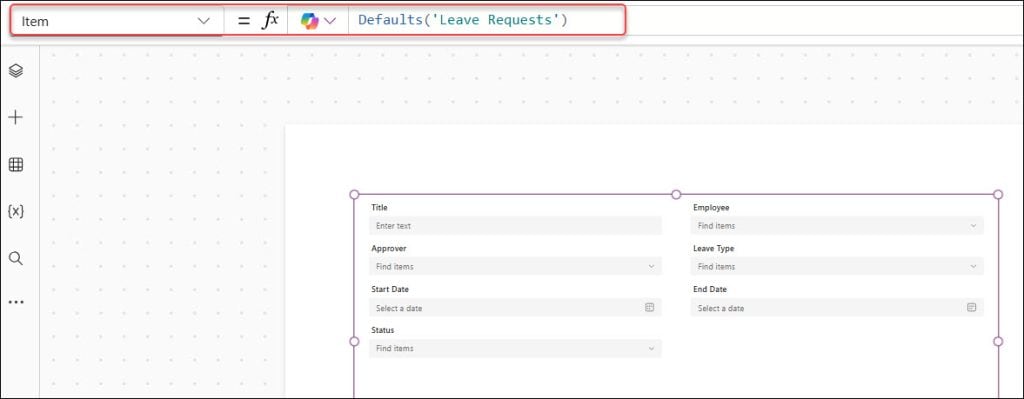
This tells Power Apps that the form creates a new leave request. If you want to build a full form before adding the people picker, see how to create a form in Power Apps.
Add the Employee, Approver, Leave Type, Start Date, End Date, and Status data cards to the form. You can remove fields that employees should not edit, such as Status. Your app can set Status to Pending when the employee submits the request.
Add Power Apps Office 365 Users Connector
Before the Combo box can search your organization’s users, connect the app to Office 365 Users.
- Select Data from the left navigation.
- Select Add data.
- Search for
Office 365 Users. - Select the connector.
- Choose Connect.
- Sign in with your work account if Power Apps requests it.
The connector now appears under the app’s data sources as Office365Users.
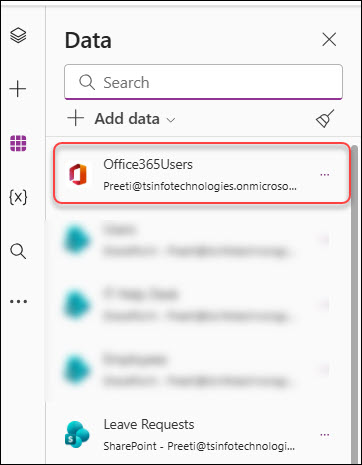
The Office 365 Users connector gives you formulas such as:
Office365Users.MyProfileV2()
This returns profile information about the current user. You can use it to prefill the Employee field or display the employee’s name.
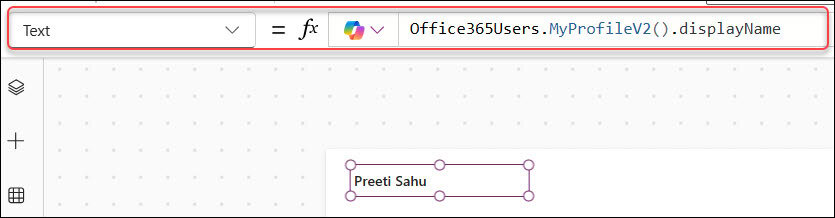
For example, add a Label control and set its Text property to:
Office365Users.MyProfileV2().displayName
You can also show the signed-in user’s basic information with the built-in User function:
User().FullName
User().Email
The built-in function is simple and fast for basic details. The Office 365 Users connector becomes useful when you need directory search, manager details, department data, or profile information for another user.
For more current-user formula patterns, see how to get current user information in Power Apps.
Add a Power Apps Combo Box for Office 365 Users
Now we will replace the default Approver control with a custom Combo box.
Select the Approver data card inside frmLeaveRequest. If the card is locked, select it and choose Unlock to change properties from the Advanced pane. Power Apps locks data cards because they belong to the form, but unlocking lets you replace the default input control.
Delete the existing input control inside the Approver data card. Do not delete the entire data card.
Then add a Combo box:
- Select Insert.
- Select Input.
- Select Combo box.
- Place it inside the Approver data card.
- Rename it to
cmbApprover.
Set the Combo box Items property to:
Office365Users.SearchUserV2(
    {
        searchTerm: cmbApprover.SearchText,
        top: 25,
        isSearchTermRequired: true
    }
).value
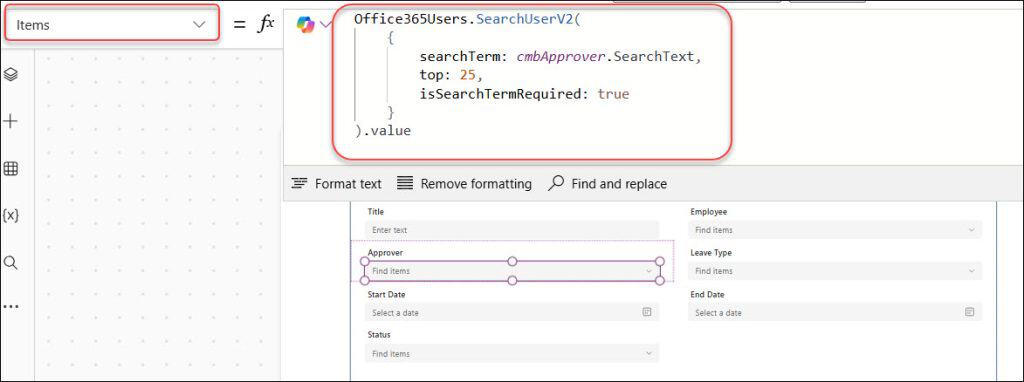
This is the most important formula in the app. Here is what each part does:
Office365Users.SearchUserV2searches users in your Microsoft 365 directory.searchTermuses text entered into the Combo box.cmbApprover.SearchTextcaptures what the user types.top: 25limits the result set to 25 people.isSearchTermRequired: trueprevents Power Apps from loading users before someone starts typing..valuereturns the actual list of matching user records.
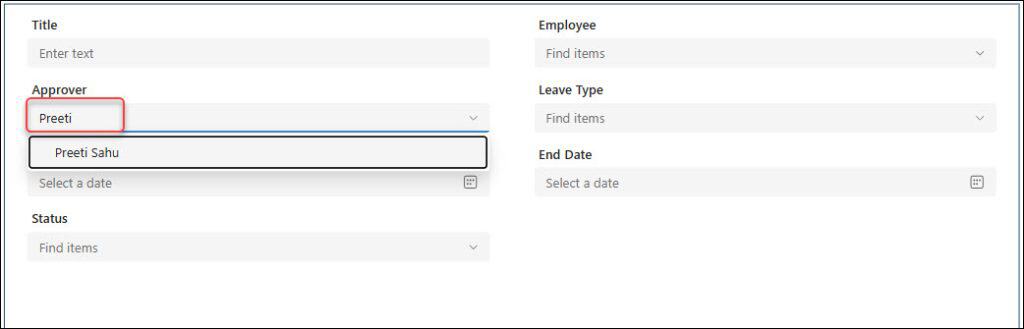
When an employee types “Pre” into the Combo box, Power Apps searches the directory for matching users. It may return Preeti Sahu, Prithvi Kumar, and other users whose profile details match the search term.
Set the DisplayFields property to:
["displayName", "mail"]
Set the SearchFields property to:
["displayName", "mail", "userPrincipalName"]
The user will see a name and email address while searching. Power Apps searches by display name, email, and user principal name.
Set the SelectMultiple property to:
false
An approver field should usually allow one person only. For a handover or notification field, you might allow multiple people instead.
Pro Tip: I always set
isSearchTermRequiredto true for an organization with many users. It avoids a large initial search and guides users to type a name or email before Power Apps returns results.
Save Power Apps Combobox Selected User to SharePoint
Adding the Combo box is only half the work. The key step is saving the selected Office 365 user into the SharePoint Person or Group column.
Select the parent Approver data card, not the Combo box. Find the data card’s Update property and set it to:
{
    '@odata.type': "#Microsoft.Azure.Connectors.SharePoint.SPListExpandedUser",
    Claims: "i:0#.f|membership|" & Lower(cmbApprover.Selected.Mail),
    Department: cmbApprover.Selected.Department,
    DisplayName: cmbApprover.Selected.DisplayName,
    Email: cmbApprover.Selected.Mail,
    JobTitle: cmbApprover.Selected.JobTitle,
    Picture: ""
}
This formula converts the Office 365 user result into the person record format that SharePoint expects.
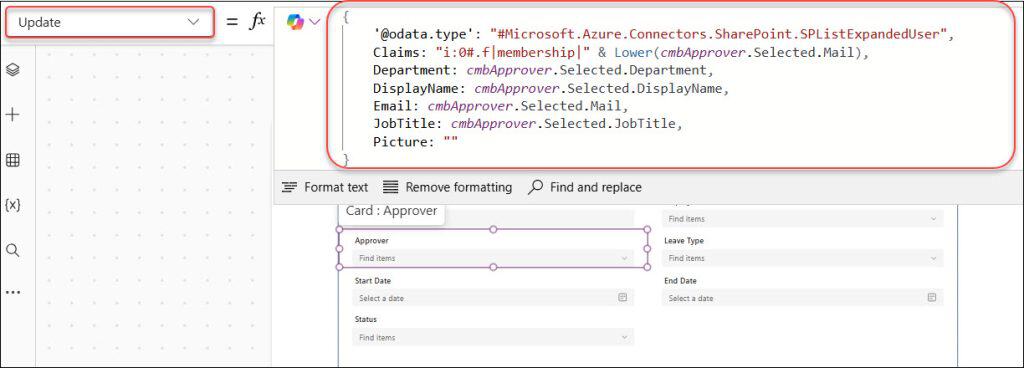
The record contains several important properties:
@odata.typeidentifies the record as a SharePoint user object.Claimsprovides the user identity in SharePoint’s required format.DisplayNamestores the person’s readable name.Emailstores the selected email address.DepartmentandJobTitleadd useful profile details.Pictureremains blank because SharePoint can resolve it separately.
The Lower function makes the email address lowercase before building the Claims value. This helps keep user identities consistent.
Now add a Submit button and set its OnSelect property to:
SubmitForm(frmLeaveRequest)
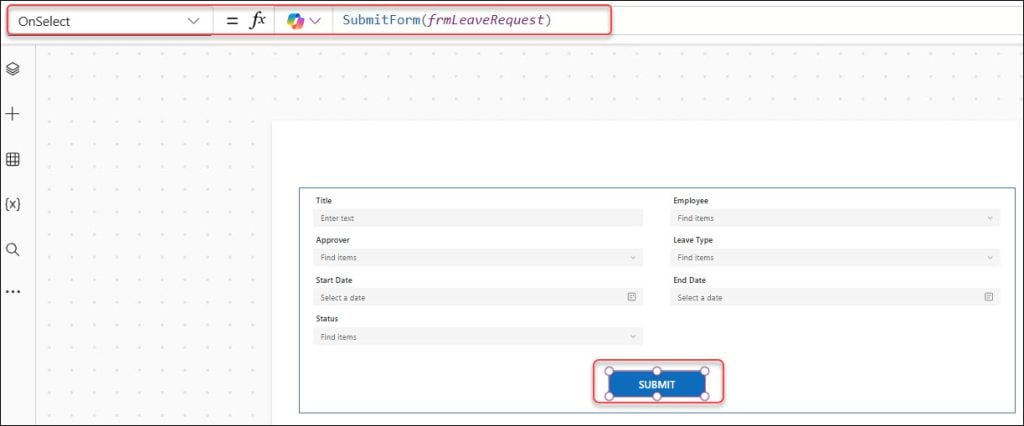
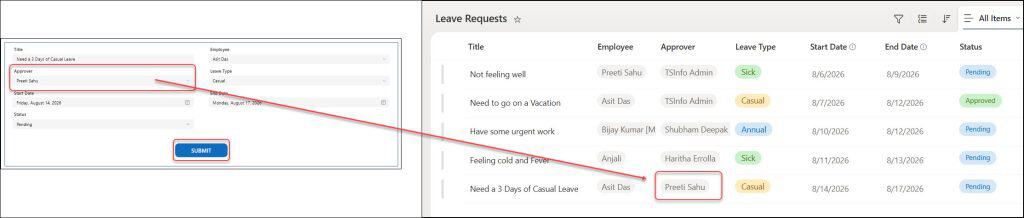
The SubmitForm function sends the form values to the Leave Requests SharePoint list. Since the Approver card’s Update formula returns a SharePoint person record, the selected person saves correctly into the Approver column.
Set the form’s OnSuccess property to:
Notify(
    "Leave request submitted successfully.",
    NotificationType.Success
);
ResetForm(frmLeaveRequest)
This displays a confirmation message and resets the form for the next request.
If your app needs direct record updates instead of a Form control, you can use the Patch function with a Power Apps collection pattern. For most beginner-friendly leave request apps, however, an Edit form is easier to build and maintain.
Set a Default Approver in Power Apps Combo Box
Employees often report to the same manager. You can reduce effort by automatically selecting the current user’s manager in the Combo box.
First, add a formula to the screen’s OnVisible property:
Set(
    varCurrentManager,
    Office365Users.ManagerV2(User().Email)
)
This uses ManagerV2 to retrieve the current user’s manager profile and stores it in a variable named varCurrentManager.

Select cmbApprover and set its DefaultSelectedItems property to:
If(
    !IsBlank(varCurrentManager),
    Table(
        {
            DisplayName: varCurrentManager.displayName,
            Mail: varCurrentManager.mail,
            Department: varCurrentManager.department,
            JobTitle: varCurrentManager.jobTitle
        }
    )
)
The Table function matters here because DefaultSelectedItems expects a table, even when the Combo box allows only one selection.
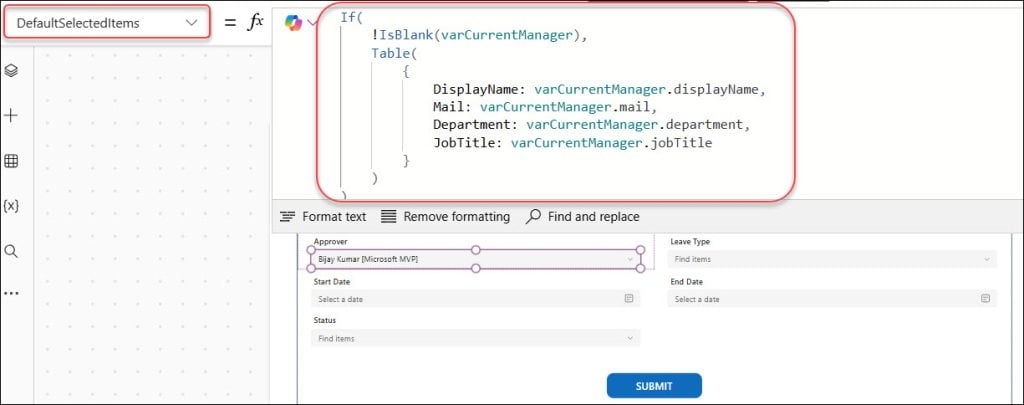
This gives employees a sensible starting point. They can still search for another approver if their manager is unavailable or if HR uses a different approval structure.
Do not assume every user has a manager value in Microsoft 365. Contractors, service accounts, new employees, and guest users may not have one. The If condition avoids an error when the manager profile is blank.
You can also control who sees or edits the Approver control. For example, use the Combo box DisplayMode property:
If(
    User().Email = "[email protected]",
    DisplayMode.Edit,
    DisplayMode.View
)
This lets an HR administrator change the approver while normal employees can only view the default manager. Learn more about similar UI patterns in Power Apps display mode.
Show Power Apps Combo Box Selected User Details
A Combo box becomes more useful when users can confirm they selected the correct person. Add a few labels below cmbApprover.
Set the first label’s Text property to:
cmbApprover.Selected.DisplayName
Set a second label to:
cmbApprover.Selected.Mail
Set a third label to:
cmbApprover.Selected.JobTitle
You can combine the department and job title in one label:
cmbApprover.Selected.JobTitle & " | " &
cmbApprover.Selected.Department
This simple display reduces mistakes when your company has multiple employees with similar names.
For example, an employee may search for “Anita.” The Combo box may return Anita Sharma from Finance and Anita Singh from HR. Displaying department and job title makes the correct selection clear.
You can also show the person in a Gallery after the request saves. Add a vertical Gallery named galLeaveRequests and set its Items property to:
Filter(
    'Leave Requests',
    Employee.Email = User().Email
)
Add a label within the Gallery and set the Text property to:
ThisItem.Approver.DisplayName
This displays the selected approver for each leave request.
If you want employees to see only their own records, use this detailed guide on filtering Power Apps data by current user.
Create a Multiple Approver Combo Box
Some organizations need two or more approvers. For example, a long leave request may require the employee’s manager, HR, and a project manager.
Create a SharePoint column called Additional Approvers. Set the column type to Person or Group and enable Allow multiple selections.
Add another Combo box named cmbAdditionalApprovers. Use the same Office 365 Users search formula:
Office365Users.SearchUserV2(
    {
        searchTerm: cmbAdditionalApprovers.SearchText,
        top: 25,
        isSearchTermRequired: true
    }
).value
Set the SelectMultiple property to:
true
For a multi-person SharePoint column, set the parent data card’s Update property to:
ForAll(
    cmbAdditionalApprovers.SelectedItems,
    {
        '@odata.type': "#Microsoft.Azure.Connectors.SharePoint.SPListExpandedUser",
        Claims: "i:0#.f|membership|" & Lower(Mail),
        Department: Department,
        DisplayName: DisplayName,
        Email: Mail,
        JobTitle: JobTitle,
        Picture: ""
    }
)
The ForAll function runs the formula once for every selected user. It creates a table of SharePoint-compatible person records.
For example, if the user selects Priya Sharma and Ravi Kumar, Power Apps creates two records and saves both into the Additional Approvers column.
Use multi-select only where it adds genuine value. A normal leave approval should have a clear sequence. Multiple approvers can confuse users unless a Power Automate approval flow handles the routing correctly.
Pro Tip: In my experience, multi-select people pickers work best for notifications, reviewers, and handover contacts. For formal approvals, I prefer one approver field per approval stage because it keeps the workflow easy to audit.
Start a Power Automate Approval Flow
After an employee submits a leave request, Power Automate can send an approval to the person selected in cmbApprover.
Create a cloud flow with the When an item is created SharePoint trigger. Select your SharePoint site and the Leave Requests list.
Add a condition that checks whether Status equals Pending. Then add a Start and wait for an approval action.
Use the Approver Email value from the SharePoint trigger as the approval recipient. The SharePoint Person field stores enough information for Power Automate to access the selected person’s email address.
After the approver responds, update the Leave Requests item:
- Set Status to Approved when the outcome is Approve.
- Set Status to Rejected when the outcome is Reject.
- Save the approver comments in a multi-line text column.
For more complex approval chains, such as manager approval followed by HR approval, use this guide on Power Automate multilevel approvals.
You can also send reminders if managers do not respond. This is especially helpful for leave requests that start soon. A reminder flow can check Pending requests each morning and email the assigned approver.
Filter Office 365 Users by Department in Power Apps
Some organizations do not want employees to search the entire directory. For example, an employee may only select an HR representative from the HR department or a project manager from their own business unit.
You can filter the Office 365 search results after the connector returns them:
Filter(
    Office365Users.SearchUserV2(
        {
            searchTerm: cmbApprover.SearchText,
            top: 50,
            isSearchTermRequired: true
        }
    ).value,
    Department = "HR"
)
This formula searches up to 50 users and returns only profiles where Department equals HR.
You can also use another control as the department filter. Assume a Dropdown named drpDepartments stores values such as IT, HR, Finance, and Sales:
Filter(
    Office365Users.SearchUserV2(
        {
            searchTerm: cmbApprover.SearchText,
            top: 50,
            isSearchTermRequired: true
        }
    ).value,
    Department = drpDepartments.Selected.Value
)
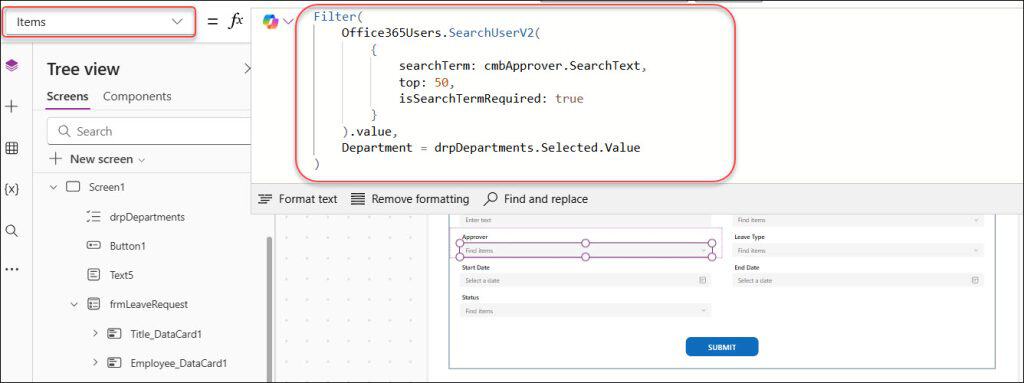
This works well for a project assignment app. A manager selects Finance in the department dropdown, then searches only Finance users in the Combo box.
Remember that Microsoft 365 profile data may not be complete. If the directory does not populate Department consistently, this filter can hide valid employees. Test it with real user profiles before relying on it.
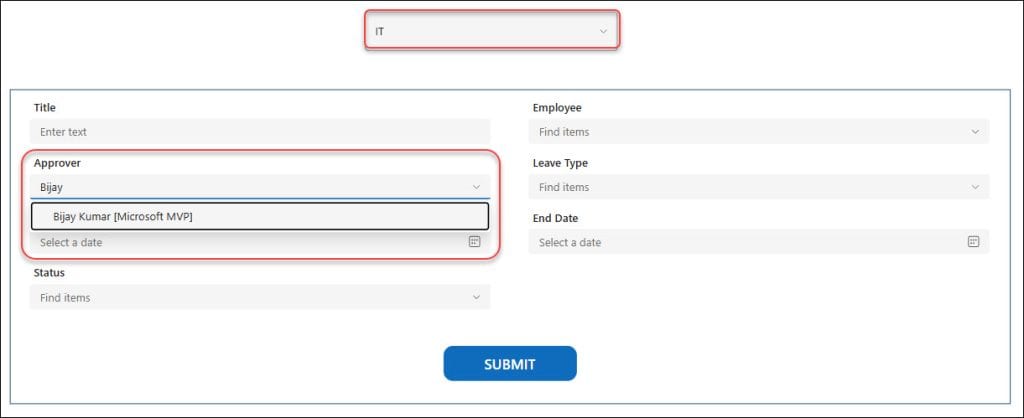
If you need a department-and-user pattern from SharePoint rather than Microsoft 365 profiles, learn how to build a Power Apps cascading dropdown control.
Points to Consider
- Use the correct person format: Office 365 search results and SharePoint Person columns use different record structures. Build the
SPListExpandedUserrecord in the data card Update property before saving. - Require a search term: Set
isSearchTermRequiredto true in large organizations. This avoids broad directory searches and improves the Combo box experience. - Check empty email values: Some accounts may return a blank
Mailvalue. Test with internal users, shared accounts, and guest accounts before depending on the selected email. - Avoid guest account errors: Guest users can have different identities and missing profile properties. Filter them out when your HR process only supports internal employees. You can review how to remove guest users from a Power Apps Combo box.
- Protect HR data: The Combo box search interface does not replace SharePoint permissions. Set proper permissions for the Leave Requests list and restrict confidential records where required.
- Name controls clearly: Use names such as
cmbApprover,cmbAdditionalApprovers, andfrmLeaveRequest. Clear names make formulas far easier to understand six months later.
Frequently Asked Questions
How do I add Office 365 users to a Power Apps Combo box?
Add the Office 365 Users connector from the Data pane. Then set the Combo box Items property to Office365Users.SearchUserV2({searchTerm: cmbApprover.SearchText}).value. Set DisplayFields to displayName and mail so users can identify the correct person.
Why does my Power Apps Combo box show no Office 365 users?
Check that the Office 365 Users connector exists in the app and that your account can access it. Also type at least a few characters when isSearchTermRequired is true. Confirm that the Combo box Items formula ends with .value.
How do I save a selected Office 365 user to SharePoint?
For a SharePoint Person column, set the parent data card’s Update property to a SharePoint user record. Include @odata.type, Claims, DisplayName, and Email. Then use SubmitForm to save the form.
Can I select multiple Office 365 users in a Combo box?
Yes. Set the Combo box SelectMultiple property to true. Your SharePoint Person column must also allow multiple selections, and the data card Update formula must use ForAll to convert each selected user.
How do I set the current user’s manager as the default approver?
Use Office365Users.ManagerV2(User().Email) to retrieve the manager profile. Store it in a variable and use Table() in the Combo box DefaultSelectedItems property. Always handle blank manager values because not every Microsoft 365 profile has one.
Can I filter Office 365 users by department in Power Apps?
Yes. Wrap the Office365Users search formula inside Filter() and compare the Department field to a fixed value or selected dropdown value. Test directory data first because user profiles may have blank or inconsistent departments.
You may also like:
- Power Apps Combo box Patch function
- Reset a Power Apps Combo Box
- Populate distinct values in a Power Apps Combo box
- Create login pages in Power Apps
- Create CRUD operations using Power Apps
- Share a Power Apps Canvas app with users
A Power Apps Combo box with Office 365 users gives your leave request app a reliable people-picker for approvers, managers, and reviewers. Use directory search, save the selected user in the correct SharePoint person format, and keep the approval process simple. I hope you found this article helpful.

Preeti Sahu is an expert in Power Apps and has over six years of experience working with SharePoint Online and the Power Platform. She is the co-author of Microsoft Power Platform: A Deep Dive book. As a Power Platform developer, she has worked on developing various tools using Power Apps and Power Automate. She also makes Microsoft 365 videos and shares them on YouTube.

