
Imagine your HR team in a 200-employee company using a simple Power Apps Canvas app to manage leave requests stored in a SharePoint list. The app works, but very quickly people start asking for more: “Can I see only my pending requests?”, “Can I filter by department?”, “Can managers quickly see just ‘Approved’ leaves?” Without good filtering, your gallery becomes a long, painful scroll.
I’ve built this kind of HR Leave Request app many times for real clients, and the difference between a “basic app” and a “tool people love” usually comes down to how easy it is to find the right records. A Gallery with a well-configured Dropdown is one of the simplest ways to make your app feel professional, fast, and user-friendly.
In this guide, I’ll walk you step-by-step through how to use a Power Apps gallery dropdown to filter data, using a SharePoint-based HR Leave Request app as our running example. We’ll cover the basic setup, filter formulas, handling choice columns, adding an “All” option, and a few field-tested tips to avoid common mistakes.
What Is a Power Apps Gallery Dropdown?
Before we start clicking around Power Apps Studio, let’s clarify what we’re actually building.
A Gallery in Power Apps is a control that displays multiple records from a data source, like a SharePoint list, in a repeating layout (rows or cards). It’s perfect for showing lists of leave requests, tasks, tickets, or approvals.
A Dropdown is an input control that lets the user pick a single item from a list of values (like Department, Status, or Leave Type). When we talk about a Power Apps gallery dropdown, we’re simply talking about using a Dropdown control to filter the records shown in a Gallery.
In an HR Leave Request app, that might look like:
- A Gallery showing all leave requests from a SharePoint list called
LeaveRequests - A Dropdown above the gallery showing values like “Pending”, “Approved”, “Rejected”
- When the user selects “Approved”, the Gallery only shows approved requests
This combination is simple, but it’s the foundation for almost every “real” Canvas app I’ve deployed.
Power Apps Gallery Dropdown
Let’s do step by step how to use a Power Apps gallery dropdown.
Scenario Setup: HR Leave Request App with SharePoint
To keep this practical, let’s define the scenario we’ll use throughout the article.
We’ll assume:
- You’re building a Canvas app connected to a SharePoint list named
LeaveRequests. - The SharePoint list has columns:
Title(single line of text) – used as the request titleEmployeeEmail(single line of text)Department(choice column: HR, IT, Finance, Sales)LeaveType(choice column: Annual, Sick, Casual)StartDate(date)EndDate(date)Status(choice column: Pending, Approved, Rejected)
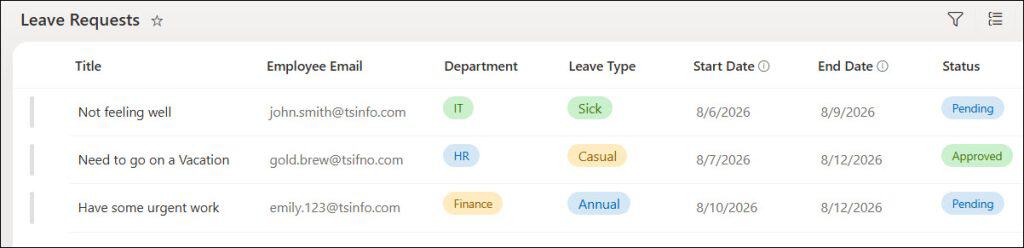
If you’re still working on establishing your list and views, you may find it useful to review how to create a SharePoint list view in SharePoint Online and work with SharePoint lists.
Our goal is to show all items from LeaveRequests in a Gallery and then progressively filter that gallery using one or more Dropdown controls.
Step 1: Add the Gallery and Connect the Data
First, we’ll add our Gallery and connect it to the SharePoint list.
- Open Power Apps Studio and edit your Canvas app.
- On the left tree view, select the screen where you want to show the leave requests (for example,
LeaveRequestsScreen). - Go to Insert > Gallery > Vertical and choose Blank vertical.
- Rename the gallery to something meaningful, for example,
galLeaveRequests. - With the gallery selected, set the Items property to your SharePoint list:
'Leave Requests'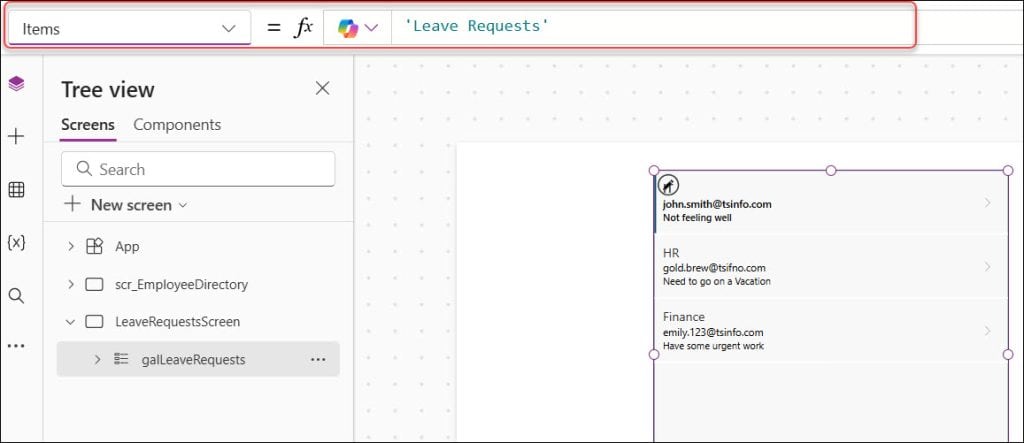
- Inside the gallery, add labels to show key fields (in Text property):
- Title:
ThisItem.Title - Department:
ThisItem.Department.Value - Status:
ThisItem.Status.Value - Dates:
Text(ThisItem.StartDate, "dd-mmm-yyyy") & " - " & Text(ThisItem.EndDate, "dd-mmm-yyyy")
- Title:
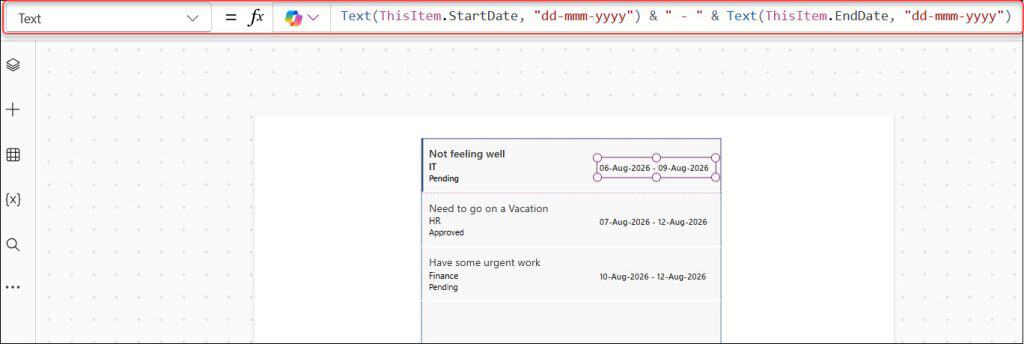
Now you have a basic gallery showing all leave requests. If you’re new to data connections in Canvas apps, you might also like the broader overview on creating Power Apps and the basics of CRUD operations using Power Apps for working with SharePoint lists.
Step 2: Add a Basic Dropdown Filter for Department
Next, let’s add a Dropdown that filters the gallery by Department.
- Go to Insert > Input > Dropdown.
- Place the Dropdown above the gallery.
- Rename it to
drpDepartment.
Because Department is a choice column in SharePoint, we’ll use the Choices function to populate the dropdown.
Set the Items property of drpDepartment to:
Choices('Leave Requests'.Department)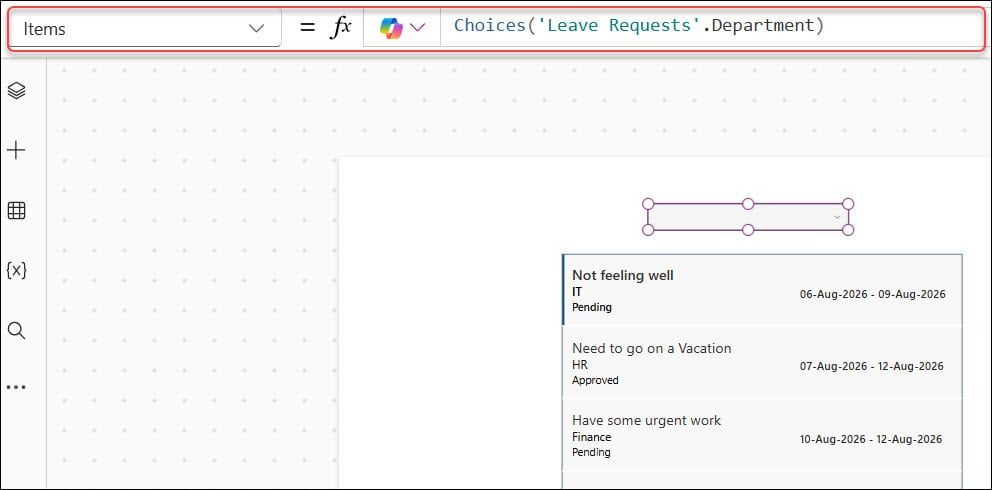
This pulls the list of possible Department values directly from the SharePoint list, so you don’t have to hard-code them. If someone adds a new department in SharePoint, it appears automatically in the dropdown.
Now we need to filter the gallery based on the user’s selection.
Set the Items property of the gallery galLeaveRequests to:
If(
    IsBlank(drpDepartment.Selected.Value),
    'Leave Requests',
    Filter(
        'Leave Requests',
        Department.Value = drpDepartment.Selected.Value
    )
)
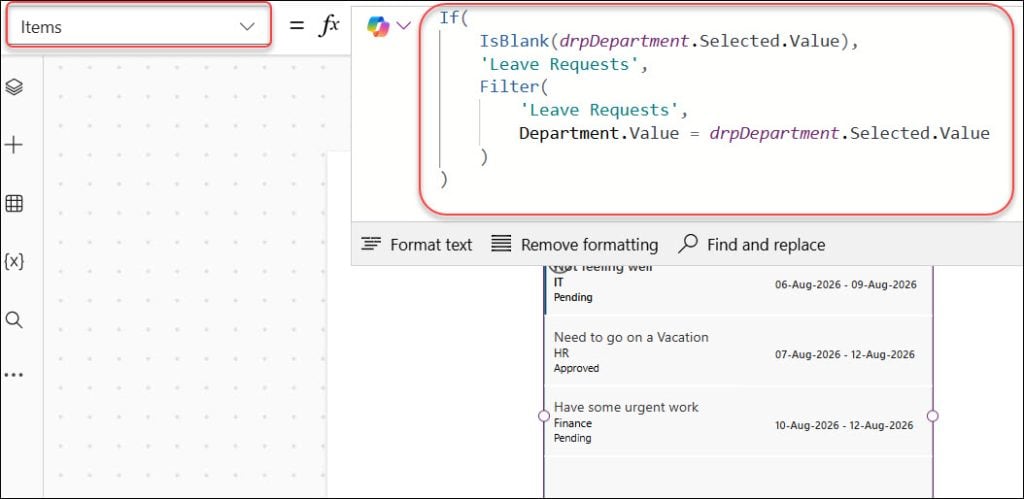
What this formula does:
- If the dropdown has no selection (blank), show all leave requests.
- Otherwise, use Filter to limit the gallery to records where the
Department.Valueequals the selected dropdown value.
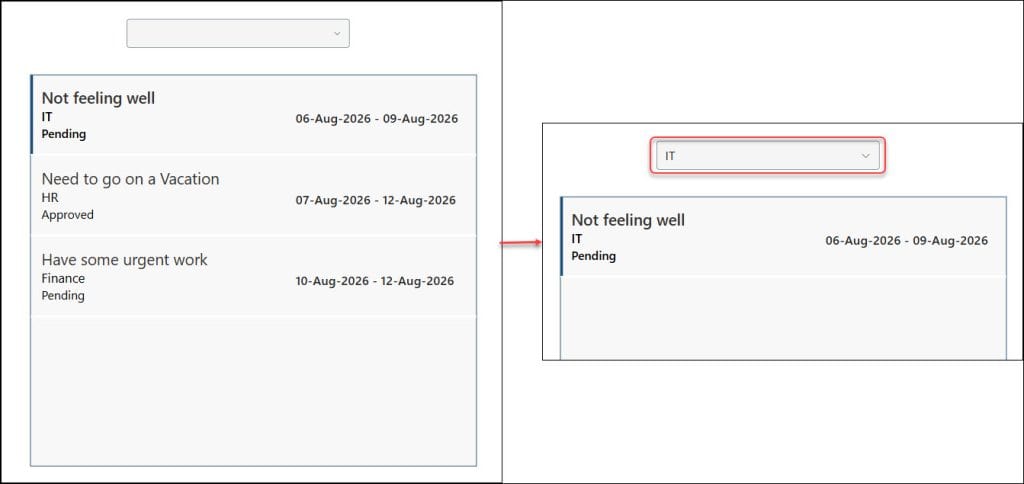
Pro Tip: I’ve found that using
IsBlank(drpDepartment.Selected.Value)instead of checking for a specific “All” value keeps things simple when you’re just starting out. Later, we’ll add a proper “All” option for more control.
If you ever see odd behavior where the dropdown values don’t show at all, you might want to review how to fix Power Apps dropdown values not showing issues here: Power Apps dropdown values not showing.
Step 3: Filter by Status with Another Dropdown
Very often, HR wants to filter by both Department and Status (Pending, Approved, Rejected). Let’s add a second Dropdown for Status.
- Insert another Dropdown above the gallery.
- Rename it to
drpStatus. - Set its Items property:
Choices('Leave Requests'.Status)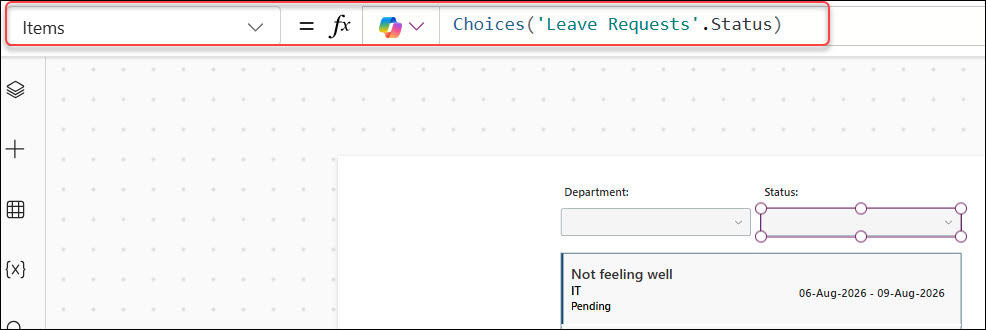
Now, update the gallery’s Items formula to filter by both dropdowns:
Filter(
    'Leave Requests',
    (IsBlank(drpDepartment.Selected.Value) || Department.Value = drpDepartment.Selected.Value),
    (IsBlank(drpStatus.Selected.Value) || Status.Value = drpStatus.Selected.Value)
)
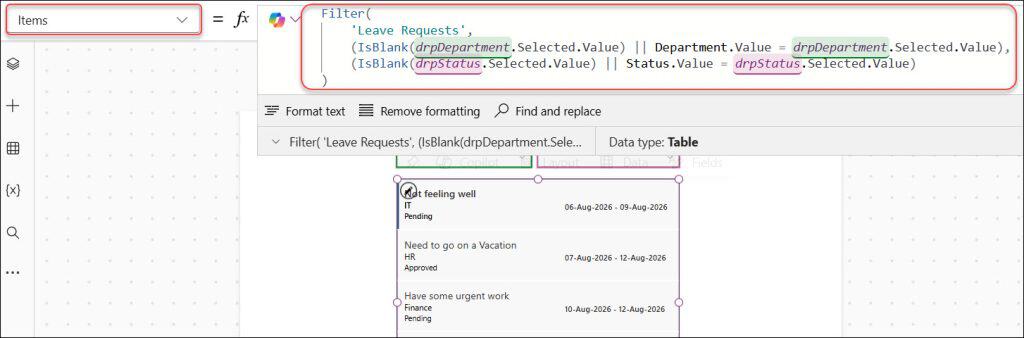
Explanation:
- We use a single Filter function with multiple conditions.
- For each dropdown, we use an
IsBlank(...) || ...pattern:- If the dropdown is blank, ignore that filter (treat it as “All”).
- If it has a value, filter by that value.
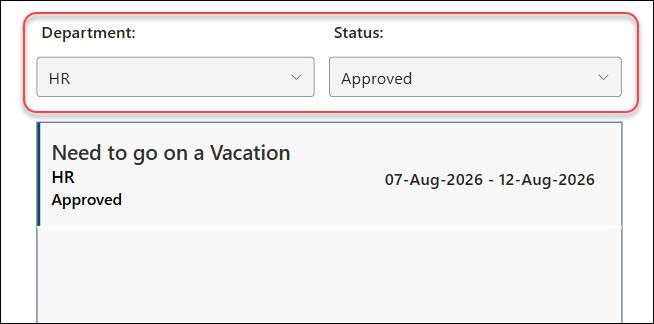
This pattern scales well when you add multiple filters and keeps the user experience smooth. You can apply the same idea to other fields like LeaveType or EmployeeEmail.
Step 4: Adding an “All” Option to the Dropdown
Users often want a quick way to “reset” the filter. Instead of having them clear the dropdown manually, I like to add an explicit “All” option.
Let’s do this for the Status dropdown using a small collection.
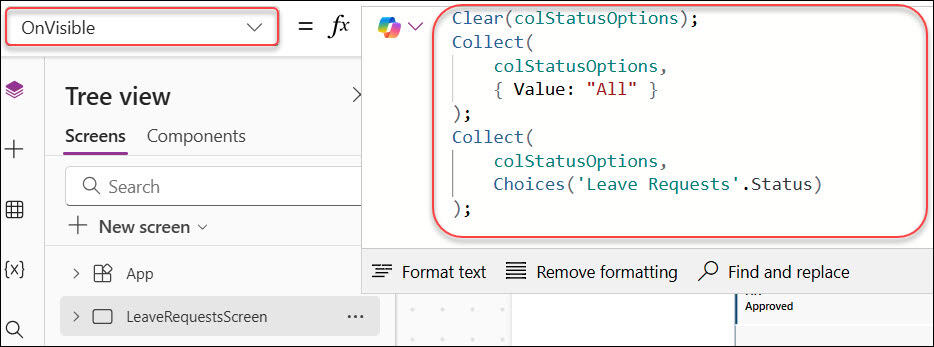
- Select your screen (
LeaveRequestsScreen). - Set the OnVisible property of the screen:
Clear(colStatusOptions);
Collect(
    colStatusOptions,
    { Value: "All" }
);
Collect(
    colStatusOptions,
    Choices('Leave Requests'.Status)
);
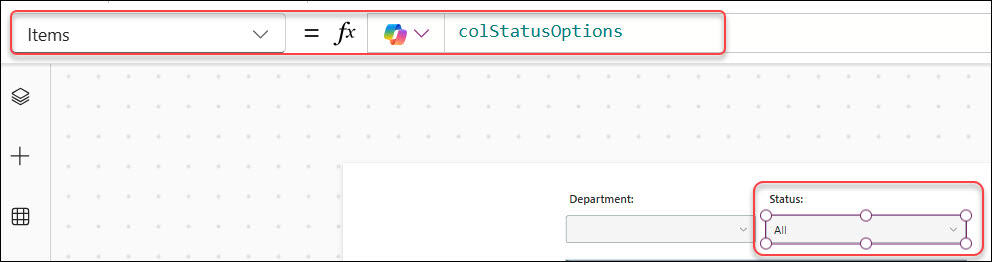
- Set the Items property of
drpStatusto the new collection:
colStatusOptions
- Optionally, set the Default (or
DefaultSelectedItemsfor a combo box) to show “All” when the screen loads:
"All"
Now update the gallery’s Items formula:
Filter(
    'Leave Requests',
    (IsBlank(drpDepartment.Selected.Value) || Department.Value = drpDepartment.Selected.Value),
    (drpStatus.Selected.Value = "All" || Status.Value = drpStatus.Selected.Value)
)
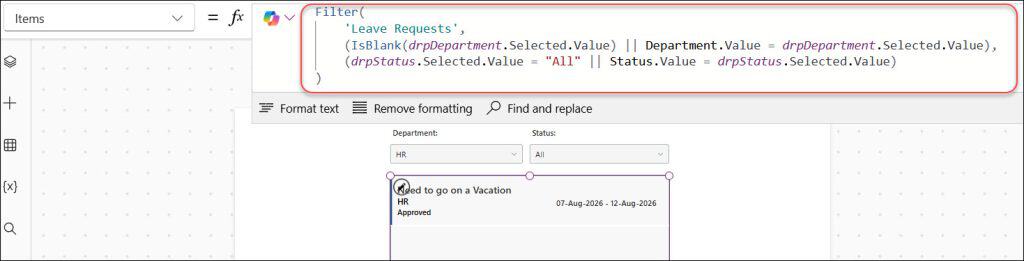
This gives you:
- “All” to show any status
- “Pending” to show only pending requests
- “Approved” to show only approved requests
- “Rejected” to show only rejected requests
Pro Tip: In my experience, adding “All” through a collection like this is more flexible than hard-coding values directly in the dropdown. It makes maintenance easier when your SharePoint choice values change.
If your app uses more advanced patterns like collecting dropdown values from a SharePoint list into a Power Apps collection, have a look at this detailed guide: Power Apps collection using SharePoint list.
Step 5: Filter by Current User and Dropdown Together
Another common real-world scenario is combining a current user filter with a dropdown. For example, employees see only their own leave requests, but still want to filter by Status.
You can filter the SharePoint list by the current user’s email using the User function and then layer status filters on top.
Assume EmployeeEmail in the list stores the employee’s email.
Set the gallery’s Items to:
Filter(
    'Leave Requests',
    EmployeeEmail = User().Email,
    (drpStatus.Selected.Value = "All" || Status.Value = drpStatus.Selected.Value)
)
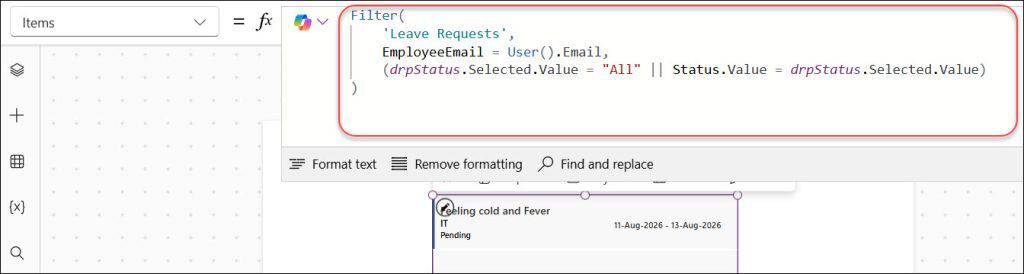
Explanation:
EmployeeEmail = User().Emailensures the gallery only shows records created by the logged-in user.- The second condition handles the dropdown filter for
Status.
If you want to go deeper into this pattern, the dedicated article on Power Apps filter data by current user is a great next step.
Step 6: Combining Dropdown Filters with Other Controls
In real projects, dropdown-based filtering is rarely the only filter you use. You might combine it with:
- A Date picker to filter by date range
- A Text input for keyword search on Title
- A Radio button for simple Yes/No type filters
Here’s a combined example for our HR Leave Request app:
drpDepartment– department filterdrpStatus– status filter (with “All”)txtSearchTitle– text input for searching by TitledteStartFilteranddteEndFilter– date pickers for StartDate range
Gallery Items formula:
Filter(
    'Leave Requests',
    (IsBlank(drpDepartment.Selected.Value)
        || Department.Value = drpDepartment.Selected.Value),
    (drpStatus.Selected.Value = "All"
        || Status.Value = drpStatus.Selected.Value),
    (IsBlank(txtSearchTitle.Text)
        || StartsWith(Title, txtSearchTitle.Text)),
    (IsBlank(dteStartFilter.SelectedDate)
        || StartDate >= dteStartFilter.SelectedDate),
    (IsBlank(dteEndFilter.SelectedDate)
        || EndDate <= dteEndFilter.SelectedDate)
)
This pattern makes your app feel powerful and responsive. When a manager opens the app, they can:
- Filter by Department = “IT”
- Status = “Pending”
- Search Title = “WFH”
- Date range = next 30 days
All in one clean screen.
If you enjoy building richer filter experiences, you might also like learning how to filter a gallery by radio button in Power Apps or how to display Dataverse choices in Power Apps gallery when you move beyond SharePoint.
Step 7: Handling Common Data Type Issues and Errors
When you start mixing Dropdown controls and Gallery filters, a few common problems pop up:
Record vs value mismatches
SharePoint choice columns often behave like records ({ Value: "Pending" }) rather than plain text. If you write:
Filter(LeaveRequests, Status = drpStatus.Selected.Value)
you’ll often get errors. Instead, compare the .Value field:
Filter(LeaveRequests, Status.Value = drpStatus.Selected.Value)
“Expected record value” errors
If you see the Power Apps error “Expected record value”, it usually means you’re trying to assign or compare a record to a text value (or vice versa). This can happen when you forget .Selected or .Value on the dropdown.
For deeper troubleshooting of this specific error pattern, check out: Expected record value Power Apps.
Dropdown not resetting properly
When you navigate away from the screen and come back, dropdowns may keep their selection and confuse users. A simple pattern is to reset controls in the screen’s OnVisible:
Reset(drpDepartment);
Reset(drpStatus);
Reset(txtSearchTitle);
This gives the user a fresh view each time they arrive at the screen.
Things to Keep in Mind
- Delegation and performance: When filtering SharePoint lists, use delegation-friendly functions like Filter and avoid retrieving the entire dataset into a collection unless you have a small list. This is critical for large HR scenarios with thousands of leave records.
- Choice column handling: Always remember that SharePoint choice columns return records; use
.Value(for text) or the proper field when comparing in filters and when binding dropdown Items. - Default selections: Set sensible defaults for dropdowns (like “All” for status) to avoid confusing “no data” screens. A blank gallery often makes users think the app is broken.
- Security and permissions: Filtering in the gallery does not replace underlying SharePoint list permissions. Make sure employees only have access to the data they’re allowed to see, even if the UI filters show fewer items.
- Clear filter UX: Provide an obvious way to reset filters—either with an “All” option or a Clear Filters button that resets dropdowns and text inputs using the Reset function.
- Consistent naming: Use clear naming conventions for controls (
drpDepartment,galLeaveRequests,txtSearchTitle) so your formulas stay readable and easy to maintain as the app grows.
Frequently Asked Questions
How do I filter a Power Apps gallery using a dropdown?
To filter a Power Apps gallery using a Dropdown, set the gallery’s Items property to a Filter expression that compares a column to the dropdown’s selected value. For example:
Filter(
LeaveRequests,
Department.Value = drpDepartment.Selected.Value
)
This will show only records in the LeaveRequests list where the Department matches the user’s selection in drpDepartment.
How do I add an “All” option to a dropdown filter?
The easiest way is to build a small collection in the screen’s OnVisible property. You can add a record with Value = "All" and then append the actual choices from the SharePoint list. For example:
Clear(colStatusOptions);
Collect(colStatusOptions, { Value: “All” });
Collect(colStatusOptions, Choices([@LeaveRequests].Status));
Then set the dropdown Items to colStatusOptions and handle “All” in the gallery filter:
Status.Value = drpStatus.Selected.Value || drpStatus.Selected.Value = “All”
How do I filter a gallery by current user and dropdown at the same time?
Use the User function for the current user and add additional conditions for dropdown filters inside a Filter function. For example:
Items =
Filter(
LeaveRequests,
EmployeeEmail = User().Email,
drpStatus.Selected.Value = “All” || Status.Value = drpStatus.Selected.Value
)
This shows only the logged-in user’s records and then further filters by status based on the dropdown selection.
Why is my Power Apps dropdown not showing any values?
If your Dropdown is not showing values, check the Items property and the underlying data type. For SharePoint choice columns, use the Choices function: Choices([@LeaveRequests].Department). Also ensure the data connection is working and the column name is spelled correctly. For a deeper look at debugging this, see Power Apps dropdown values not showing.
How do I combine text search with dropdown filters in a gallery?
You can combine text search with dropdown filters by adding multiple conditions to the Filter function. For example:
Items =
Filter(
LeaveRequests,
drpStatus.Selected.Value = “All” || Status.Value = drpStatus.Selected.Value,
IsBlank(txtSearchTitle.Text)
|| StartsWith(Title, txtSearchTitle.Text)
)
This filters by status and, if the user types something in txtSearchTitle, it also filters the Title using a starts-with search.
Can I use gallery dropdown filters with Dataverse instead of SharePoint?
Yes, the pattern is almost identical when you use Dataverse tables instead of SharePoint lists. You still use Dropdown controls bound to Choices (Dataverse option sets) and Filter functions on the gallery. Just make sure you reference the Dataverse table and column names correctly, and handle choice columns appropriately. When you’re ready to move beyond SharePoint, guides like Power Apps patch Dataverse choice column will help you wire up more advanced scenarios.
You may also like:
- Power Apps cascading dropdown control
- Power Apps hover popup tooltip methods
- Power Apps app StartScreen
- Create form in Power Apps
- Filter a Power Apps Dropdown Control
- Power Apps toggle control
You’ve seen how a simple Power Apps gallery dropdown can transform a basic list of records into a powerful, user-friendly experience for your HR leave management app. My recommendation is to start with one dropdown filter, get the formula right, and then layer additional filters and “All” logic on top as your users ask for more. I hope you found this article helpful.

Preeti Sahu is an expert in Power Apps and has over six years of experience working with SharePoint Online and the Power Platform. She is the co-author of Microsoft Power Platform: A Deep Dive book. As a Power Platform developer, she has worked on developing various tools using Power Apps and Power Automate. She also makes Microsoft 365 videos and shares them on YouTube.


You guys are awesome!!
Thank you soooo much, it was very helpful. Now I can put my creativity hat on