
I once built a Power Apps form for an HR team that onboarded a handful of new starters every week. On the first day of testing, one of the HR officers pointed out that they were typing exactly the same things into every new record: the office address, the IT department, today’s date and their own name as the person who created it.
They were right, and the fix was to fill those fields in automatically, while still letting people change them when needed.
In Power Apps, you do that by setting default values on the form’s data cards. The formulas are short, but there’s one important detail: the default should only apply to new records, otherwise editing an existing record would quietly overwrite what was saved.
Quick answer: Select the control inside the data card and change its default property to If(Form1.Mode = FormMode.New, <default value>, Parent.Default). Use Default for text inputs, DefaultDate for date pickers and DefaultSelectedItems for combo boxes (choice and person columns). New records get your value; existing records keep their saved value.
In this tutorial, I’ll explain how data card defaults work and then give you the formulas for text, choice, person, date and number fields, as well as a default that’s based on another field.
How data card defaults work
Every field in an edit form sits inside a data card, and it helps to know how the pieces fit together before you change anything. Microsoft’s guide to data cards describes the pattern. The card’s own Default property is usually ThisItem.FieldName, the value stored in the record. The control inside the card, such as a text input, combo box or date picker, reads that value through Parent.Default.
And the card’s Update property decides what gets saved when the form is submitted.
The form itself has a Mode, which is FormMode.New, FormMode.Edit or FormMode.View (form functions). So the trick is to check the mode: return your default value in New mode, and Parent.Default in every other mode, so an existing record always shows what was saved.
One practical tip before you start: cards are locked by default. To change their properties, select the card and, on the Advanced tab, select Unlock to change properties.
The example: an Employees list
For the examples, I’m using a SharePoint list called Employees. It has Employee Name (Person), Address (Multiple lines of text), Contact (Number), Join Date (Date and time) and Department (a Choice column with IT, Finance, HR and Manager).

In the app, I added an Edit form from Insert > Edit form, named it EmployeeForm, and connected it to the list.

1. Default text for new records only
Let’s start with the address, since almost every new starter works at the same office. Select the text input inside the Address card and set its Default property to this formula:
If(EmployeeForm.Mode = FormMode.New, "NY 1003, New York City, US", Parent.Default)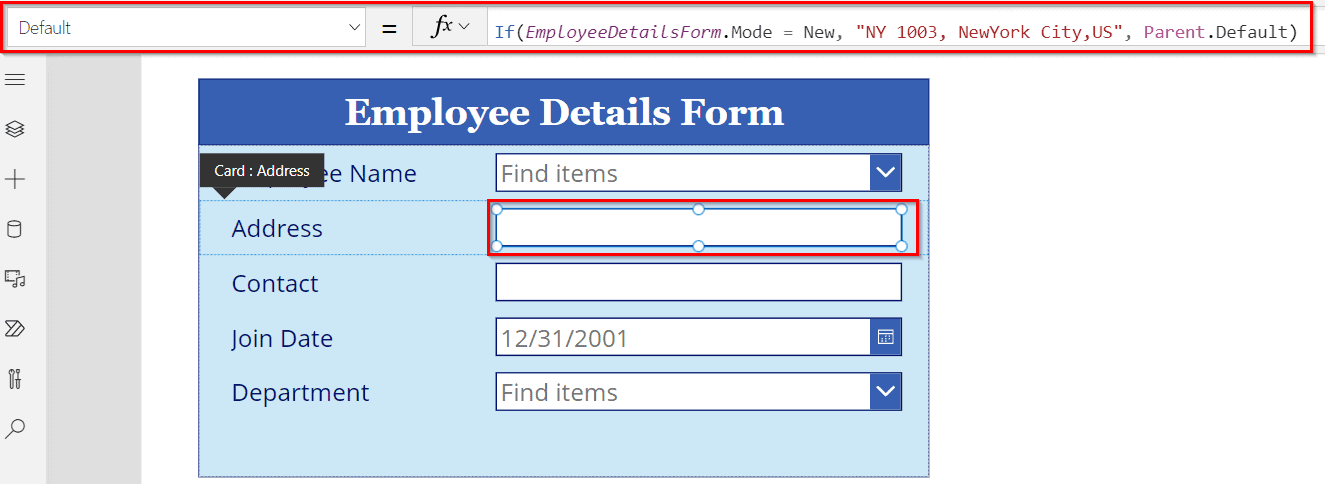
To see the result while you’re building, set the form’s DefaultMode to FormMode.New. In a finished app, you’d usually open the form from a button with NewForm(EmployeeForm) instead.

The new form now shows the address already filled in, and the user can still change it for someone who works elsewhere:

If your form uses the modern text input control, the same formula goes in its Default property as well.
2. Default choice value (dropdown or combo box)
A SharePoint Choice column appears in the form as a combo box, and combo boxes don’t use a Default property. Instead, select the combo box in the Department card and set DefaultSelectedItems:
If(EmployeeForm.Mode = FormMode.New, [{Value: "IT"}], Parent.Default)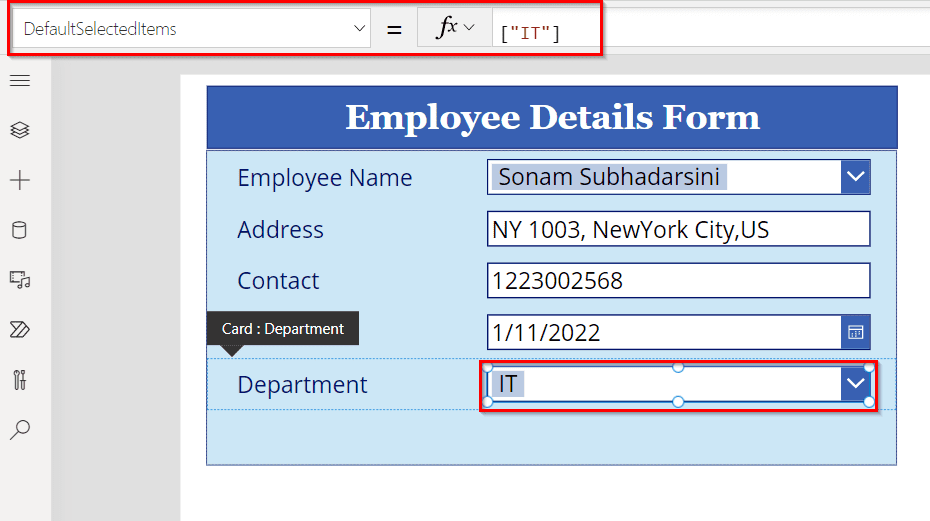
In the screenshot, you’ll see the shorter form ["IT"]. It creates the same one-column table with a Value column, so either version works.
The value has to match one of the column’s choices exactly, including capitals and spaces. If you’d rather not rely on typing it correctly, you can pick it from the column’s own list of choices:
If(EmployeeForm.Mode = FormMode.New, Filter(Choices(Employees.Department), Value = "IT"), Parent.Default)
Make sure you use DefaultSelectedItems rather than Default, which is deprecated on the combo box. The modern combo box also expects a table in DefaultSelectedItems, and keep in mind that it allows multiple selections by default.
3. Default person: the current user
Person columns take the most care. SharePoint expects a person record in a specific format, so the default has to be built as a record rather than just a name or email address. Select the combo box in the Employee Name card, leave its Items property as it is, and set DefaultSelectedItems to this:
If(
    EmployeeForm.Mode = FormMode.New,
    [
        {
            Claims: "i:0#.f|membership|" & Lower(User().Email),
            DisplayName: User().FullName,
            Email: User().Email,
            Department: "",
            JobTitle: "",
            Picture: ""
        }
    ],
    Parent.Default
)
There are two things I’ve learned the hard way here. First, don’t replace the card’s Items with a list from Office 365 Users, as some older tutorials suggest. The card’s Update property expects a SharePoint person record, and a list from Office 365 Users can show the right name in the form but fail to save it correctly.
Second, User().Email actually returns the person’s sign-in name (their UPN). In most organizations that’s the same as their email address, but if yours are different, use Office365Users.MyProfileV2().mail for Email and keep the UPN in Claims.
4. Default date: today
For the join date, today’s date is a sensible starting point. Select the date picker in the Join Date card and set DefaultDate:
If(EmployeeForm.Mode = FormMode.New, Today(), Parent.Default)If you use the modern date picker, set DefaultDate there too. Its SelectedDate property only reports the date the user picked, so it can’t be used to set a default.
5. Yes/No and number defaults
Yes/No and number fields follow exactly the same pattern. On a classic toggle or check box, the formula goes in Default; on the modern toggle, it goes in Checked:
// Toggle or check box (classic: Default, modern toggle: Checked)
If(EmployeeForm.Mode = FormMode.New, true, Parent.Default)

// Number
If(EmployeeForm.Mode = FormMode.New, 1, Parent.Default)
6. Default value based on another field
Defaults don’t have to be fixed values. In an Orders form, I wanted the Target Shipped Date to default to five days after the Order Date, but only if nobody had already entered a shipping date.

To do that, set the DefaultDate of the Target Shipped Date picker to the formula below. DataCardValue10 is the name of the Order Date picker in my form, so replace it with yours:
If(
    IsBlank(ThisItem.'Target Shipped Date'),
    DateAdd(DataCardValue10.SelectedDate, 5, TimeUnit.Days),
    Parent.Default
)
Now, whenever the user picks an Order Date, the shipping date moves along with it. And if the record already has a shipping date, the formula leaves it alone:

Default value not working? Check these
If your default doesn’t appear, the most likely reason is that the form isn’t in New mode. Open it with NewForm(FormName), or set its DefaultMode to FormMode.New while you test.
The next thing to check is the property. Text inputs use Default, date pickers use DefaultDate, and combo boxes use DefaultSelectedItems; putting the formula in the wrong one does nothing. For choice and person fields, the value also has to match exactly: the text must match one of the choices, and a person needs the full record shown above.
If the default shows in the form but isn’t saved, look at the card’s Update property. It should still point at the control, for example DataCardValue5.SelectedItems. And if the form shows old values after saving, call ResetForm(FormName) or NewForm(FormName) to load the defaults again.
More Power Apps form tutorials:
- How to Update DataCard Value in Power Apps
- How to Copy Power Apps Data Card Value To Another?
- How to change Power Apps DataCard to dropdown
- 2 Best Methods to Create a Simple Form in Power Apps [Step-by-Step]
- Power Apps Form field validation on submit [Email, Phone Number, Date & Text]
- Power Apps Display Mode: A Complete Guide (With Real Examples)
Frequently Asked Questions
How do I set a default value in a Power Apps data card?
Select the control inside the card and set its default property: Default for text inputs, DefaultDate for date pickers or DefaultSelectedItems for combo boxes. Wrap it in If(Form1.Mode = FormMode.New, value, Parent.Default) so only new records get it.
What does Parent.Default mean in Power Apps?
Parent.Default is the Default property of the data card that holds the control, usually the value stored in the record (ThisItem.FieldName). Controls use it so the card stays self-contained.
How do I set the current user as the default in a person field?
Set the combo box DefaultSelectedItems to a table with a SharePoint person record: Claims set to “i:0#.f|membership|” & Lower(User().Email), plus DisplayName and Email from User().
How do I set a default choice in a Power Apps form?
Set the combo box DefaultSelectedItems to [{Value: “IT”}], using a value that matches one of the column’s choices exactly. Use Parent.Default for existing records.
How do I set today’s date as the default in Power Apps?
Set the date picker’s DefaultDate to If(Form1.Mode = FormMode.New, Today(), Parent.Default). On the modern date picker, use DefaultDate too, not SelectedDate.

I have worked with Microsoft technologies for more than 18 years, including SharePoint, Microsoft 365 and the Power Platform (Power Apps, Power Automate and Power BI), at companies like HP, TCS and KPIT. I started EnjoySharePoint in 2011 to share the solutions I build in real projects with readers in the United States, Canada, the United Kingdom, Australia, New Zealand and beyond. Microsoft has recognized this work with the Microsoft MVP award 13 times since 2014.
I have an existing powerapps connected to sharepoint list, I would like add a default value in a field “Reference Number” as “ICS-ID” where ID is the sharepoint list unique item which us automatically generated by sharepoint list, I could not find this ID field in powerapps to use as per your 4th last lesson in the above instructions. Can you please help me how to do it. Thanks-Gopi