
An HR team I worked with needed a simple leave request app for 200 employees. Employees had to choose one or more leave types—Annual Leave, Sick Leave, Work From Home, or Compensatory Off—without scrolling through a long form or typing inconsistent values.
A Power Apps Listbox worked well for that screen. It gave users a compact selection area, while a SharePoint list stored the leave request and the selected leave types. The key was choosing the right SharePoint column type and using the right formula for single versus multiple selections.
In this practical Power Apps tutorial, I’ll show you how to populate Power Apps Listbox items from a SharePoint list, save selections, and update existing requests.
Why Use Power Apps Listbox Items From a SharePoint List?
Power Apps Listbox is an input control that displays a vertical list of choices. Users can select one value or several values when you enable multiple selection. It works best when users need to see several choices at once, and the option list stays reasonably short.
For our HR Leave Request app, employees should choose leave types from one controlled list. That prevents data issues such as “Sick leave,” “SickLeave,” and “Medical leave” representing the same request type.
A SharePoint list makes a practical data source for this kind of Canvas app. Your HR team can view requests directly in SharePoint, update list settings without changing app screens, and connect a Power Automate approval flow when they need manager approval.
Use a Listbox when:
- Users need to choose from a visible list of options.
- The option list contains a manageable number of entries.
- Multiple selection is useful, such as selecting several leave categories or requested benefits.
- You want the same values to appear consistently in Power Apps and SharePoint.
For longer lists or lists where users need search, I normally use a Combo box instead. A Combo box supports search and handles people records, lookup fields, and large option sets more smoothly. You can compare the practical differences in this guide on Power Apps Combo box vs Dropdown.
Pro Tip: In my experience, a Listbox is strongest for a short fixed set of values. Once the list grows past about 10 to 15 options, users start looking for search. That is the point where I move to a Combo box.
Prepare the SharePoint List
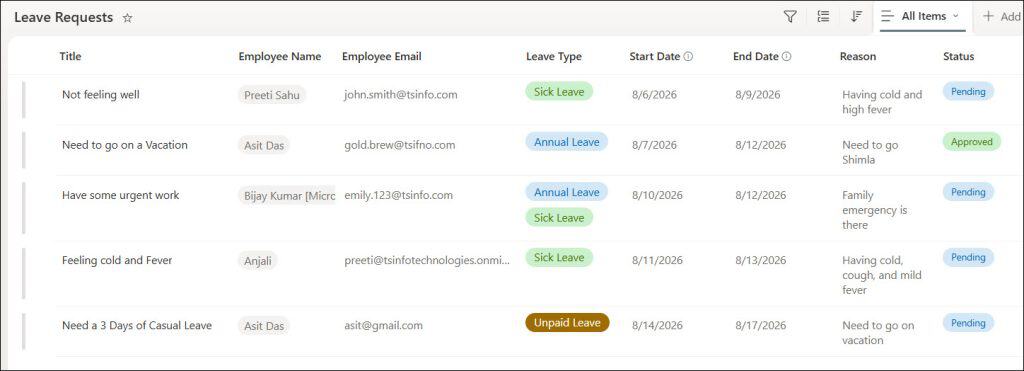
Start with a SharePoint list named Leave Requests. This list stores each employee’s request and its approval status.
You can create the list manually or follow this guide on working with a SharePoint list. For this example, create these columns.
| Column name | SharePoint column type | Purpose |
|---|---|---|
| Title | Single line of text | Stores a readable request title |
| Employee Name | Person | Stores the employee’s display name |
| Employee Email | Single line of text | Stores the employee email |
| Leave Type | Choice | Stores one or more leave types |
| Start Date | Date and Time | Stores the first leave date |
| End Date | Date and Time | Stores the final leave date |
| Reason | Multiple lines of text | Stores the employee’s reason |
| Status | Choice | Stores Pending, Approved, or Rejected |
For the Leave Type column, add these choice values:
- Annual Leave
- Sick Leave
- Work From Home
- Compensatory Off
- Unpaid Leave
Turn on Allow multiple selections only if an employee can submit several leave types in one request. For example, an employee may request Annual Leave and Compensatory Off in a single date range.
For Status, add these choices:
- Pending
- Approved
- Rejected
Set the default status to Pending. This removes one unnecessary decision from the employee-facing app.
Choose the Correct Column Type
This decision affects every formula you write later.
A single-select SharePoint Choice column stores one choice record. A multi-select Choice column stores a table of choice records. The difference matters because a Power Apps Listbox returns either one selected record or a table of selected records.
If HR allows only one leave type per request, keep Leave Type as a single-select Choice column. If employees can mix leave categories, turn on multiple selection and use SelectedItems when saving data.
Avoid using a plain text column for controlled options unless you have a strong reason. Text fields allow inconsistent spelling and create more cleanup work for HR.
Pro Tip: I always decide whether the list needs one or many values before building the app. Changing a SharePoint Choice column from single-select to multi-select later often forces formula changes across forms, patches, filters, and Power Automate flows.
Create the Canvas App and Connect SharePoint
Create a blank Canvas app in the correct Power Platform environment. Use a tablet layout if HR staff will manage requests on desktop, or use a responsive layout if employees will access the app from Teams or mobile devices.
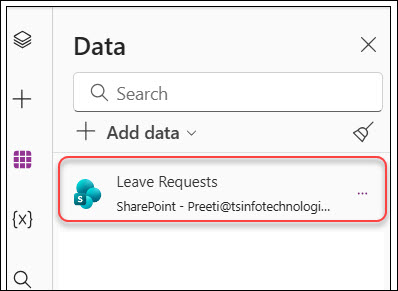
Then connect the Leave Requests SharePoint list.
- Open the Canvas app in Power Apps Studio.
- Select Data from the left navigation.
- Select Add data.
- Search for SharePoint.
- Choose the SharePoint connector.
- Select the SharePoint site that contains the Leave Requests list.
- Select Leave Requests.
- Select Connect.
Power Apps now adds Leave Requests as a data source. You can reference the list directly in formulas.
If you are new to starting from SharePoint, this walkthrough on creating a Canvas app from a SharePoint list gives you a useful starting point.
Add the Required Controls
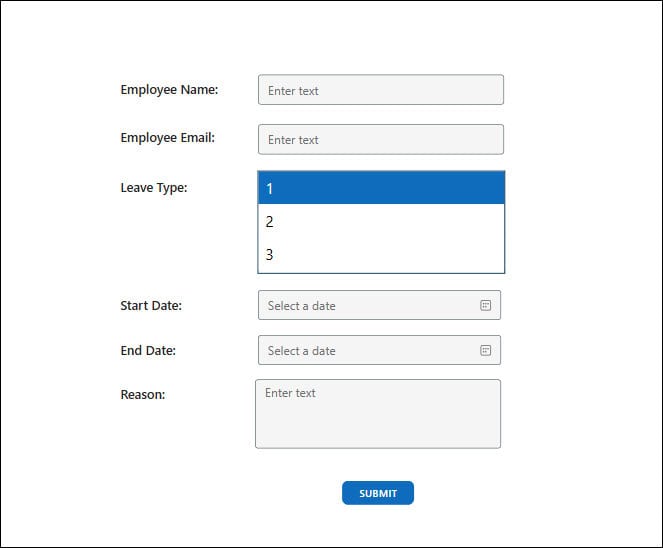
On a screen called scrNewRequest, add these controls:
- Text input named
txtEmployeeName - Text input named
txtEmployeeEmail - Listbox named
lstLeaveType - Date Picker named
dpStartDate - Date Picker named
dpEndDate - Text input named
txtReason - Button named
btnSubmitRequest
Set the employee controls to the signed-in user by using these formulas.
Set the Default property of txtEmployeeName to:
User().FullName
Set the Default property of txtEmployeeEmail to:
User().Email
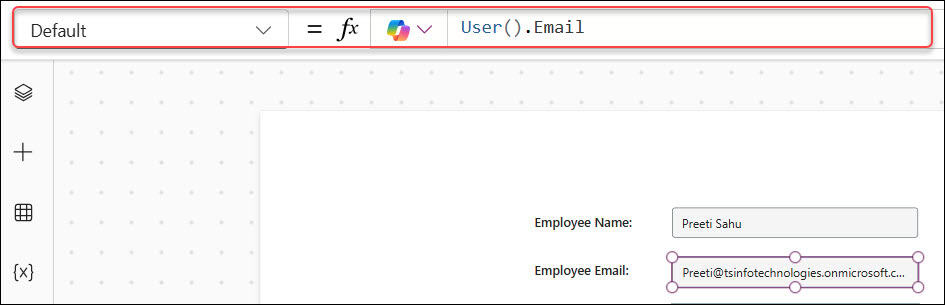
The User() function returns information about the person currently using the app. This saves time for employees and prevents them from entering another employee’s email by mistake. You can also expand this pattern by following this guide to get current user information in Power Apps.
Populate Power Apps Listbox Items From a SharePoint List
Now add a Listbox to the leave request form. Select lstLeaveType, then set its Items property to this formula:
Choices([@'Leave Requests'].'Leave Type')
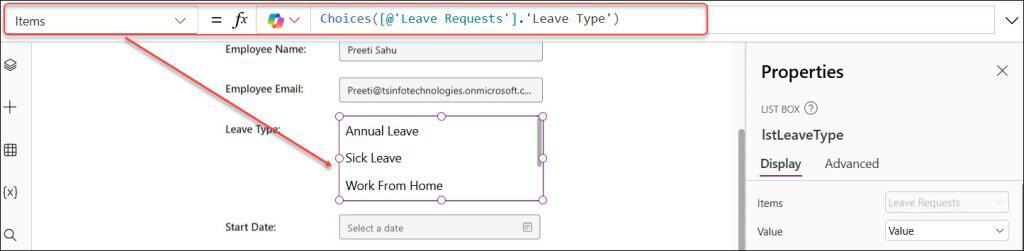
This is the best formula when you want to show the available values from a SharePoint Choice column.
Choices() returns the configured choices for the Leave Type column. The [@'Leave Requests'] format clearly identifies the SharePoint data source. The result is a table of records, and each record includes a Value field such as “Annual Leave” or “Sick Leave.”
Set the Listbox Value property to:
Value
This tells the control to display the Value field from each choice record.
At this point, your Listbox should display:
- Annual Leave
- Sick Leave
- Work From Home
- Compensatory Off
- Unpaid Leave
Display Values From a Text Column
Sometimes your choices come from another SharePoint list instead of a Choice column. For example, HR may maintain a separate list named Leave Types with fields such as Title, IsActive, and SortOrder.
In that case, set the Items property of the Listbox to:
SortByColumns(
    Filter(
        'Leave Types',
        IsActive = true
    ),
    "SortOrder",
    SortOrder.Ascending
)
Then set the Listbox Value property to:
Title
This approach gives HR more control. They can add a new leave category, disable an old category, or change the display order without editing the Canvas app.
If you only want the distinct values from a text field in the Leave Requests list, use:
Sort(
    Distinct(
        'Leave Requests',
        'Leave Type'
    ),
    Value,
    SortOrder.Ascending
)
However, I do not recommend using historical request data as the master source for leave types. If no one has selected “Compensatory Off” yet, it will not appear. A Choice column or separate configuration list is more reliable.
Pro Tip: I use a SharePoint Choice column for small, stable lists. I use a separate configuration list when business users need to manage choices themselves. That simple decision prevents unnecessary app updates later.
Enable and Read Multiple Selections
If employees can request more than one leave type, set the Listbox SelectMultiple property to:
true
When multiple selection is enabled, use:
lstLeaveType.SelectedItems
This returns a table containing every selected record.
For a single-select Listbox, use:
lstLeaveType.Selected
This returns one record.
To show selected leave types in a label for testing, set the label’s Text property to:
Concat(
    lstLeaveType.SelectedItems,
    Value,
    ", "
)

The Concat() function loops through the selected records and joins their Value fields with commas. If an employee selects Annual Leave and Compensatory Off, the label displays:
Annual Leave, Compensatory Off
This is also a useful preview before users submit the request.
Save Listbox Selections to SharePoint
Use the Patch function when you want direct control over saving a record. Patch() creates or changes a data source record without requiring a Power Apps form.
For a multi-select Leave Type column, set the OnSelect property of btnSubmitRequest to:
If(
    IsEmpty(lstLeaveType.SelectedItems),
    Notify(
        "Please select at least one leave type.",
        NotificationType.Error
    ),
    Patch(
        'Leave Requests',
        Defaults('Leave Requests'),
        {
            Title: txtEmployeeName.Text & " - " & Text(
                dpStartDate.SelectedDate,
                "dd mmm yyyy"
            ),
            'Employee Name': {
                '@odata.type': "#Microsoft.Azure.Connectors.SharePoint.SPListExpandedUser",
                Claims: "i:0#.f|membership|" & txtEmployeeName.Text,
                DisplayName: txtEmployeeName.Text,
                Email: txtEmployeeName.Text,
                Department: "",
                JobTitle: "",
                Picture: ""
            },
            'Employee Email': txtEmployeeEmail.Text,
            'Leave Type': lstLeaveType.SelectedItems,
            'Start Date': dpStartDate.SelectedDate,
            'End Date': dpEndDate.SelectedDate,
            Reason: txtReason.Text,
            Status: {Value: "Pending"}
        }
    );
    Notify(
        "Your leave request has been submitted.",
        NotificationType.Success
    );
    Reset(lstLeaveType);
    Reset(dpStartDate);
    Reset(dpEndDate);
    Reset(txtReason)
)
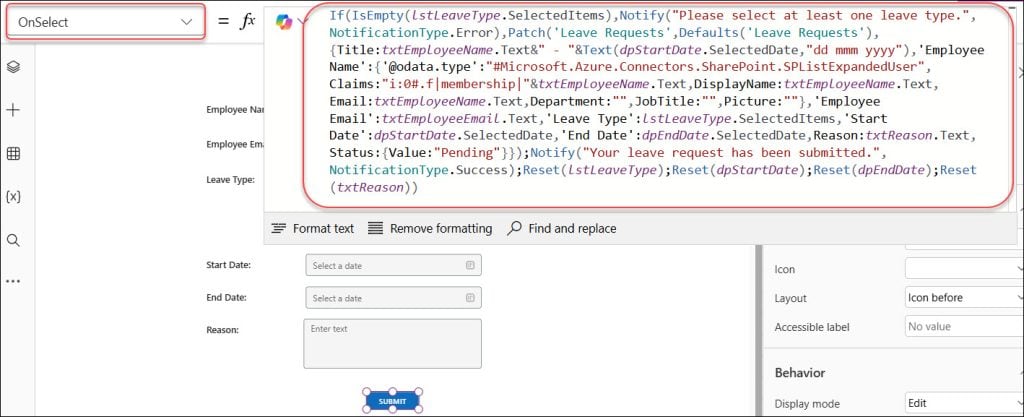
This formula first checks whether the employee selected at least one leave type. IsEmpty() checks a table, which makes it the right function for SelectedItems.
If the user selected a leave type, Patch() creates a new item. Defaults('Leave Requests') tells Power Apps to create a new SharePoint item instead of updating an existing one.
The formula saves lstLeaveType.SelectedItems directly into the multi-select SharePoint Choice column. It also sets the Status Choice column with {Value: "Pending"} because SharePoint Choice fields expect a record rather than plain text.
For more details about direct updates, see this example of using the Patch function to update a SharePoint list item.
Save One Selected Value
For a single-select Leave Type column, use Selected instead of SelectedItems.
Patch(
    'Leave Requests',
    Defaults('Leave Requests'),
    {
        Title: txtEmployeeName.Text & " - " & Text(dpStartDate.SelectedDate, "dd mmm yyyy"),
        'Employee Name': txtEmployeeName.Text,
        'Employee Email': txtEmployeeEmail.Text,
        'Leave Type': lstLeaveType.Selected,
        'Start Date': dpStartDate.SelectedDate,
        'End Date': dpEndDate.SelectedDate,
        Reason: txtReason.Text,
        Status: {Value: "Pending"}
    }
)
The selected record already matches the structure SharePoint expects. Do not use lstLeaveType.Selected.Value for a Choice field unless you wrap it again as {Value: ...}.
Validate the Date Range
Before saving, validate dates. Employees should not submit an end date before a start date.
Add this condition before the Patch() statement:
If(
    dpEndDate.SelectedDate < dpStartDate.SelectedDate,
    Notify(
        "End date must be the same as or later than the start date.",
        NotificationType.Error
    ),
    Patch(
        'Leave Requests',
        Defaults('Leave Requests'),
        {
            Title: txtEmployeeName.Text & " - " & Text(dpStartDate.SelectedDate, "dd mmm yyyy"),
            'Employee Name': {
                '@odata.type': "#Microsoft.Azure.Connectors.SharePoint.SPListExpandedUser",
                Claims: "i:0#.f|membership|" & txtEmployeeName.Text,
                DisplayName: txtEmployeeName.Text,
                Email: txtEmployeeName.Text,
                Department: "",
                JobTitle: "",
                Picture: ""
            },
            'Employee Email': txtEmployeeEmail.Text,
            'Leave Type': lstLeaveType.SelectedItems,
            'Start Date': dpStartDate.SelectedDate,
            'End Date': dpEndDate.SelectedDate,
            Reason: txtReason.Text,
            Status: {Value: "Pending"}
        }
    )
)
You can apply more detailed submit rules through Power Apps form field validation, especially when the app has mandatory attachments, manager names, or leave balance logic.
Pro Tip: I always validate before calling
Patch(). A successful patch with bad data is worse than a clear validation message, because HR must correct the record later.
Update an Existing Leave Request
Most HR apps need an employee or HR administrator to edit an existing request. Add a vertical Gallery named galLeaveRequests and set its Items property to:
SortByColumns(
    Filter(
        'Leave Requests',
        'Employee Email' = User().Email
    ),
    "Created",
    SortOrder.Descending
)
This gallery shows only the signed-in employee’s requests. It supports a basic self-service model and avoids exposing every employee’s leave details. You can learn more about this useful pattern in Power Apps filter data by current user.
Set the Listbox DefaultSelectedItems property to:
galLeaveRequests.Selected.'Leave Type'
This loads the currently saved Leave Type values when the user selects a gallery item.
Then use this formula in an Update button’s OnSelect property:
Patch(
    'Leave Requests',
    galLeaveRequests.Selected,
    {
        'Leave Type': lstLeaveType.SelectedItems,
        'Start Date': dpStartDate.SelectedDate,
        'End Date': dpEndDate.SelectedDate,
        Reason: txtReason.Text
    }
);
Notify(
    "Your leave request has been updated.",
    NotificationType.Success
);
Refresh('Leave Requests')
Here, galLeaveRequests.Selected identifies the existing SharePoint record. Unlike Defaults(), it tells Patch() to update that item.
I recommend allowing employees to edit only requests where the status remains Pending. Add this to the DisplayMode property of the Update button:
If(
    galLeaveRequests.Selected.Status.Value = "Pending",
    DisplayMode.Edit,
    DisplayMode.Disabled
)
That rule stops an employee from changing dates after a manager approves the request. You can extend this pattern with a Power Apps display mode formula for different user roles.
Add an Approval Workflow
After the employee saves a request, trigger a Power Automate approval flow. The flow can send the manager an approval card, update the Status column, and notify the employee of the result.
A simple flow design looks like this:
- Trigger the flow when an item is created in the Leave Requests SharePoint list.
- Get the employee’s manager or use a Manager Email column.
- Start an approval action.
- Update Status to Approved or Rejected.
- Send the employee an email or Teams message.
If your company uses layered approvals, such as team manager approval followed by HR approval, use a multi-level approval process in Power Automate.
Keep the app responsible for collecting accurate information. Let the flow handle notifications and approval logic. This separation makes troubleshooting much easier.
Key Points
- Single versus multiple selection: Use
Selectedfor one choice andSelectedItemsfor many choices. Your SharePoint Choice column must match the selection design. - Choice record format: SharePoint Choice columns expect records such as
{Value: "Pending"}. Plain text often causes type mismatch errors during Patch operations. - Listbox usability: Use a Combo box instead of a Listbox when users need search, when choices are numerous, or when you display people and lookup records.
- Delegation warnings: Delegation means Power Apps sends supported queries to SharePoint instead of processing only the first locally loaded records. Avoid building a Listbox from a large historical SharePoint list with non-delegable formulas. Review Power Apps delegation warnings before deploying at scale.
- Item-level security: Filtering a gallery by the current user improves the interface, but it does not replace SharePoint permissions. Configure SharePoint list permissions when employee leave information requires protection.
- Refresh after updates: Use
Refresh('Leave Requests')after updates when the gallery must immediately show the latest SharePoint values.
Frequently Asked Questions
How do I populate a Power Apps Listbox from a SharePoint Choice column?
Set the Listbox Items property to:Choices([@'Leave Requests'].'Leave Type')
Then set the Value property to Value. This displays the choices configured for the SharePoint column.
How do I save multiple Listbox selections to SharePoint?
Turn on multiple selections for both the Listbox and the SharePoint Choice column. Then save the values through the Patch function by using:
‘Leave Type’: lstLeaveType.SelectedItems
Why does my Power Apps Listbox show blank items?
The Listbox may not know which field to display from your records. Set its Value property to Value for SharePoint Choice records, or set it to Title when the source is a standard SharePoint list.
Can a Power Apps Listbox display multiple SharePoint columns?
A Listbox primarily displays one text field per row. If users need to see several columns, such as leave type, policy code, and remaining balance, use a Gallery or a customized Combo box instead.
How do I set the default selected item in a Power Apps Listbox?
Set the DefaultSelectedItems property to the matching choice record or table of records. For an existing Leave Request record, use:
galLeaveRequests.Selected.’Leave Type’
For more examples, see how to set a default value in a Power Apps List Box.
Should I use a Listbox or Combo box in Power Apps?
Use a Listbox for short, visible option lists. Use a Combo box for searchable lists, large value sets, people fields, lookup columns, or more advanced filtering requirements.
You may also like:
- Filter a List box in Power Apps
- Validate a Power Apps Combo box control
- Power Apps Dropdown Blank Values
- Save Power Apps dropdown values to a SharePoint list
- Create a Power Apps gallery from a SharePoint list
- Send approval requests to multiple approvers in Power Automate
A Power Apps Listbox gives your SharePoint-based leave app a simple and controlled way to collect one or more leave types. Build the SharePoint Choice column correctly, use Selected or SelectedItems based on your selection mode, and use the Patch function to save clean records. I hope you found this article helpful.

Preeti Sahu is an expert in Power Apps and has over six years of experience working with SharePoint Online and the Power Platform. She is the co-author of Microsoft Power Platform: A Deep Dive book. As a Power Platform developer, she has worked on developing various tools using Power Apps and Power Automate. She also makes Microsoft 365 videos and shares them on YouTube.

