
Your flow works perfectly in testing: it creates the item, sends the approval, posts to Teams. Then you realize the email goes to the wrong person, or to no one, because the flow doesn’t have the right email address.
I’ve run into this on HR leave requests, onboarding and help desk flows. The fix depends on whose email you need and where the flow starts. In this tutorial, I’ll show you seven ways to get a user’s email address in Power Automate, and how to check that an address is valid before you send to it.
Quick answer: For a SharePoint Person column, use the column’s Email from the trigger, such as Employee Email. For the item’s author, use Created By Email. For the person who ran an instant flow, use User email from the Manually trigger a flow trigger. For anyone else, use Office 365 Users Get user profile (V2) with their UPN or ID and read Mail.
Which method do you need?
| You need the email of | Use |
|---|---|
| A person picked in a SharePoint column | Method 1: the Person column’s Email |
| Whoever created or last changed the item | Method 2: Created By or Modified By Email |
| The person who ran an instant flow | Method 3: User email from the trigger |
| The current Power Apps user | Method 4: pass it from the app |
| The flow owner, a known user or a manager | Method 5: Office 365 Users |
| Someone identified by an employee ID | Method 6: a master list |
| Everyone in a group | Method 7: group members |
Getting the right address matters most in approvals, such as multilevel approvals in Power Automate, where each level goes to a different person.
Method 1: From a SharePoint Person column
This is the pattern I use most. My Leave Requests list has a Person or Group column named Employee, and every new request should email that employee.
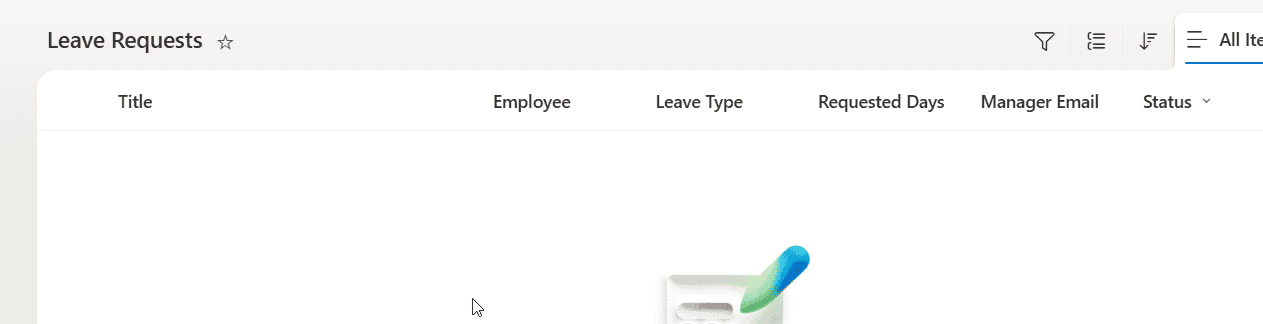
In the column settings, set Allow selection of to People only, so each item has one clear person. Then create an automated flow with the SharePoint trigger When an item is created.
The trigger gives you several values for each Person column: Employee Email, Employee DisplayName, Employee Claims, Employee JobTitle and more. In Send an email (V2), set To to Employee Email. As an expression, it’s:
triggerBody()?['Employee']?['Email']To branch on the email, add a Condition with Employee Email on the left, is equal to, and the address on the right, such as hr@contoso.com. Better still, keep addresses like that in a settings list or an environment variable rather than typing them into the flow.
I show more branching examples in how to send an email using an if condition.
If the column allows multiple people, the trigger returns an array. Use an Apply to each over the column and send to each person’s Email, or join the addresses with a semicolon.
Sending one message to several people from a list works the same way as sending an email to multiple recipients from a SharePoint list.
Method 2: From Created By or Modified By
If the person who created the item is the one you want to email, you don’t need an extra column. The SharePoint triggers include Created By Email and Modified By Email:
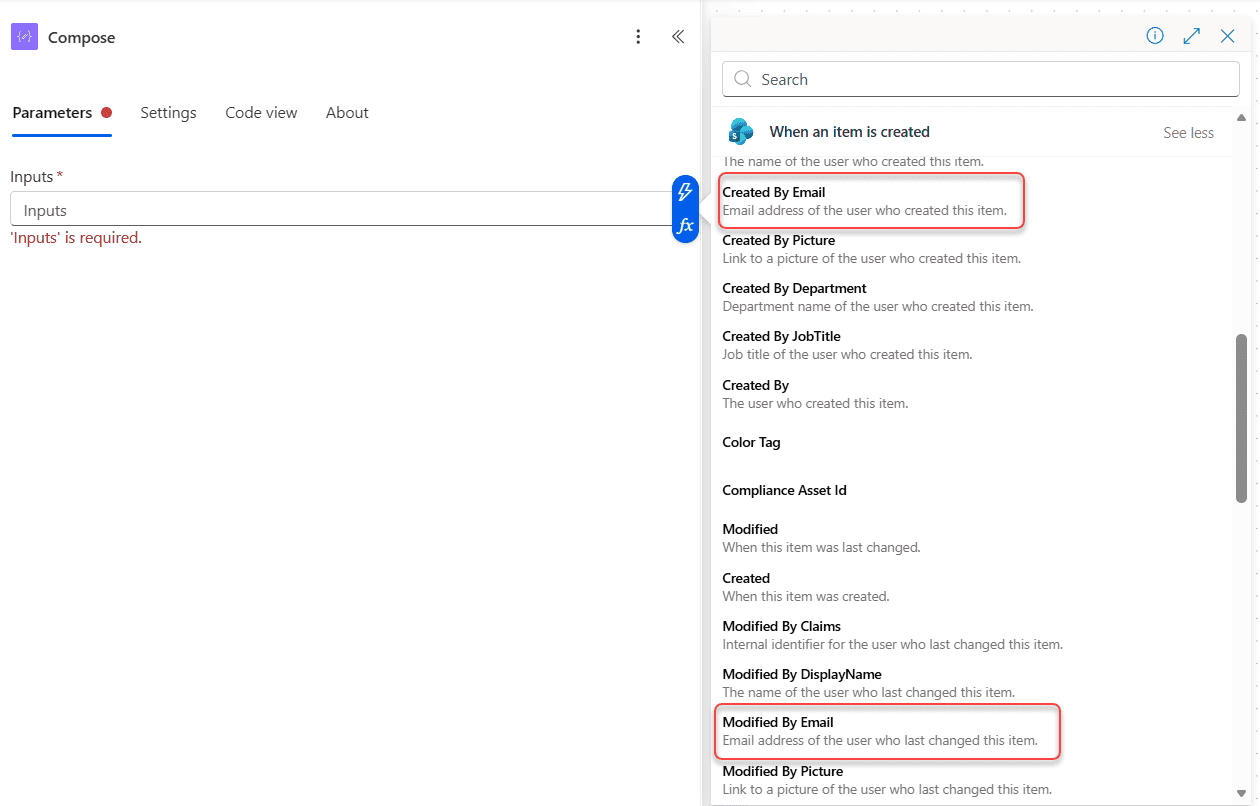
This works well for simple lists. It breaks down when someone submits on behalf of another person, or when items are created by a service account or another flow. In those cases, the creator isn’t the requester, so use a Person column instead.
Method 3: The person who ran an instant flow
When a flow starts with Manually trigger a flow, for example from the Power Automate app or a button, the trigger includes the person who ran it. In the dynamic content, select User email or User name:
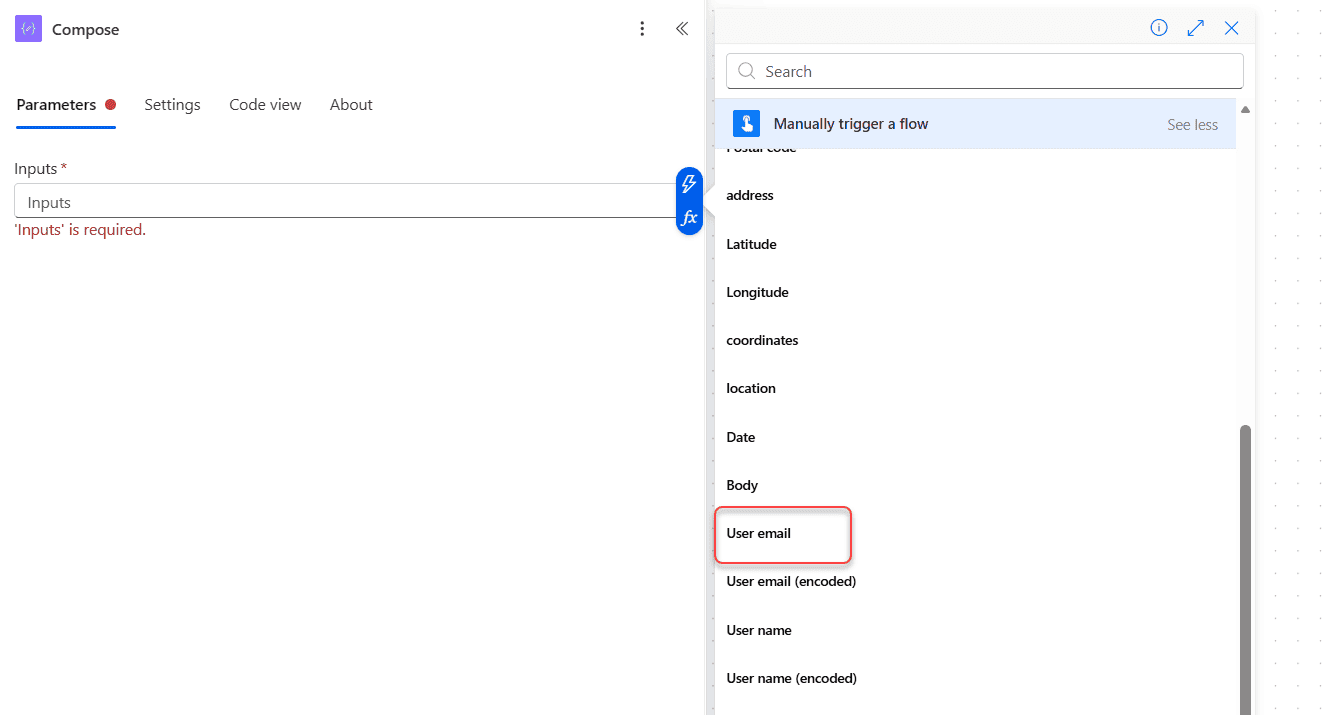
You don’t need to ask people to type their own email. If you also need their job title or manager, pass User email to Get user profile (V2) in Method 5.
If other people should run your instant flow, add them as Power Automate run-only users.
Method 4: The current Power Apps user
When a canvas app runs a flow, pass the user from the app. Many examples pass User().Email, but that returns the user’s UPN (sign-in name), which isn’t always the same as their mailbox address. In most tenants they match, but not when someone has an alias or a changed name.
My approach is to pass the user’s ID and let the flow look up the real address. In the app, the button calls the flow like this:
'PA - Create Request'.Run(
    User().EntraObjectId,
    txtRequestTitle.Text,
    txtDescription.Text
)
In the flow’s Power Apps (V2) trigger, add a text input named UserId, then add Get user profile (V2) with UserId as the User (UPN), and use its Mail.
The same app-to-flow pattern is used to send table reports from Power Apps by email.
Microsoft also recommends validating parameters that an app sends to a flow, because someone could call the flow with different values. Don’t use an email from the app to grant access or approve anything without checking it.
Method 5: With the Office 365 Users connector
The Office 365 Users connector reads profiles from Microsoft Entra ID. These are the actions I use:
| Action | Input | Returns |
|---|---|---|
| Get my profile (V2) | None | The profile of the account behind the connection |
| Get user profile (V2) | User (UPN) or user ID | That user’s profile, including Mail |
| Get manager (V2) | User (UPN) or user ID | The user’s manager |
| Search for users (V2) | Search term, such as a name | Matching users |
After Get user profile (V2), pick Mail from the dynamic content:
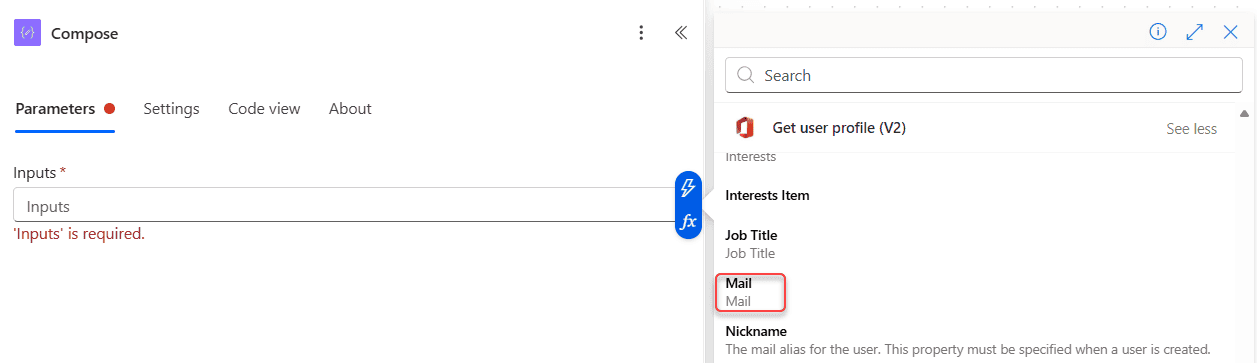
Two things to watch for. First, Get my profile (V2) returns the connection owner, not the person who created the item, so in an automated flow it’s usually you or a service account.
Second, Get manager (V2) fails with “No manager found” when the manager isn’t set in Microsoft Entra ID, so turn on Configure run after for the next step or add a fallback address.
If your tenant blocks some profile fields, the profile actions can fail with a 403 error. Fill in Select fields with only what you need, such as mail,displayName.
Method 6: From a master list with employee IDs
Get user profile (V2) only accepts a UPN or a user ID, not your own employee numbers. If your requests store an employee ID, keep a master Employees list with EmployeeId, DisplayName and Email, and look the person up:
- Trigger: When an item is created on the Requests list.
- Get items on Employees with the filter query
EmployeeId eq '@{triggerBody()?['EmployeeId']}'and Top Count 1. - Send an email (V2) to the Email of the result, inside the Apply to each that Power Automate adds.
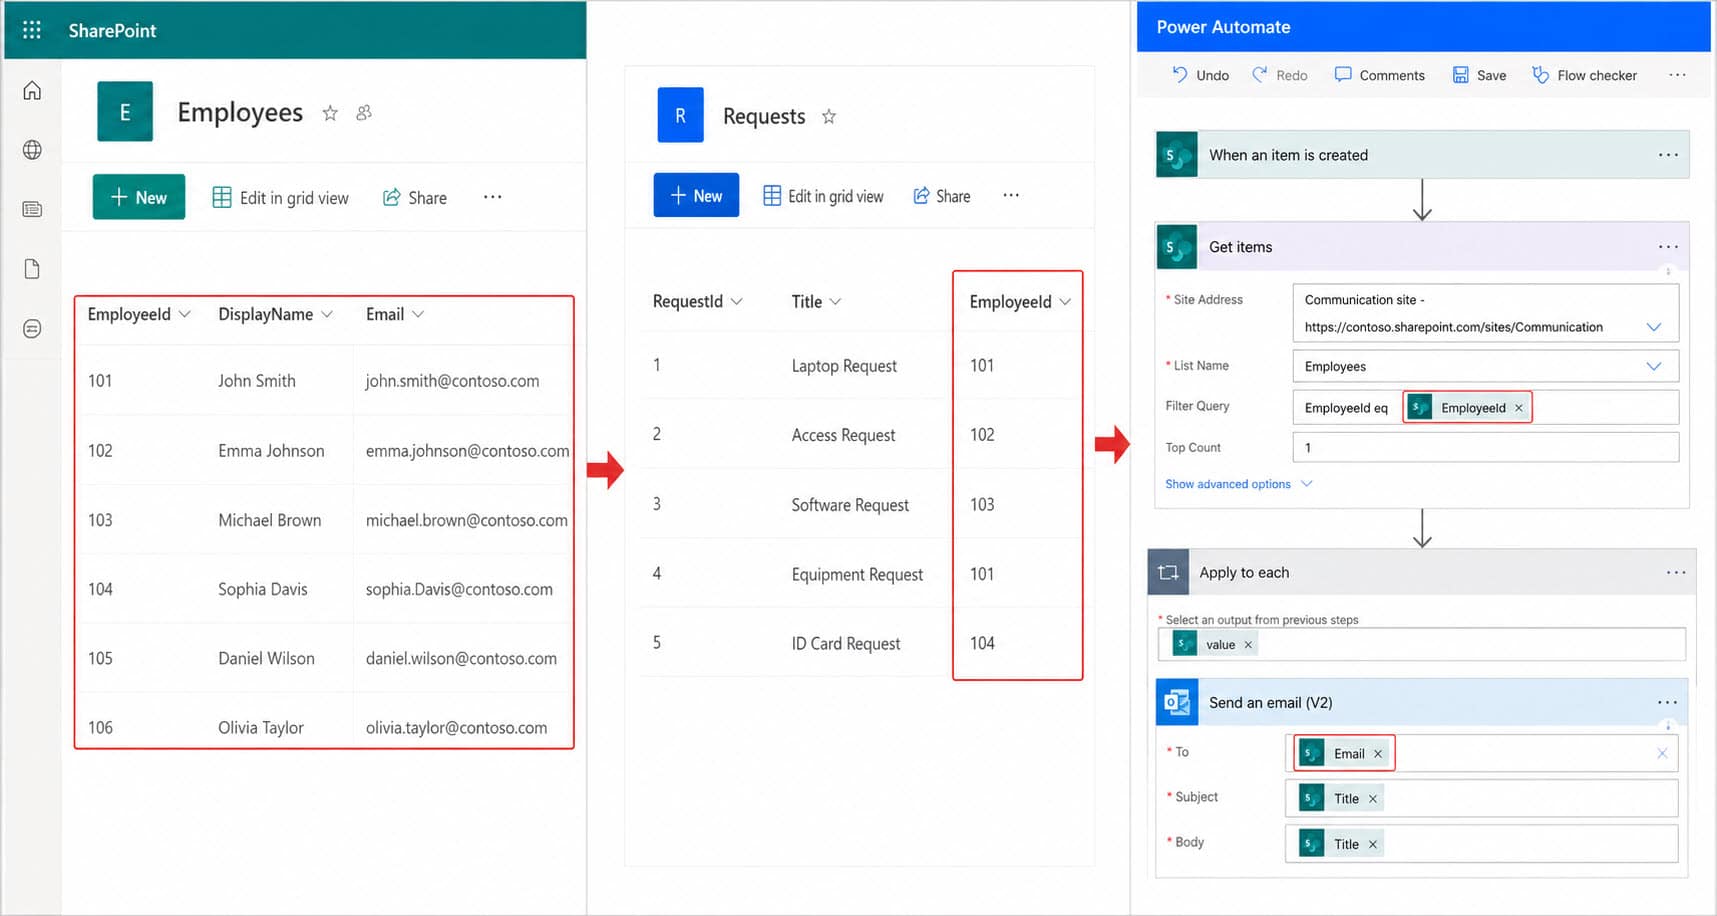
Keep the master list up to date with a scheduled flow from Microsoft Entra ID or your HR system, and limit who can see it, because it holds personal data.
If filter queries are new to you, see how to use the Get items filter query.
Method 7: Everyone in a group
To email all members of a Microsoft 365 group or security group, the Microsoft Entra ID connector has Get group members. It needs admin-level permissions (such as Group.ReadWrite.All), so ask your admin first, or use a service account.
For a SharePoint group, add Send an HTTP request to SharePoint with the GET method and this Uri:
_api/web/sitegroups/getbyname('Leave Approvers')/users?$select=EmailAdd the header Accept: application/json;odata=nometadata so the response is easy to read. Then add a Select with From set to body('Send_an_HTTP_request_to_SharePoint')?['value'] and Map set to item()?['Email'] in text mode, and a Compose that joins the addresses:
join(body('Select'), ';')Use the Compose output in the To field of Send an email (V2).
To manage those groups from a flow, see how to add multiple users to a SharePoint group. For approvals, you can also send an approval to a Microsoft 365 group.
Check that an email address is valid
Power Automate doesn’t have a built-in email validator, but two checks catch most problems. For the format, this expression returns true when the address has exactly one @, a dot after it and no spaces:
and(equals(length(split(trim(triggerBody()?['Email']), '@')), 2), contains(last(split(triggerBody()?['Email'], '@')), '.'), not(contains(triggerBody()?['Email'], ' ')))Put it on the left of a Condition, choose is equal to and enter true on the right. Replace triggerBody()?['Email'] with your own value.
To check that the person really exists in your organization, use Search for users (V2) with the address as the search term, then check length() of the results. If it’s 0, send the message to a fallback address or log it instead.
For the blank check that should come first, see how to check if a string is empty in Power Automate.
Tips
- Use Person columns rather than plain text emails. You get the email, name and more without extra lookups.
- Check for blanks before sending. An empty To field fails the whole flow.
- Don’t hard-code addresses. Store them in a SharePoint list or an environment variable.
- If sending fails for some users, check whether their mailbox is active. See how to use the Send an email (V2) action.
These Power Automate email tutorials go well with this one:
Frequently Asked Questions
How do I get the current user’s email in Power Automate?
In an instant flow, use User email from the Manually trigger a flow trigger. In a SharePoint flow, use the Person column’s Email or Created By Email. From Power Apps, pass the user to the flow.
What’s the difference between Get my profile (V2) and Get user profile (V2)?
Get my profile (V2) returns the account behind the connection. Get user profile (V2) returns any user by UPN or ID. Both are in the Office 365 Users connector reference.
Is User().Email in Power Apps the same as the email address?
Not always. It returns the user principal name, which usually matches the mailbox address. Look up Mail with Get user profile (V2) when it matters.
How do I validate an email address in Power Automate?
Check the format with an expression on split() and contains(), and check that the user exists with Search for users (V2).

Preeti Sahu is a Microsoft MVP for Power Apps with over six years of experience working with SharePoint Online and the Power Platform. She is the co-author of the book Microsoft Power Platform: A Deep Dive. As a Power Platform developer, she has built various tools with Power Apps and Power Automate, and she makes Microsoft 365 videos for YouTube.