
A few months ago, I worked on a simple HR leave tracking app for a client who had one problem I see all the time. Their team had clean employee data sitting in Excel, but they wanted to use that data inside a Canvas app without rebuilding everything manually.
That is exactly where a Power Apps collection from Excel makes sense. You can pull Excel table data into the app, store it in memory as a collection, shape it the way you want, and then use it in galleries, forms, dropdowns, or even push it later into a SharePoint list or another data source.
In this guide, I’ll show you the complete step-by-step process, the formulas that matter, the mistakes to avoid, and the practical way I set this up in real projects.
Why Create a Power Apps Collection from Excel?
If you’re new to this, a collection in Power Apps is an in-memory table that your app can use during the session. It is great when you want temporary working data, faster app interaction, or a staging layer before saving records to something more permanent like a SharePoint list.
In real projects, I use this pattern when teams already maintain source data in Excel. For example, HR may keep employee master data in a workbook, and the app only needs that data to populate dropdowns, galleries, or temporary edits before submitting approved records.
If you need a broader foundation first, this fits nicely with the patterns covered in Power Apps tutorials and also works well when you later combine it with a Power Apps collection complete guide.
Pro Tip: In my experience, Excel works well for starter apps and admin-managed datasets, but I never treat it like a true multi-user transactional database. If the app will grow, I plan the move early to SharePoint or Dataverse.
When this approach works best
A Power Apps collection from Excel is best when:
- You already have structured data in Excel.
- The file changes occasionally, not every second.
- You want to shape, rename, sort, or filter the data before using it.
- You are building a Canvas app, not a Model-driven app.
- You need a quick business solution without creating a full backend first.
This is not the best choice if many users will edit the same workbook at the same time, or if you need row-level security, relational data, and enterprise governance. In those cases, I usually recommend Dataverse or a properly designed SharePoint list.
Set up the Excel file correctly
This is the part many beginners rush through, and it causes most of the issues later. Before you open Power Apps, clean the Excel file first.
For this walkthrough, I’ll use one example the whole way through: an HR Leave Request helper app for a 200-employee company. The HR team keeps an Excel file with columns like EmployeeID, EmployeeName, Department, ManagerEmail, LeaveType, and Balance.
Use an Excel table, not a raw range
Your data must be formatted as a proper Excel table. Open the workbook, select the data, and choose Format as Table in Excel. Then give the table a clean name such as tblEmployees.
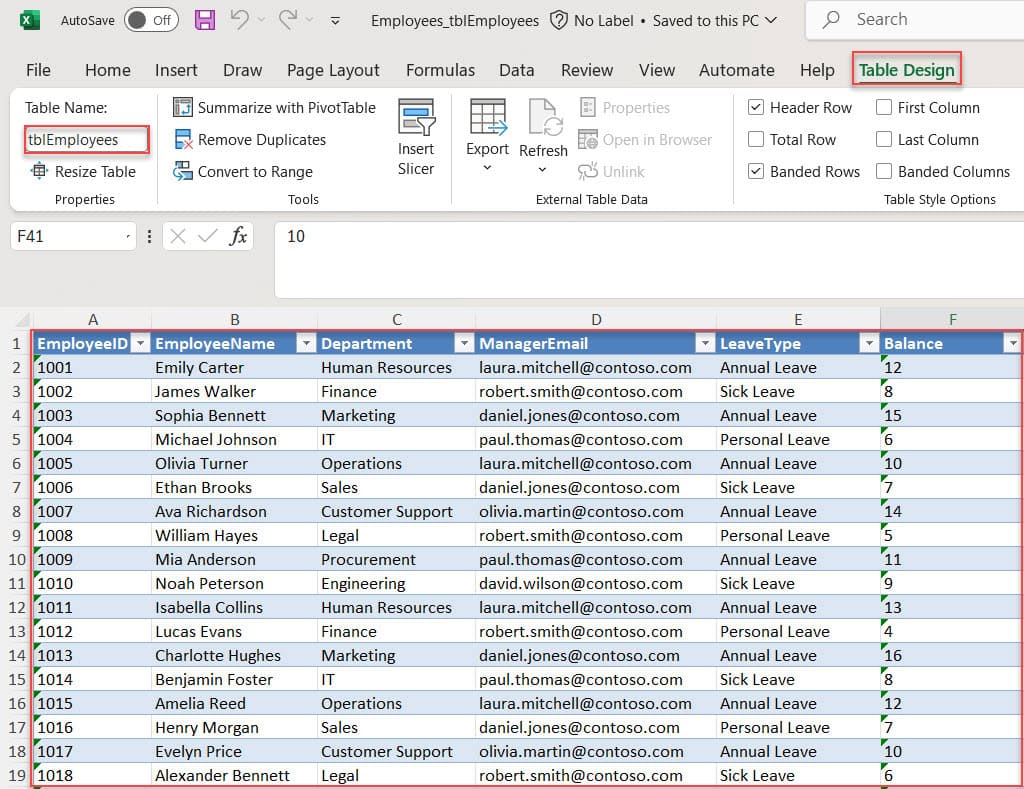
This matters because Power Apps connects to the table object, not just random cells. If you skip this, your data source may not appear correctly when you connect the workbook.
Keep column names simple
I strongly recommend using clean column names like:
- EmployeeID
- EmployeeName
- Department
- ManagerEmail
- LeaveBalance
Avoid spaces, special characters, and inconsistent naming. Yes, Power Apps can still read messy names, but your formulas become harder to read and maintain.
Store the file in OneDrive or SharePoint
For cloud-based connections, the Excel file should usually live in OneDrive for Business or a SharePoint document library. That makes it much easier for Excel Online (Business) to connect from Power Apps.
If your app later needs stronger data handling, this is often the point where I also suggest moving beyond Excel and using a SharePoint list-based app approach with proper create and update logic.
Pro Tip: I’ve found that file structure matters more than makers expect. A clean table with six good columns will save you more time than any fancy formula later.
Create the Power Apps Canvas app and Connect Excel
Follow the steps below!
Step 1: Create a blank Canvas app
Go to Power Apps, create a new Canvas app, and choose a tablet or phone layout based on your scenario. For an HR app with lists and forms, I usually start with a tablet because it gives more room for a Gallery, a details section, and action buttons.
If you’re still getting comfortable with screen structure, it helps to review broader app-building patterns from the main Power Apps tutorials hub.
Step 2: Add the Excel data source
In the app:
- Open Data.
- Choose Add data.
- Search for Excel Online (Business).
- Select your connection.
- Browse to the workbook in OneDrive or SharePoint.
- Select the table, for example
tblEmployees.
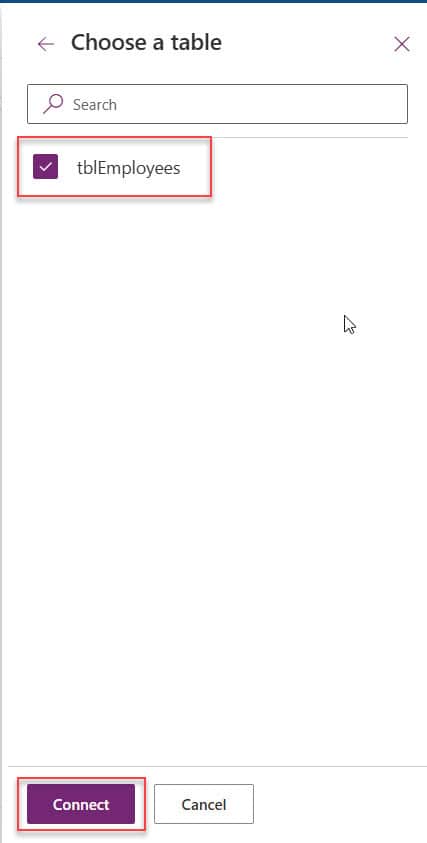
Once connected, the table appears as a data source in your app.
Step 3: Create the collection
Now add a Button control and set its Text property to something like Load Employee Data.
Use this formula in the button’s OnSelect property:
ClearCollect(colEmployees, tblEmployees)
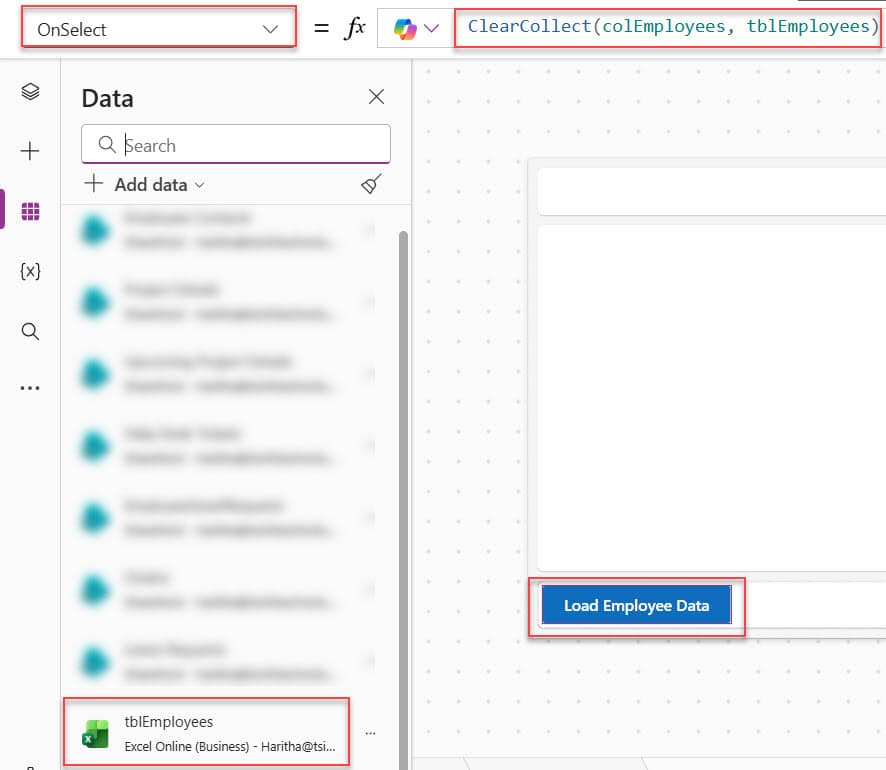
Here is what this does in plain language:
- ClearCollect clears the old collection first.
- Then it loads fresh records from the Excel table.
colEmployeesbecomes your in-app working table.
I prefer ClearCollect over Collect in most practical app setups because it prevents duplicate rows when users click the button more than once.
If you want the collection to load automatically when the app opens, you can place the same formula in App.OnStart or in the OnVisible property of the first screen. That pattern works especially well alongside other logic patterns like how to create a collection on app OnStart in Power Apps.
Pro Tip: I usually do not load large Excel datasets on every screen visit. I load once, then refresh only when the user actually needs fresh data.
Show the Excel Collection in the Power Apps app
Once the collection exists, you can use it exactly like a table inside the app.
Use a Gallery to display rows
Insert a Vertical Gallery and set its Items property to:
colEmployees
Inside the gallery, add labels such as:
- ThisItem.EmployeeName
- ThisItem.Department
- ThisItem.ManagerEmail
This gives you a quick employee list view for the HR team.
Count the number of imported records
Add a Label control and use this formula in the Text property:
"Employees loaded: " & CountRows(colEmployees)
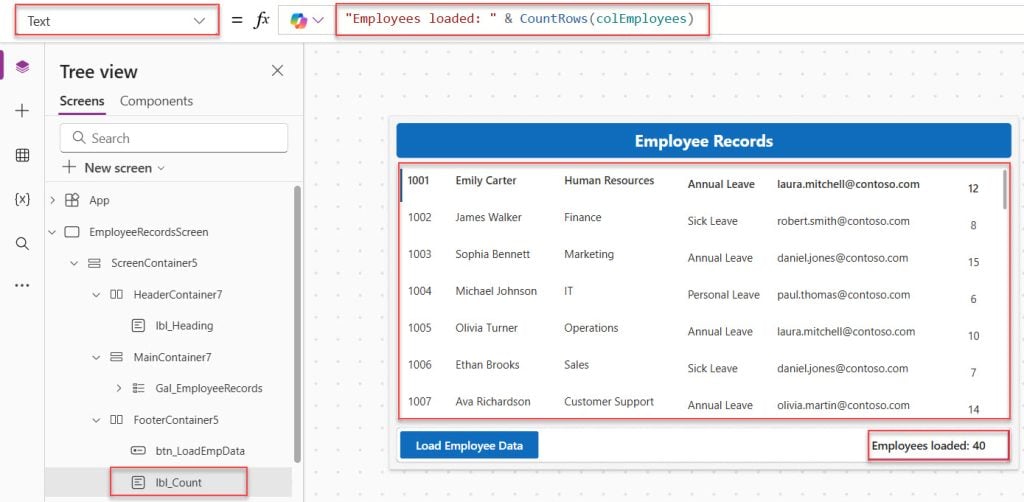
This is a simple way to confirm the collection loaded successfully. I often add this during development because it tells me immediately if the app pulled 0 rows, 20 rows, or 500 rows.
Filter the collection for business use
Let’s say HR only wants to see employees from the Finance department. A second gallery or filtered view can use:
Filter(colEmployees, Department = "Finance")
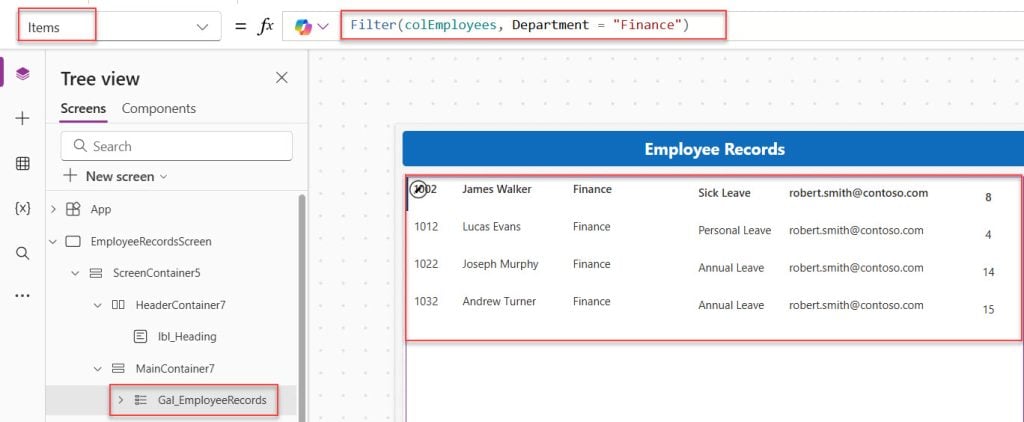
That is one reason collections are useful. You can shape and reuse them without repeatedly hitting the original source. If you build interactive screens often, this fits naturally with gallery filtering patterns from the Power Apps tutorials hub.
Power Apps Clean and Shape the collection
This is where real project work starts. In client apps, I almost never stop at ClearCollect(colEmployees, tblEmployees). I usually clean the data so the app stays readable and predictable.
Rename columns for cleaner formulas
If your Excel columns are messy, rename them while collecting:
ClearCollect(
    colEmployees,
    RenameColumns(
        tblEmployees,EmployeeName, 'Emp Name',
        ManagerEmail, 'Mgr Email'
    )
)
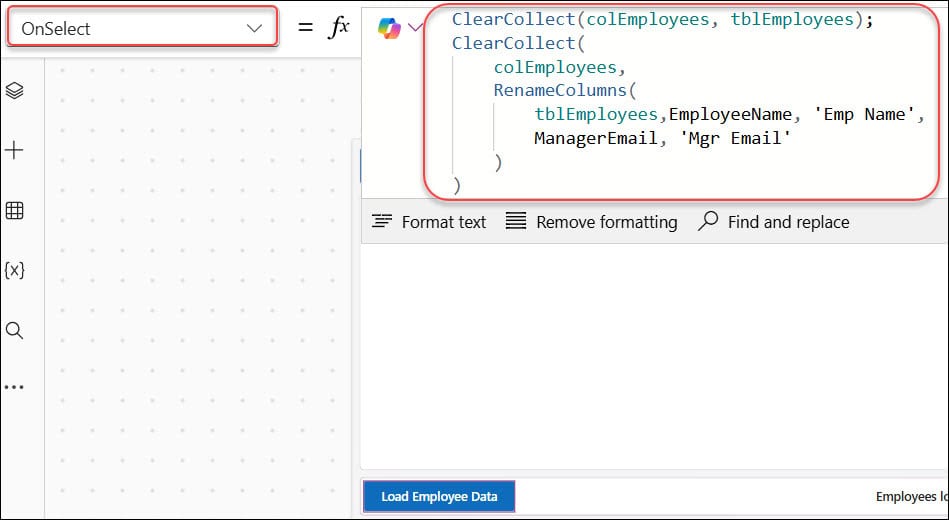
Now your formulas look cleaner. Instead of writing ThisItem.'Employee Name', you can use ThisItem.EmpName.
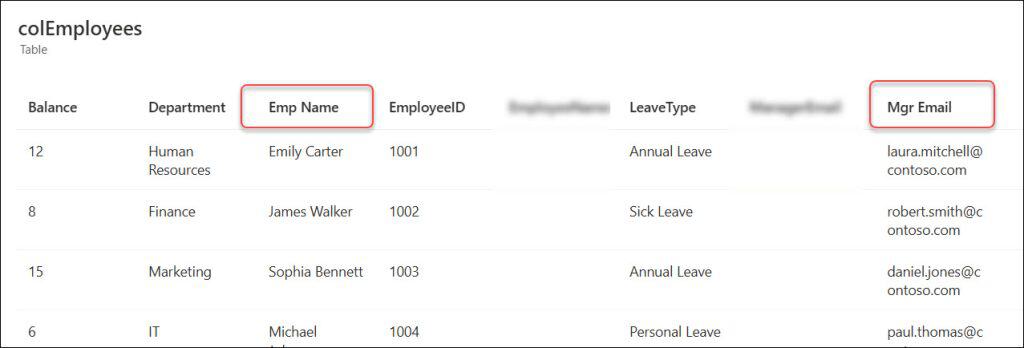
This is especially helpful when Excel files come from business users who do not think in app-friendly naming conventions.
Remove columns you do not need
If the workbook has 20 columns but your app only needs 6, trim it early:
ClearCollect(
    colEmployees,
    ShowColumns(
        tblEmployees,
        "EmployeeID",
        "EmployeeName",
        "Department",
        "ManagerEmail",
        "LeaveType",
        "LeaveBalance"
    )
)
This makes the collection lighter and your app easier to maintain. In performance tuning, reducing unnecessary columns is one of the first things I do.
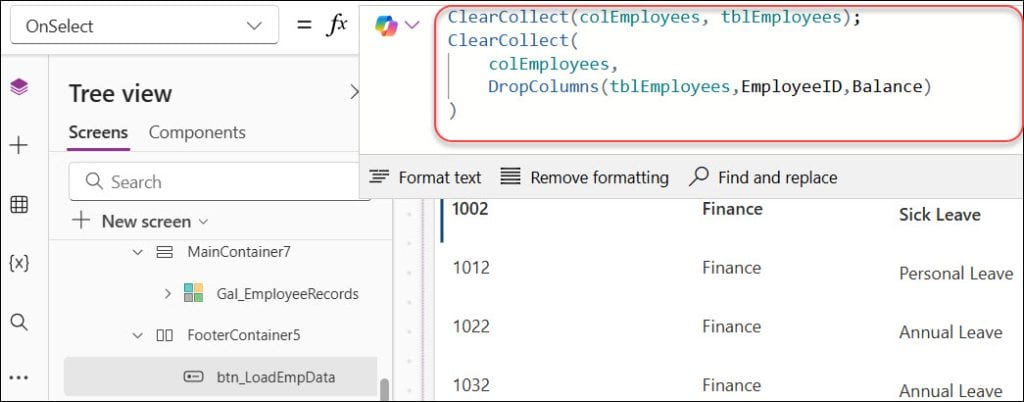
You can also drop specific columns:
ClearCollect(
    colEmployees,
    DropColumns(tblEmployees,EmployeeID,Balance)
)
Add calculated columns in Power Apps Collection
You can enrich the collection during import. For example, if HR wants to classify employees by balance status:
ClearCollect(
    colEmployeesStatus,
    AddColumns(
        tblEmployees,
        BalanceStatus,
        If(Balance < 5, "Low", "Available")
    )
)
Now the app can display a warning tag inside the Gallery without recalculating it in multiple controls.
Pro Tip: I’ve found that shaping the collection once up front keeps the rest of the app much cleaner. When formulas are repeated across ten controls, maintenance gets messy fast.
Sort and search the collection
A collection becomes much more useful when users can quickly find records.
Sort by one column
If you want to sort employees by balance:
ClearCollect(
    colEmployeesSorted,
    Sort(colEmployees, LeaveBalance, Descending)
)
This creates another collection, though in many apps I sort directly in a gallery instead:
Sort(colEmployees, LeaveBalance, Descending)
Sort by multiple columns
If HR wants department first and then employee name:
SortByColumns(
    colEmployees,
    "Department", Ascending,
    "EmployeeName", Ascending
)
This works well in the Items property of a Gallery or Data table.
Search inside the collection
For a search box named txtSearch, use:
Filter(
    colEmployees,
    StartsWith(EmployeeName, txtSearch.Text)
)
This keeps the experience simple and fast for smaller datasets. It is one of those patterns I use all the time in admin and lookup screens.
If you need more advanced screen behavior, pair this with practical UI patterns like Power Apps gallery filter examples or Power Apps combo box control ideas from related tutorials.
Use Power Apps collection in a real app flow
Let’s bring this back to the HR example. The collection is not the final goal. It supports the actual business process.
The HR app can load the employee Excel table into colEmployees, show employees in a Gallery, let the user select one employee, and prefill a leave request form. A label could show the person’s current leave balance, and a dropdown could display leave types.
For example, when a manager selects an employee, you can display a role label with:
If(User().Email = ThisItem.ManagerEmail, "Manager", "Employee")
And if you later save a request to a SharePoint list, you might use:
Patch(
    LeaveRequests,
    Defaults(LeaveRequests),
    {
        Title: ThisItem.EmployeeName,
        EmployeeID: ThisItem.EmployeeID,
        Department: ThisItem.Department,
        ManagerEmail: ThisItem.ManagerEmail,
        LeaveType: ddLeaveType.Selected.Value,
        RequestDate: Today()
    }
)
That is a common real-world pattern. Excel gives you source data, the collection gives you in-app flexibility, and Patch writes approved records to the actual tracking list.
If you want to go deeper on writing data, this connects well with topics like Power Apps CRUD operations complete guide, how to update a SharePoint list item using the Patch function, and broader Power Automate approval flow follow-up scenarios.
Power Apps ClearCollect vs Collect in this scenario
This question comes up often, and it matters.
Use Collect when:
- You want to append new records.
- You intentionally want to keep existing rows.
- You are building the collection in stages.
Example:
Collect(colEmployees, tblEmployees)
Use ClearCollect when:
- You want a fresh copy every time.
- You do not want duplicates.
- You are refreshing app data from Excel.
Example:
ClearCollect(colEmployees, tblEmployees)
For an Excel import scenario, I almost always use ClearCollect first. It is safer for beginners and cleaner for support later.
Things to Keep in Mind
- Excel must be a table — A normal range is not enough. Format the dataset as a proper Excel table before connecting it.
- Use ClearCollect for reloads — This avoids duplicate records when users press the same load button multiple times.
- Watch data size — Large Excel tables can slow the app. Collections are useful, but loading too many rows still affects startup time.
- Keep names app-friendly — Clean column names reduce formula errors and make controls like Gallery and Form easier to configure.
- Do not treat Excel like Dataverse — Excel is fine for simple app scenarios, but not ideal for high-concurrency business apps.
- Plan the next step early — If the app will need approvals, item updates, or role-based tracking, move the final process to a SharePoint list or Dataverse.
Frequently Asked Questions
How do I create a Power Apps collection from Excel?
First, format the Excel data as a table and store the workbook in OneDrive for Business or SharePoint. Then connect the table in a Canvas app and use a formula like ClearCollect(colData, tblEmployees).
Why is my Excel table not showing in Power Apps?
Most of the time, the data is not formatted as a proper Excel table. I also check whether the file is stored in the right cloud location and whether the connection is using Excel Online (Business).
Should I use Collect or ClearCollect for Excel data?
For most import and refresh scenarios, use ClearCollect. It reloads the data cleanly and prevents duplicate rows inside the collection.
Can I edit the collection after importing from Excel?
Yes. You can filter it, sort it, rename columns, add columns, and even patch selected data into another source. That is one of the main advantages of using a collection as a working layer.
Is Excel a good long-term data source for Power Apps?
It works for lightweight solutions, admin-maintained datasets, and proofs of concept. For larger production apps with many users, I usually move to SharePoint or Dataverse.
Can I save collection data from Excel into SharePoint?
Yes, that is a common pattern. You can load Excel into a collection and then use Patch or ForAll to create records in a SharePoint list when needed.
Conclusion
You now know how to prepare the Excel file, connect it to a Canvas app, create a working collection, and shape that data for real business use. My preferred approach is simple: use Excel as the starting point, use a clean collection for app logic, and move important business transactions into SharePoint or Dataverse as the app matures. I hope you found this article helpful.
You may also like:
- Display Date Without Time in Power Apps
- Power Apps GroupBy Function
- Power Apps Named Formulas
- Power Apps Dropdown Control With SharePoint
- Filter Data By Current User in Power Apps

I have worked with Microsoft technologies for more than 18 years, including SharePoint, Microsoft 365 and the Power Platform (Power Apps, Power Automate and Power BI), at companies like HP, TCS and KPIT. I started EnjoySharePoint in 2011 to share the solutions I build in real projects with readers in the United States, Canada, the United Kingdom, Australia, New Zealand and beyond. Microsoft has recognised this work with the Microsoft MVP award 13 times since 2014.