
Your Power Automate flow is ready: it creates a SharePoint list item, sends an approval, maybe even posts to Teams. Everything works in testing, until you realize one thing: you don’t reliably have the user’s email address. Sometimes you need the person who triggered the flow, sometimes the creator of a list item, sometimes the current Power Apps user.
I’ve seen this across a lot of real projects: HR leave approvals, employee onboarding, ticketing systems, expense approvals. The flow logic is fine, but without the correct email address, your notification emails, approval workflow, or reminders end up going to the wrong person (or no one at all).
In this guide, I’ll walk you through practical, step-by-step ways to get a user email address in Power Automate, depending on where the trigger comes from and where your data lives.
Choose the Right Way to Get the User Email
There isn’t a single “best” way to get a user email address in Power Automate. It depends on:
- How the flow is triggered (manual, When an item is created, Power Apps, scheduled).
- Whether the email is already stored in your data source (SharePoint list, Excel, Dataverse).
- Whether you need the current user, item creator, or someone else (like a manager).
Broadly, you can get user email from:
- The trigger itself (for example, from a SharePoint item or manual trigger).
- A SharePoint column that holds email or person data.
- A Power Apps parameter.
- Office 365 Users or similar connectors once you have an ID or UPN.
If your process is list-based and involves approvals, you might also want to look at patterns like Power Automate multilevel approvals and Power Automate approval reminder, which rely heavily on accurately resolving user emails.
Pro Tip: I always try to store email addresses (or at least person fields) in the source data (SharePoint, Dataverse) so downstream flows just read them instead of trying to calculate them every time.
Get User Email Address in Power Automate
Now I’ll tell you how to get a user’s email address in Power Automate, with different methods you can use based on your requirements.
Method 1: Get User Email from a SharePoint List Item using Power Automate
This is the most common pattern I see: a SharePoint list drives the process, and every new item triggers a flow.
You have a SharePoint list called Leave Requests with a person column called Employee that stores the requester. Each time an item is created, you want to send emails to that employee.
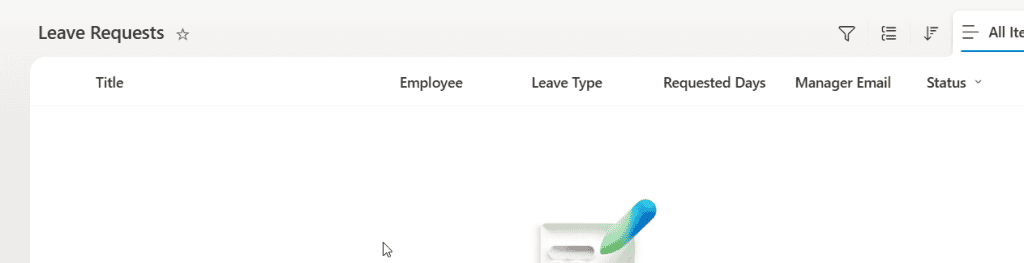
You use an Automated cloud flow with the trigger When an item is created (SharePoint).
Step 1: Make sure the column type is correct
In SharePoint:
- Create a column called
Employee. - Set its type to Person or Group.
- Limit to people only (no groups) if you want one clear email per item.
- Optional: add
Manageras another Person column if you need the manager’s email too.
Proper SharePoint list design upfront saves time later.
Step 2: Read the email from the person field in the flow
Once you have the trigger:
- Trigger: When an item is created.
- The dynamic content for
Employeewill expose several sub-properties:- Employee Email
- Employee DisplayName
- Employee Claims
In most cases, Employee Email is what you need.
In your Send an email (V2) action:
- To: use Employee Email from dynamic content.
You can also store that email in another field or use it in conditions. For example, in a Condition action:
if(equals(triggerBody()?['Employee/Email'], '[email protected]'), 'HR', 'Employee')
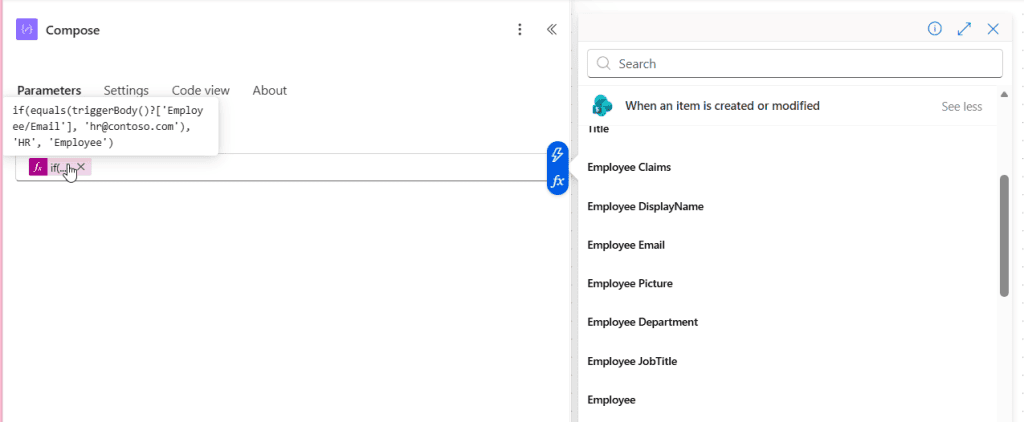
This checks if the requester is from HR and branches accordingly. The pattern is similar to the one used when checking if a string is empty in Power Automate, just applied to an email field.
Pro Tip: In my experience, using Person or Group columns is more reliable than storing raw email as simple text. You get email, name, and claims in one place and it’s easier to maintain in the long run.
If you want to build views or filters based on these users (for example, show only “My requests”), knowing how to filter data by current user in Power Apps is handy.
Method 2: Get User Email from Power Apps (Current User)
If you trigger a flow from Power Apps, you may want the current Power Apps user’s email (the person using the app).
You have a canvas app where employees submit requests. A button runs a Power Automate flow to create items, send emails, and perform other automation. You want to pass the current user’s email to the flow.
Step 1: Get the user email in Power Apps
In Power Apps, you can get current user information using the User() function. For example:
User().Email
There is also a detailed walkthrough on get current user information in Power Apps if you want to capture more properties like Full Name or Image.
Step 2: Pass the email as a parameter to the flow
Assume your flow is named PA – Create Request. You can call it from a button like this:
'PA - Create Request'.Run(
    User().Email,
    txtRequestTitle.Text,
    txtDescription.Text
)
In the flow:
- Trigger: Power Apps (V2).
- Add input parameters: RequesterEmail, Title, Description.
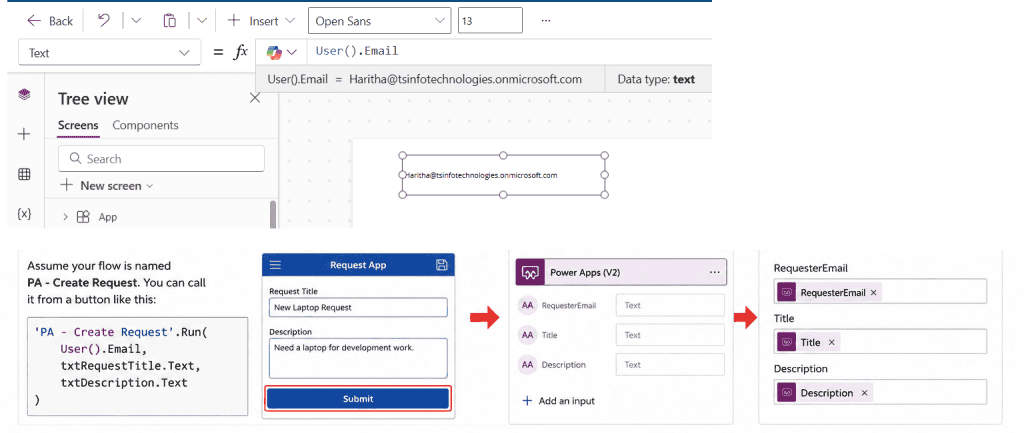
Now you can use RequesterEmail directly in any Send an email, Create item, or other actions.
This is the same pattern used when you send table reports from Power Apps email using Power Automate, where the app passes data into the flow.
Pro Tip: I prefer passing the user email explicitly from Power Apps instead of recomputing it inside the flow. It keeps the flow simpler and more reusable.
If your app needs to show user-specific data or validate login, patterns such as create login page in Power Apps and Power Apps filter data by current user are worth exploring too.
Method 3: Get User Email from the Flow Trigger or Run Context in Power Automate
Sometimes you trigger flows manually (button in Power Automate portal) or via scheduled flows, and you want the email of the person who started the flow.
You have an Instant cloud flow with a Manually trigger a flow trigger. You want to send an email back to the person who started it or record their email in a SharePoint list.
Using dynamic content: Trigger user email
For many triggers (especially When an HTTP request is received or Manually trigger a flow), there is limited user info. However, you can still access the owner or run connections in some cases via:
- Workflow() or triggerOutputs() expressions.
- Or you rely on input parameters for email, same as the Power Apps pattern.
Realistically, for manual triggers, I recommend asking the user to pick themselves using an input:
- Add an input Email (text) or User (if supported).
- The person enters or selects their email when triggering the flow.
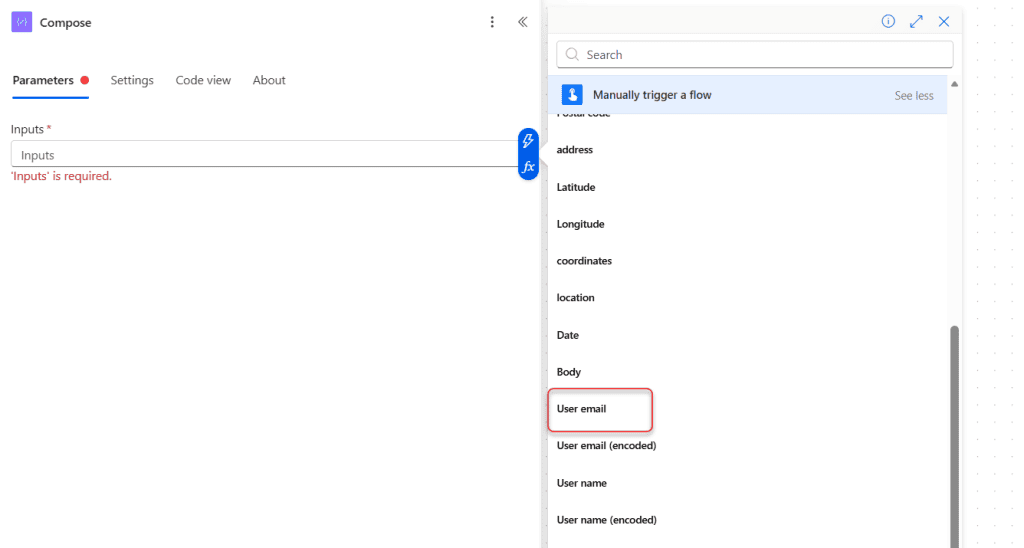
Then use that value as the email in your logic.
Use SharePoint Created By or Modified By
If your flow is triggered by When an item is created or When an item is modified, but you don’t have a dedicated Employee column, you can still use:
- Created By Email
- Modified By Email
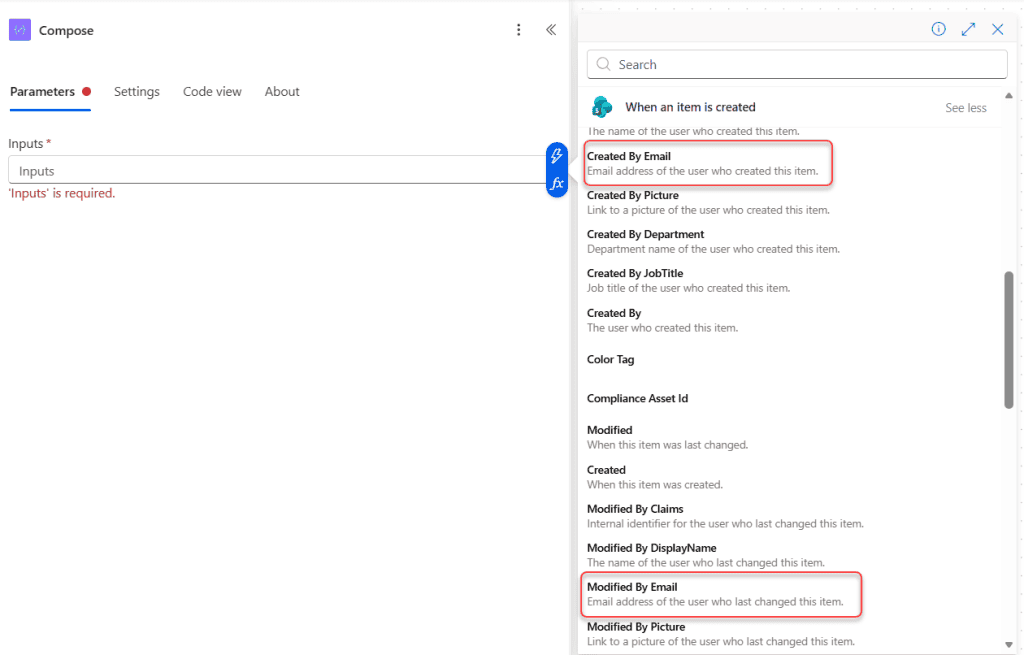
These are available as dynamic fields in the trigger.
In a Send an email (V2) action:
- To: Created By Email.
This is a simple way to avoid extra columns if the creator is always the target.
Pro Tip: In my experience, relying solely on
Created Byworks well for simple solutions but becomes limiting once you have delegated submissions or service accounts. In more complex flows, I always switch to explicit person columns.
If you are working with complex list structures or calendar views, patterns like SharePoint list calendar view and create list view in SharePoint Online can help you organize user-related items.
Method 4: Get User Email Using Office 365 Users (From ID or Name)
Sometimes you only have a display name, ID, or user principal name (UPN) and you want to resolve the email properly. For that, you can use an identity connector such as Office 365 Users.
You have a SharePoint list with text fields holding employee IDs. You want to use those IDs to find the user and send them emails from Power Automate.
Step 1: Get the user ID or UPN
In your flow:
- Use the trigger output or list item to get EmployeeId (text).
- It might be the UPN ([email protected]) or a custom ID.
Step 2: Use “Get user profile” style action
Add an action like Get user profile (V2) (from the identity connector) and pass the ID/UPN. Once you have the profile:
- It exposes properties like Mail, UserPrincipalName, etc.
- Use Mail as your email address.
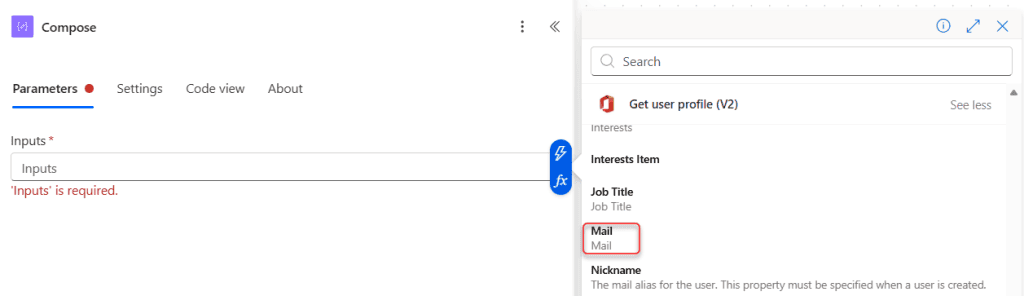
The profile data is handy if you also need display name or job title.
This pattern is very similar to how you work with Dataverse and use actions like Power Automate Dataverse upload a file or an image where you resolve a record first and then use its properties.
Pro Tip: I’ve found that UserPrincipalName and Mail are often the same in many tenants, but not always. Always test with users that have aliases or different primary SMTP addresses.
If you are building more advanced solutions that integrate with Microsoft Graph or external identity systems, watch out for mailbox-related errors like “The mailbox is either inactive, soft deleted, or is hosted on-premises” and refer to dedicated guidance for that.
Method 5: Store and Reuse User Email in SharePoint or Dataverse
For repeat interactions, I try to avoid resolving the same user over and over. Instead, I store email addresses where the business data lives, and reuse them.
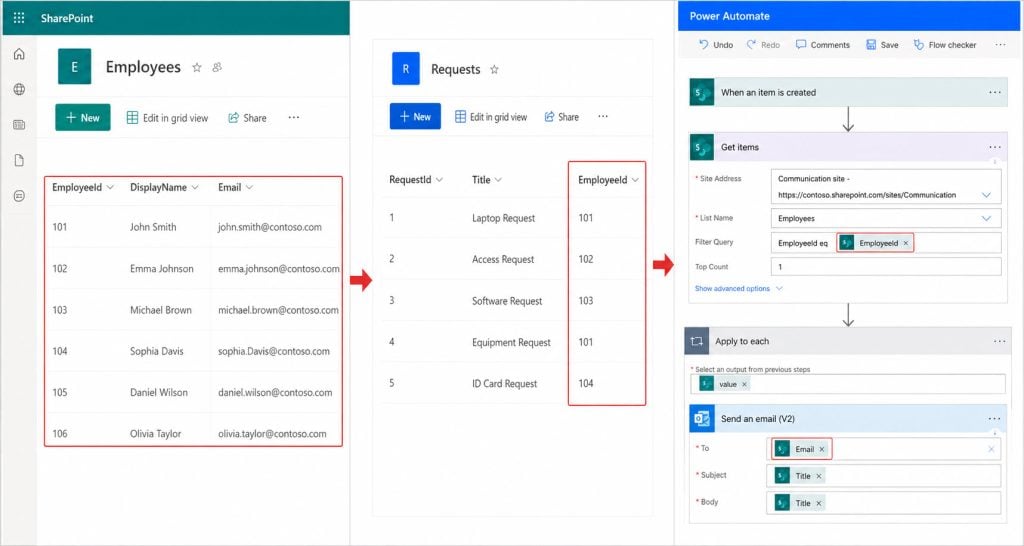
You’re building an HR Leave Management system. Each employee often submits multiple requests. Rather than looking up their email every time, you store it in an Employees list or Dataverse table and link requests to that record.
- Create a master SharePoint list or Dataverse table Employees.
- Store columns like EmployeeId, DisplayName, Email.
- In the request list, store EmployeeId instead of email directly.
- In your Power Automate flow, when a new request comes in:
- Use Get items (SharePoint) or List rows (Dataverse) to find the matching employee record.
- Use Apply to each if more than one row is possible.
- Use the Email field from that master record.
You can see similar lookup patterns in topics like loop through SharePoint list items in Power Automate and count rows in a SharePoint list using Power Automate.
Pro Tip: If you use this pattern, consider scheduled or on-demand flows to regularly sync email addresses from your HR system or Azure AD into the master list, so the data stays accurate without manual updates.
Good SharePoint list permissions and sensitivity labels for SharePoint libraries are important if you store personal data such as email addresses and employee IDs.
Things to Keep in Mind
- Prefer Person columns over text emails – Use Person or Group columns in SharePoint lists so you get email, name, and more without extra lookups.
- Pass user email from Power Apps when possible – Using
User().Emailin Power Apps and passing it to a flow keeps the logic simple and predictable. - Watch environment and connection permissions – The connection used in Power Automate must be allowed to read user profiles and list data, or email lookups will fail.
- Handle missing or invalid emails gracefully – Use Condition actions to check if an email is blank before sending, and route to a fallback address or log an error.
- Avoid hardcoding emails in flows – Store configuration like HR mailbox or admin addresses in SharePoint lists or environment variables instead of writing them directly in the flow.
- Secure lists that store personal data – Protect your employee email data with proper SharePoint permissions and avoid exposing those lists to all users.
Frequently Asked Questions
How do I get the current user email in Power Automate?
If your flow is triggered from Power Apps, use User().Email in the app and pass it as a parameter to the flow. For SharePoint-triggered flows, use a Person or Group column (like Employee) and read the Employee Email property from the trigger. Avoid trying to guess the user purely from connection or run context when a proper column can hold it.
How can I get the creator’s email address from a SharePoint item?
Use an Automated cloud flow with the trigger When an item is created. In the trigger output, you get Created By Email and Created By DisplayName fields that you can use directly in Send an email (V2) or approval actions. This works even if you don’t have a dedicated Employee column, as long as the creator is the person you want to email.
How do I pass the user email from Power Apps to a Power Automate flow?
In Power Apps, call the flow using something like ‘MyFlow’.Run(User().Email, OtherInputs…). Then in your flow’s Power Apps (V2) trigger, define a text input parameter (for example, RequesterEmail) to receive the email. You can then use that parameter everywhere in the flow, such as in Create item or Send an email actions.
How can I get user email based on employee ID in Power Automate?
Store employee information (including email) in a master SharePoint list or Dataverse table. When a flow runs, use Get items or List rows with a filter such as EmployeeId eq ‘12345’ to find the record. Then use the Email column from that record in your notifications or approvals.
Why is my Power Automate email action failing for some users?
Common reasons are missing mailboxes, wrong or outdated email addresses, or insufficient permissions for the connector. Some users might have on-premises or inactive mailboxes, leading to errors like “The mailbox is either inactive, soft deleted, or is hosted on-premise.” You should log the failing email addresses and verify them against your directory or HR system.
How do I use user emails to send reminder emails in Power Automate?
First capture the user emails (requester, approver, manager) from your triggers, person columns, or lookups and store them in your items. Then use a Scheduled cloud flow or condition-based logic to find records that need reminders, and send emails to those stored addresses using Send an email (V2). You can follow the same model shown in Power Automate send reminder emails and Power Automate approval reminder.
You’ve seen multiple practical ways to get a user email address in Power Automate, from SharePoint person fields to Power Apps parameters and user lookups. Start with the simplest pattern that matches your trigger and data source, and only add more complexity when you really need it. I hope you found this article helpful.
You may also like:
- Create Multilevel Approvals in Power Automate
- Convert Float to Integer in Power Automate
- Send Power Automate Approval Reminder
- Power Automate Filter Query If Blank
- Convert String to Float in Power Automate

Preeti Sahu is an expert in Power Apps and has over six years of experience working with SharePoint Online and the Power Platform. She is the co-author of Microsoft Power Platform: A Deep Dive book. As a Power Platform developer, she has worked on developing various tools using Power Apps and Power Automate. She also makes Microsoft 365 videos and shares them on YouTube.

