
I recently built an IT helpdesk tracker for a client, and the first version had one screen. A plain Power Apps Gallery showing every open ticket. It worked fine until the list crossed 300 rows.
The support team started scrolling forever to find their own tickets. The fix wasn’t a new screen or a fancy control.
It was filtering the gallery properly, so people could search, pick a status, and see only what mattered to them.
That’s the single most useful skill you can pick up in Power Apps. Making a Gallery respond to what the user types or selects, instead of dumping every row on the screen.
In this guide, I’ll walk you through filtering a gallery with a search box, a dropdown, multiple conditions, radio buttons, and dates. We’ll use a helpdesk ticket tracker as the running example, built on a SharePoint list.
By the end, you’ll have a Power Apps gallery that filters live as people type, and you’ll understand exactly why each formula works the way it does.
The sample SharePoint list we’ll filter
Before writing any formulas, let’s look at the actual data. Everything in this guide runs against a SharePoint list called Help Desk Tickets.
It has five columns:
Title(single line of text)Status(choice)Priority(choice)AssignedTo(person)- and
DueDate(date).
Here are six sample rows so you can see exactly what we’re filtering against:
| Title | Status | Priority | Assigned To | Due Date |
|---|---|---|---|---|
| VPN drops every morning | Open | High | Asit | 18 Sep 2026 |
| Printer offline on 3rd floor | In Progress | Low | Preeti | 23 Sep 2026 |
| Outlook not syncing | Open | Medium | Anjali | 30 Sep 2026 |
| Laptop battery replacement | Resolved | Low | Haritha | 1 Oct 2026 |
| SharePoint access request | In Progress | Medium | Preeti | 1 Oct 2026 |
| Password reset for CRM | Resolved | High | Anjali | 2 Oct 2026 |
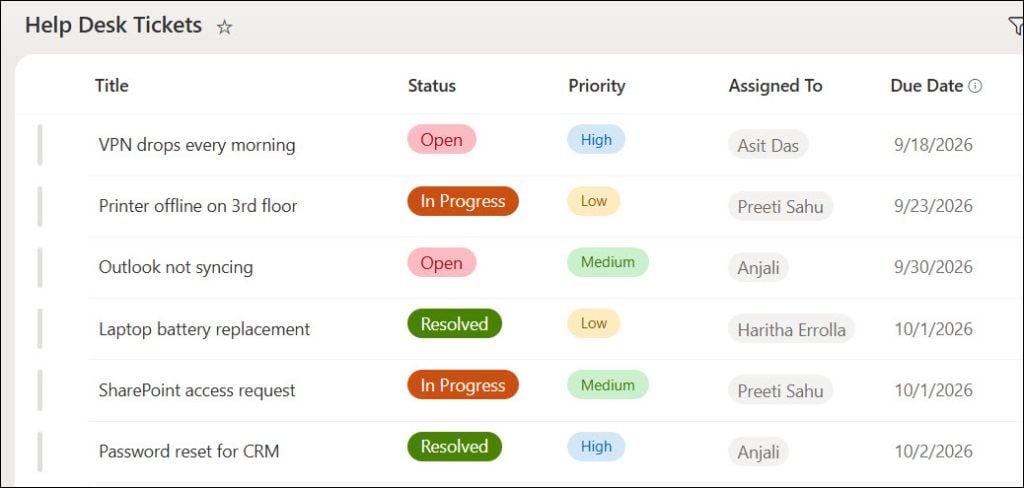
Keep this table in mind as you read. Every formula below is written to work with exactly this data shape.
If you haven’t connected a list like this to a canvas app yet, it’s worth reading how to create a canvas app in Power Apps from a SharePoint list first.
That way the rest of this tutorial makes sense in context.
What gallery filtering actually means in Power Apps
A Gallery control in a Canvas app shows a repeating set of records from a data source.
That could be a SharePoint list, a Dataverse table, or an Excel file.
By default, its Items property just points at the whole table: Items = 'Helpdesk Tickets'. That means all six rows above show up, every time.
Filtering means changing that Items property so it only returns the rows that match a condition.
You do this with the Filter() function, part of Power Fx, the formula language behind every canvas app. The basic shape looks like this:
Filter(DataSource, Condition)DataSource is your table — Helpdesk Tickets, in our example.
Condition is anything that evaluates to true or false for each row. It could be a text match, a dropdown selection, a date range, or several of these combined.
Filtering a gallery with a search box
This is the filter every app needs. Add a Text input control above your gallery — call it SearchBox.
Then set the gallery’s Items property to:
Filter('Help Desk Tickets', StartsWith(Title, SearchBox.Text))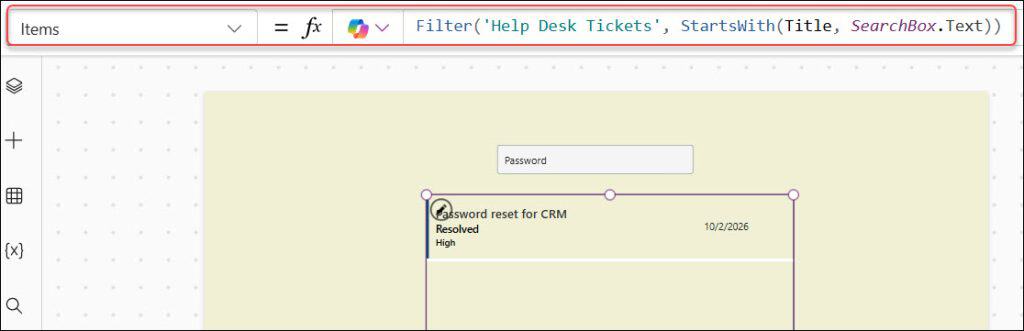
StartsWith checks whether Title begins with whatever the user has typed. Type “VPN” into the search box, and only the first row from our sample table shows.
It’s fast, and it delegates well against SharePoint. That means the filtering happens on the server, not by pulling every row down first.
If you want a “contains” search instead of “starts with,” use Search() on SharePoint data sources:
Search('Help Desk Tickets', SearchBox.Text,Title)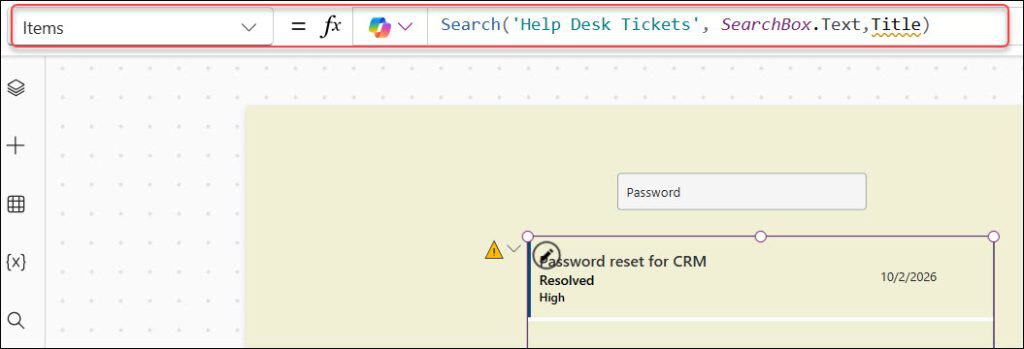
Search() was built specifically for this pattern. It works nicely across text columns.
I’ve covered it in more depth in this piece on using the Search function against a SharePoint list, including how to search multiple columns at once.
Pro tip: I’ve found that clients almost always ask for case-insensitive search without realizing that’s what they want — they just say “it’s not finding my ticket.”
StartsWithandSearchare already case-insensitive on SharePoint. If you’re filtering a local collection instead, wrap your comparison inLower()on both sides, or useIsMatchfor pattern-based matching.
Filtering by a dropdown (single condition)
Add a Dropdown control named StatusDropdown.
Populate its Items with ["Open", "In Progress", "Resolved"] — those are the exact three values from our Status column. Then filter:
Filter('Help Desk Tickets', Status.Value = StatusDropdown.Selected.Value)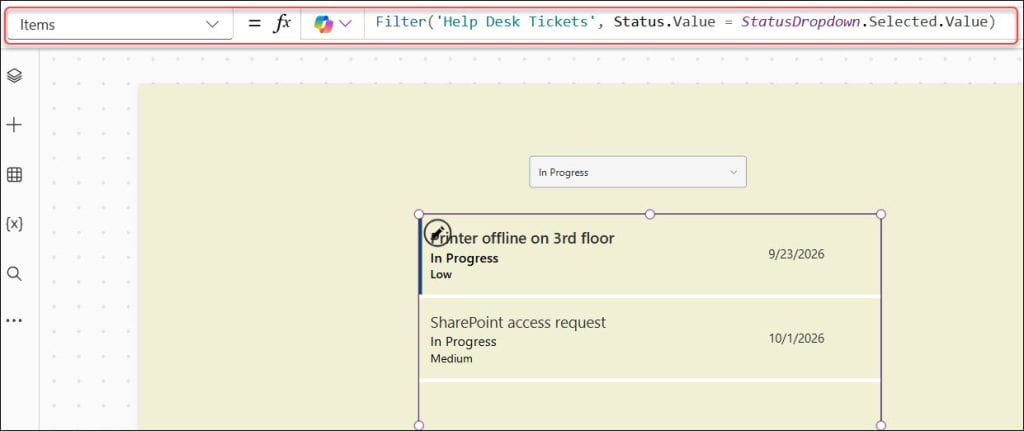
Notice .Value on both sides. SharePoint choice columns return a record, not plain text, so you have to compare the Value field specifically.
This trips up a lot of beginners. It’s exactly why I wrote a separate guide on filtering a SharePoint choice field within Power Apps if you want the full breakdown.
If you’d rather use a Combo box instead of a plain dropdown, the pattern is nearly identical.
That’s useful when you want multi-select or search-as-you-type. See filtering a gallery with a combo box for the exact syntax.
Combining multiple filters at once
Real apps rarely filter by just one thing. Our helpdesk tracker needs search text and status and priority, all applied together.
Chain your conditions with && (or the And() function):
Filter(
    'Help Desk Tickets',
    StartsWith(Title, SearchBox.Text) &&
    (StatusDropdown.Selected.Value = Status.Value || IsBlank(StatusDropdown.Selected)) &&
    (PriorityDropdown.Selected.Value = Priority.Value || IsBlank(PriorityDropdown.Selected))
)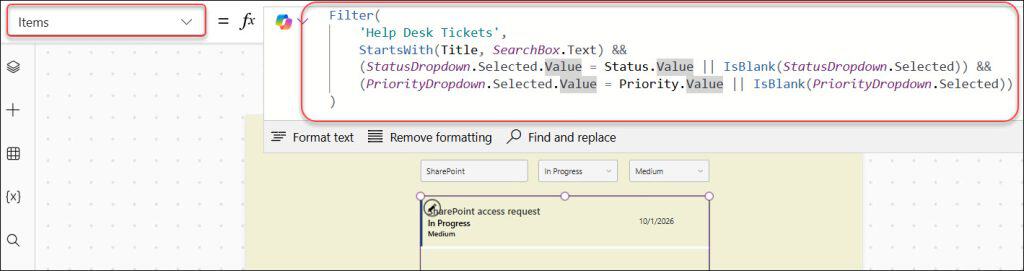
The IsBlank() checks are doing the real work here. They let each dropdown act as an optional filter.
If nobody has picked a status yet, that part of the condition just evaluates to true. It doesn’t exclude anything.
I use this pattern constantly. It’s covered in more detail in this guide on filtering a gallery with multiple dropdowns, which is worth bookmarking since almost every business app needs it eventually.
The live demo above shows exactly this idea in action. Type into the search box, then layer a status and priority filter on top, and watch the ticket cards update instantly — the same six sample rows from our table, just filtered differently each time.
My analysis of the demo: notice that when all three filters are empty, every ticket shows. That’s the same blank-check pattern from the formula above.
When you narrow it down and nothing matches, the empty state message appears instead of a blank white gallery. This is a detail I always build into client apps.
An unexplained blank screen makes people think the app is broken. In Power Apps, you’d handle that with a Label whose Visible property is CountRows(FilteredGallery.AllItems) = 0.
Filtering with radio buttons or checkboxes
For a small, fixed set of options — say, our three priority levels — radio buttons often read better on a screen than a dropdown.
Especially on mobile. The formula is the same shape:
Filter('Help Desk Tickets', Priority.Value = PriorityRadio.Selected.Value)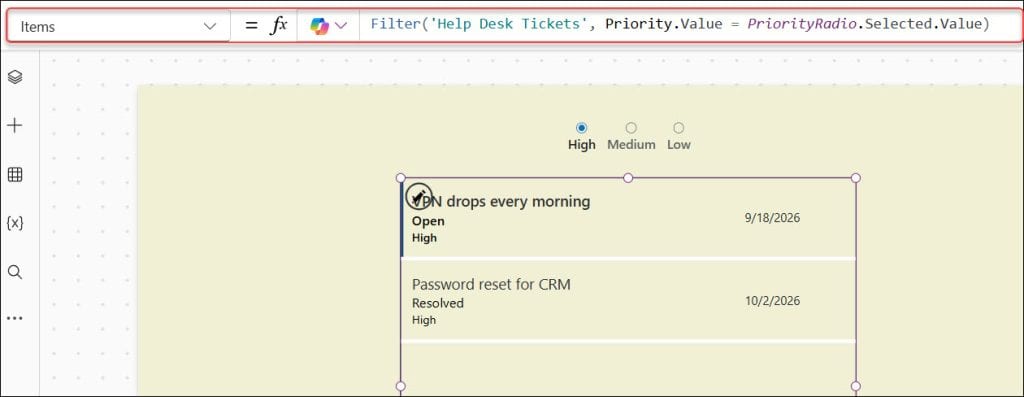
I go step by step through this exact scenario in filtering a gallery by radio button.
If your users need to select more than one option at a time — for example, “show me High and Medium priority” — a checkbox control with an in operator handles it:
Filter('Helpdesk Tickets', Priority.Value in SelectedPriorities)Here, SelectedPriorities is a collection built up as each checkbox is toggled.
Filtering by date range
Our ticket tracker also has a DueDate column, as you saw in the sample table. Add two Date Picker controls, StartDate and EndDate.
Then filter like this:
Filter(
    'Help Desk Tickets',
    DueDate >= StartDate.SelectedDate && DueDate <= EndDate.SelectedDate
)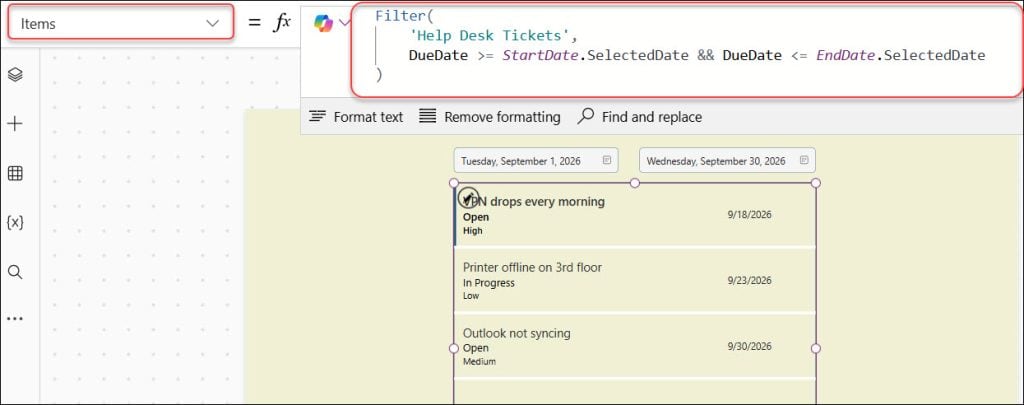
This is one of the more common filters I get asked to build. “Show me everything due this week,” or “everything due this month.”
If you want ready-made patterns for those specific windows instead of a manual date picker, I’ve written dedicated guides. Check out filtering by week, filtering by month, and filtering by quarter.
Each uses WeekNum(), Month(), or a rolling date calculation instead of manual pickers.
Pro tip: In my experience, date filters are where delegation warnings show up most often on SharePoint. A plain
>=and<=on a date column delegates fine. Wrapping it in functions likeDateValue()on a text column usually doesn’t. Keep your date column as an actual Date type in SharePoint, not text, and this mostly stays out of your way.
Understanding delegation warnings when filtering
If your SharePoint list or Dataverse table has more than 500 rows (the default, adjustable up to 2,000), Power Apps warns you.
You’ll see a blue underline under part of your formula when a function can’t be delegated. Delegation means Power Apps asks the data source to do the filtering itself, on the server.
Instead of pulling data into the app first. Filter(), StartsWith(), and basic comparisons (=, >, <) delegate well on SharePoint.
Functions like Sort() on certain columns, or nested Filter() calls with Or() across mismatched column types, sometimes don’t.
When a formula isn’t delegable, Power Apps only filters within the first batch of records it already downloaded. That means your users might not see a ticket that genuinely matches their search.
Simply because it wasn’t in that first batch. I always test this by adding a temporary label showing CountRows('Helpdesk Tickets') versus CountRows(FilteredGallery.AllItems) while building.
That way I catch quietly-broken filters before a client does. For the full list of what delegates and what doesn’t, read this breakdown of Power Apps delegation warnings.
It’s one of those things that looks fine in testing with six rows and breaks silently at 4,000.
A few things to watch out for
- Delegation limits bite at scale. A filter that works perfectly with your sample rows can silently drop results once a SharePoint list grows past 2,000 items. Test with realistic data volume, not just a handful of sample rows.
- Choice columns need
.Value. Comparing a SharePoint choice or person column directly to text almost always fails or throws an error — always drill into.Value(or.DisplayNamefor person columns). - Reset your filters cleanly. When a user clears a search box or dropdown, make sure your formula treats that as “no filter,” not as “filter for blank” — the
IsBlank()pattern from earlier handles this correctly. - Don’t overload one gallery with every possible filter. I’ve seen apps with six dropdowns stacked above a gallery, and it overwhelms people. Group less-used filters behind a collapsible panel or a separate filter screen.
- Set control
Display Modewhile filters run. Disabling inputs briefly during a slow network call, using Display Mode, avoids users double-typing or triggering duplicate filter passes. - Filter by the current user where relevant. If each person should only see their own tickets, combine your filter with
AssignedTo.Email = User().Email— full pattern in filtering data by current user.
Frequently asked questions
Why is my Power Apps gallery not filtering correctly?
The most common cause is comparing a choice or person column to plain text without using .Value or .DisplayName. The second most common cause is a delegation limit. The app is only filtering within the first 500 or 2,000 downloaded records, so matching rows outside that batch never appear.
Can I filter a gallery by more than one dropdown at the same time?
Yes. Chain your conditions with && inside a single Filter() call. Use IsBlank() checks so an unselected dropdown doesn’t exclude any rows. This is the same pattern used for combining search, status, and priority earlier.
Does Filter() work the same way on Dataverse as it does on SharePoint?
Mostly yes, but Dataverse delegates a wider range of functions than SharePoint. That includes more complex string operations and Or() conditions. If you’re deciding between the two for a new app, SharePoint is fine for lists under a few thousand rows; Dataverse scales further and delegates more reliably.
How do I clear all filters and reset the gallery in Power Apps?
Set each input control back to its default using Reset(). Or simply clear the variables/collections your filter conditions rely on with a “Clear filters” button’s OnSelect. The gallery updates automatically once the underlying Items formula re-evaluates.
Why does my search box filter every keystroke feel slow?
On large data sources, every keystroke re-runs the filter. That’s fine locally but can lag against a live SharePoint or Dataverse connection. Consider filtering a local collection instead of the live data source for instant typing, then syncing changes back periodically. See Power Apps collection filter for that pattern.
Can I highlight or auto-select the first filtered item in a gallery?
Yes. You can set the gallery’s Default property to First(FilteredGallery.AllItems) so the first matching row is selected automatically after a filter runs. I’ve written a focused walkthrough on selecting the first item in a gallery if you want that exact setup.
You may also like the following tutorials:
- Displaying data with Power Apps gallery connected to SharePoint
- Power Apps Button Control With SharePoint Examples
- Using Patch with a Power Apps gallery to save edits
- Grouping gallery items in Power Apps
- Conditional formatting examples for the Power Apps gallery
- Building a nested gallery in Power Apps
If there’s one thing I want you to take from this, it’s to build filters one at a time, not all at once. Start with a simple StartsWith search, prove it works against your real list size, then add your dropdown with .Value matching, and finally chain everything together with &&. That’s the order I follow on every project, and it’s saved me from chasing delegation bugs after the fact.
It also makes troubleshooting a lot easier down the road. When something breaks in a five-condition filter, you won’t know which piece is at fault unless you built and tested each one on its own first. Take it slow, get each control talking to your data correctly, and the rest of the app comes together a lot faster than you’d expect.

Preeti Sahu is an expert in Power Apps and has over six years of experience working with SharePoint Online and the Power Platform. She is the co-author of Microsoft Power Platform: A Deep Dive book. As a Power Platform developer, she has worked on developing various tools using Power Apps and Power Automate. She also makes Microsoft 365 videos and shares them on YouTube.

