
Need each employee to see only their own records in your Power Apps app? That is a common setup in HR, service, and operations apps, and Power Apps makes it possible by using the signed-in user details from User() and matching them to your data.
A simple business example is an Employee Asset Requests app. Each employee submits requests for a laptop, monitor, headset, or software, and you want them to see only their own requests instead of the full company list. That is clear, professional, and easy to follow in a beginner tutorial.
In this article, I’ll show you 4 ways to filter data by current user in Power Apps.
SharePoint List – Columns Used in This Power Apps App
We’ll use a SharePoint list named EmployeeAssetRequests with only the columns we actually use in formulas:
| Column name | Data type |
|---|---|
| Title | Single line of text |
| EmployeeEmail | Single line of text |
| Employee | Person or Group |
| RequestStatus | Choice |
| AssetCategory | Choice |
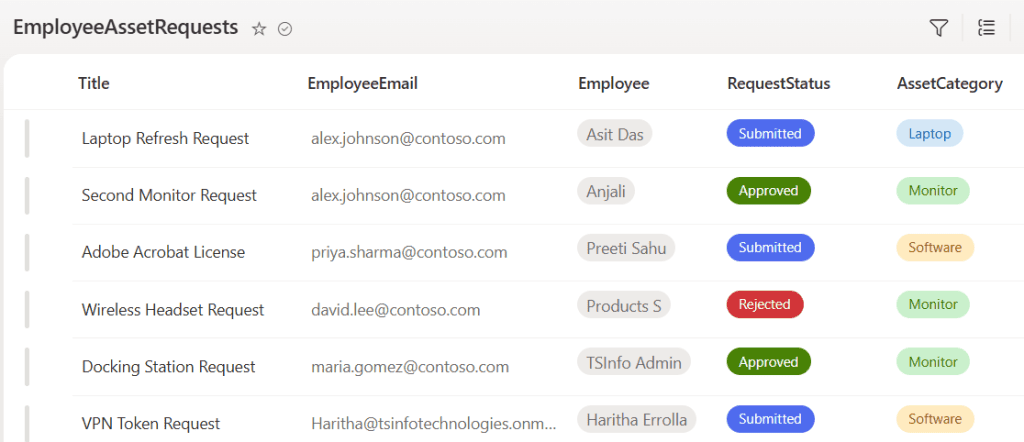
We’ll use the same list across all methods so you can see how the formulas change while the data stays consistent.
Filter Data By Current User in Power Apps
Let’s work on the 4 methods for filtering records for the current user in Power Apps.
Method 1 – Filter by Email Text Column in Power Apps
Use this when your list stores the employee email in a text column. It’s the simplest way to explain current user filtering.
Step 1: Add a Power Apps Gallery for Requests
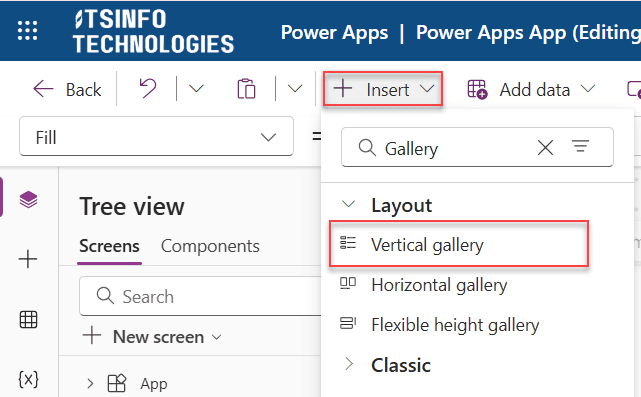
- Go to Power Apps App→ Insert → Gallery → Vertical gallery.
- Insert a modern vertical gallery onto your main screen.
Step 2: Connect the SharePoint List
- Select the gallery.
- In the right pane, set Data source to EmployeeAssetRequests.
Step 3: Filter Gallery items by EmployeeEmail
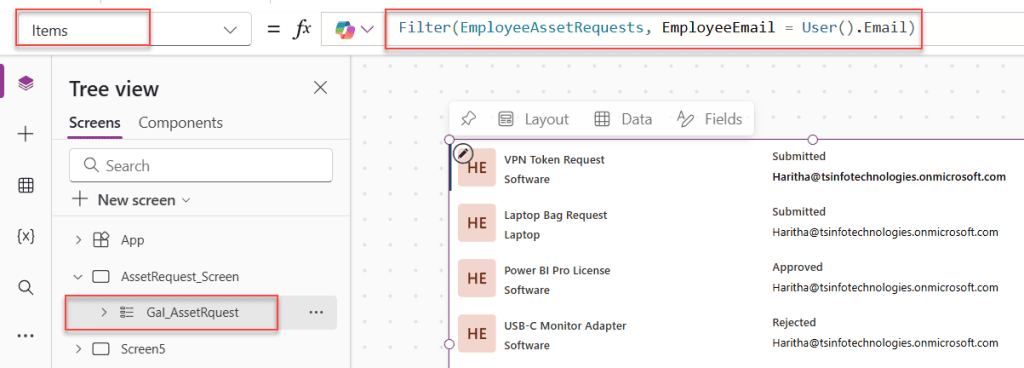
Set the gallery’s Items property to:
Filter(EmployeeAssetRequests, EmployeeEmail = User().Email)
How does this formula work?
- Filter() returns only records that match its condition.
- User().Email returns the email of the current Power Apps user.
- The gallery shows only rows where EmployeeEmail equals the signed‑in user’s email.
Step 4: Show Request Details in Power Apps Gallery
Set the labels inside the gallery:
ThisItem.Title
ThisItem.AssetCategory.Value
ThisItem.RequestStatus.Value
How does this formula work?
- ThisItem refers to the current record in the gallery.
- Title shows the request name.
- AssetCategory.Value and RequestStatus.Value show the selected choice text for category and status.
Pro Tip: This pattern is perfect for quick demos or small apps where you already have an email column and don’t need complex user objects.
Method 2 – Filter by Person Column (Employee) in Power Apps
This is more professional for production apps because you use a Person or Group column instead of plain text. It’s common for “Requested By” or “Assigned To” fields.
Step 1: Verify the Employee column in SharePoint List
In your SharePoint list:
- Confirm you have a Person or Group column named Employee.
- Set it to “People only” and “Allow only one selection”.
Step 2: Filter by Employee.Email
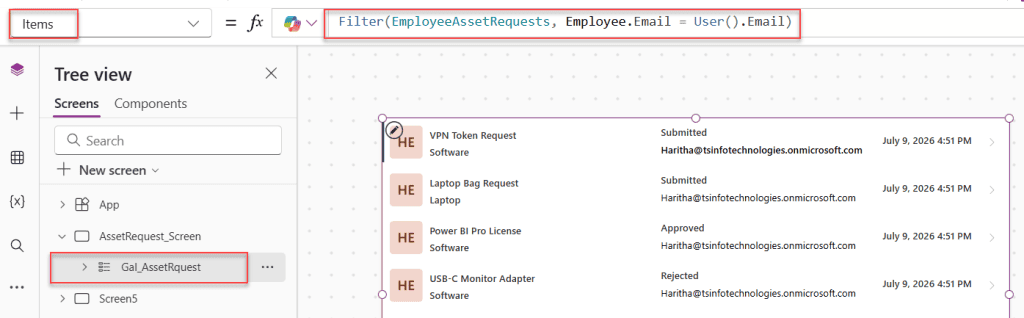
Set the gallery Items property to:
Filter(EmployeeAssetRequests, Employee.Email = User().Email)
How does this formula work?
- Employee is a person field that includes properties like Email and DisplayName.
- The formula compares Employee.Email to User().Email and returns only rows where the stored employee matches the current app user.
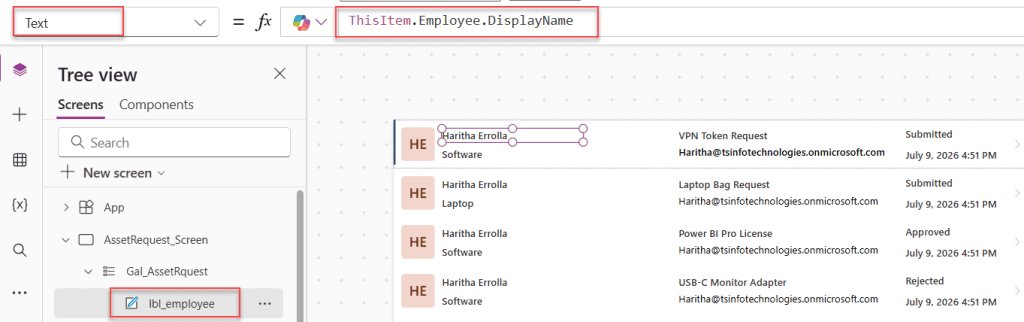
Step 3: Display the Employee Name
Add a label in the gallery and set Text to:
ThisItem.Employee.DisplayName
How does this formula work?
- Employee.DisplayName gives the friendly name of the person stored in the Employee field.
- This label confirms which employee owns each request while the filter keeps the view to “only me”.
Pro Tip: Use this pattern when your list already has an “Employee”, “Requested By”, or “Owner” person column. It keeps data consistent across SharePoint, Power Apps, and Power Automate.
Method 3 – Store the Current User Email in a Power Apps Global Variable
Use this when you need the current user email in several places: filters, forms, and labels. It avoids repeating User().Email everywhere.
Step 1: Create a Global Variable in App OnStart
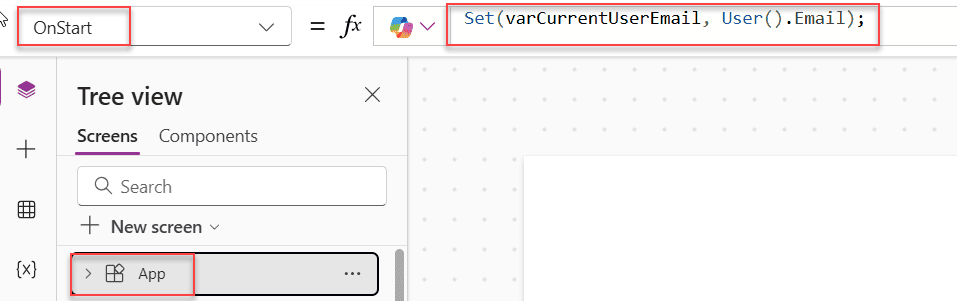
- Select App in the tree view.
- Open the OnStart property and add:
Set(varCurrentUserEmail, User().Email)
How does this formula work?
- Set() creates a global variable available across all screens.
- varCurrentUserEmail stores the current user’s email once, at app start.
Step 2: Run OnStart
- In the left navigation, select App.
- Click Run OnStart to initialize the variable.
Step 3: Filter the Power Apps Gallery Using the Variable
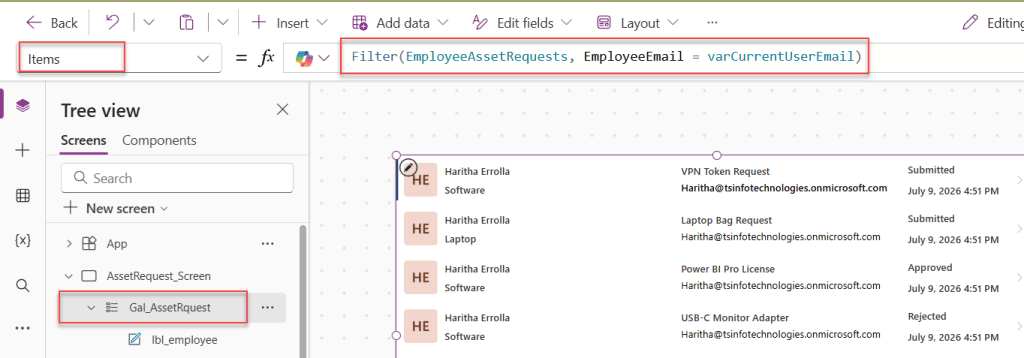
Update the gallery Items property:
Filter(EmployeeAssetRequests, EmployeeEmail = varCurrentUserEmail)
How does this formula work?
- The filter now uses varCurrentUserEmail instead of calling User().Email directly.
- The behavior is the same, but the formula is easier to read and reuse.
Step 4: Use the variable in other controls
For example, set a label Text to:
"Requests for: " & varCurrentUserEmail
How does this formula work?
- This gives a clear header showing which user the current view belongs to.
- You reuse the same variable for display and logic, keeping things consistent.
Pro Tip: Use Set() for values that truly need to be global. For screen‑specific filters, you can use local context variables, but for current-user identity it’s common to store it once as a global variable.
Method 4 – Use a Named Formula for CurrentUserRequests in Power Apps
Use this when you want a clean, reusable pattern that behaves like a “virtual data source” filtered to the current user. It’s ideal for apps with multiple screens.
Step 1: Define a named formula
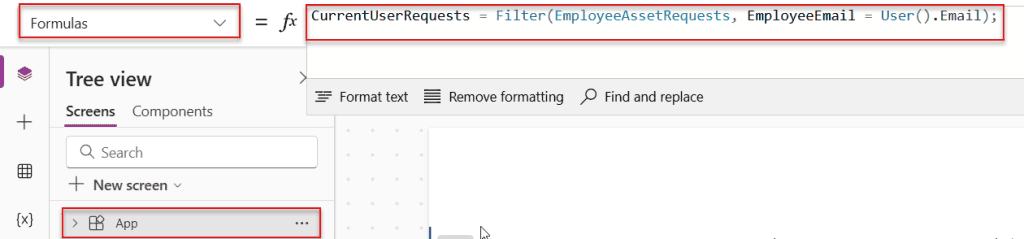
- Select App.
- Open the Formulas pane.
- Add:
CurrentUserRequests = Filter(EmployeeAssetRequests, EmployeeEmail = User().Email)
How does this formula work?
- CurrentUserRequests becomes a named formula that always returns the current user’s asset request rows.
- You can use it anywhere in the app, similar to a data source, but already filtered.
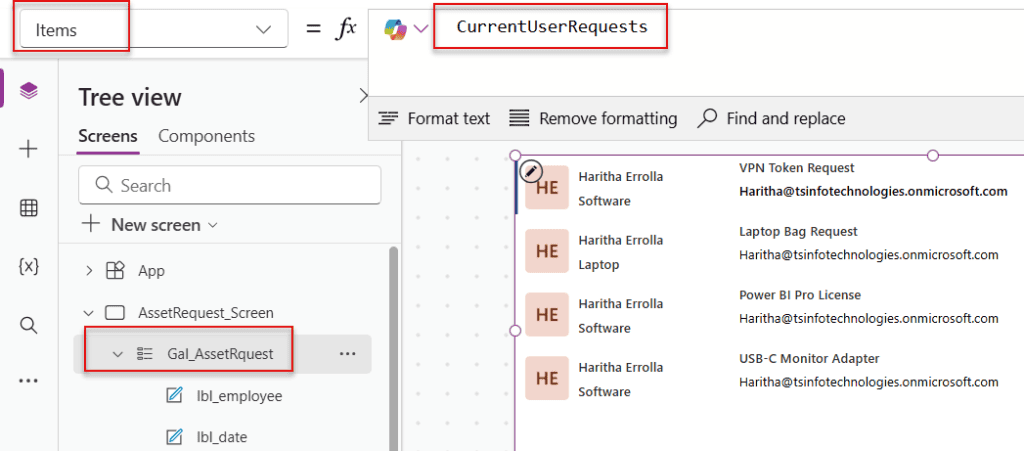
Step 2: Bind the Gallery to the Power Apps Named Formula
Set the gallery Items property to:
CurrentUserRequests
How does this formula work?
- Instead of writing
Filter(EmployeeAssetRequests, EmployeeEmail = User().Email)again, the gallery simply uses CurrentUserRequests. - If you ever change the filter logic, you update it once in the named formula and all galleries stay in sync.
Things to Keep in Mind
- Use the right column type for identity. For simple tutorials, a text column like EmployeeEmail is fine. For production apps, prefer a Person or Group column like Employee so you can use properties such as Email, DisplayName, and Image across the platform.
- Filter vs LookUp. Use Filter() when you want a table of results (for a gallery). Use LookUp() when you need a single record (for a form or one label). For current-user lists, Filter() is the natural fit.
- Avoid mixing identity formats. Make sure the value stored in EmployeeEmail uses the same format as User().Email in your tenant. If one uses aliases and the other uses full UPNs, adjust the data to be consistent.
- Think about future growth. If you expect managers or admins to see “team requests” later, keeping a clean Employee person column now will make those features easier to build.
- Use modern controls. Stick to modern gallery, label, and input controls so the UI matches current Power Apps styling and works well with future updates.
Final Thoughts
You’ve now seen four practical ways to filter data by the current user in Power Apps using a clean Employee Asset Requests scenario. We walked through filtering by a text email column, filtering by a Person column, storing the current user email in a global variable, and using a named formula to reuse the current‑user filter across your app.
Use the email‑based Filter() pattern when you want the simplest setup, choose the Person column pattern for production‑grade apps, use a global variable when you need the identity in many places, and adopt named formulas when you want the cleanest and most maintainable architecture.
I hope you found this article very helpful!
Also, you may like:
- Power Apps IsMatch() Function
- The Best Way to Display Dataverse Choices in Power Apps Gallery
- Filter Power Apps Gallery by Person
- Filter Power Apps Gallery By Week

I have worked with Microsoft technologies for more than 18 years, including SharePoint, Microsoft 365 and the Power Platform (Power Apps, Power Automate and Power BI), at companies like HP, TCS and KPIT. I started EnjoySharePoint in 2011 to share the solutions I build in real projects with readers in the United States, Canada, the United Kingdom, Australia, New Zealand and beyond. Microsoft has recognized this work with the Microsoft MVP award 13 times since 2014.