
Almost every Power Apps app I build has the same pattern: a gallery of items on the left, and the details of whichever item you tap on the right or on the next screen. A project tracker, a product catalog, a list of help desk tickets. It all comes down to one property, Selected, and a few rules about using it.
In this tutorial, I’ll show you how to get the selected item from a gallery and show it in a label, an edit form and a display form, how to look it up by ID, and how to select a specific item by default.
Quick answer: Use the gallery’s Selected property, which returns the record the user tapped, for example Gallery1.Selected.Title in a label. To show it in a form, set the form’s Item property to Gallery1.Selected. If the form is on another screen, save the item first with Set(varSelectedItem, ThisItem) in the gallery’s OnSelect, and set the form’s Item to varSelectedItem.
Show the selected value in a label
This gallery lists best-selling books and their authors:

Add a label next to the gallery and set its Text to a column of the selected record:
"You have selected " & Books_gallery.Selected.Author & " - " & Books_gallery.Selected.BookName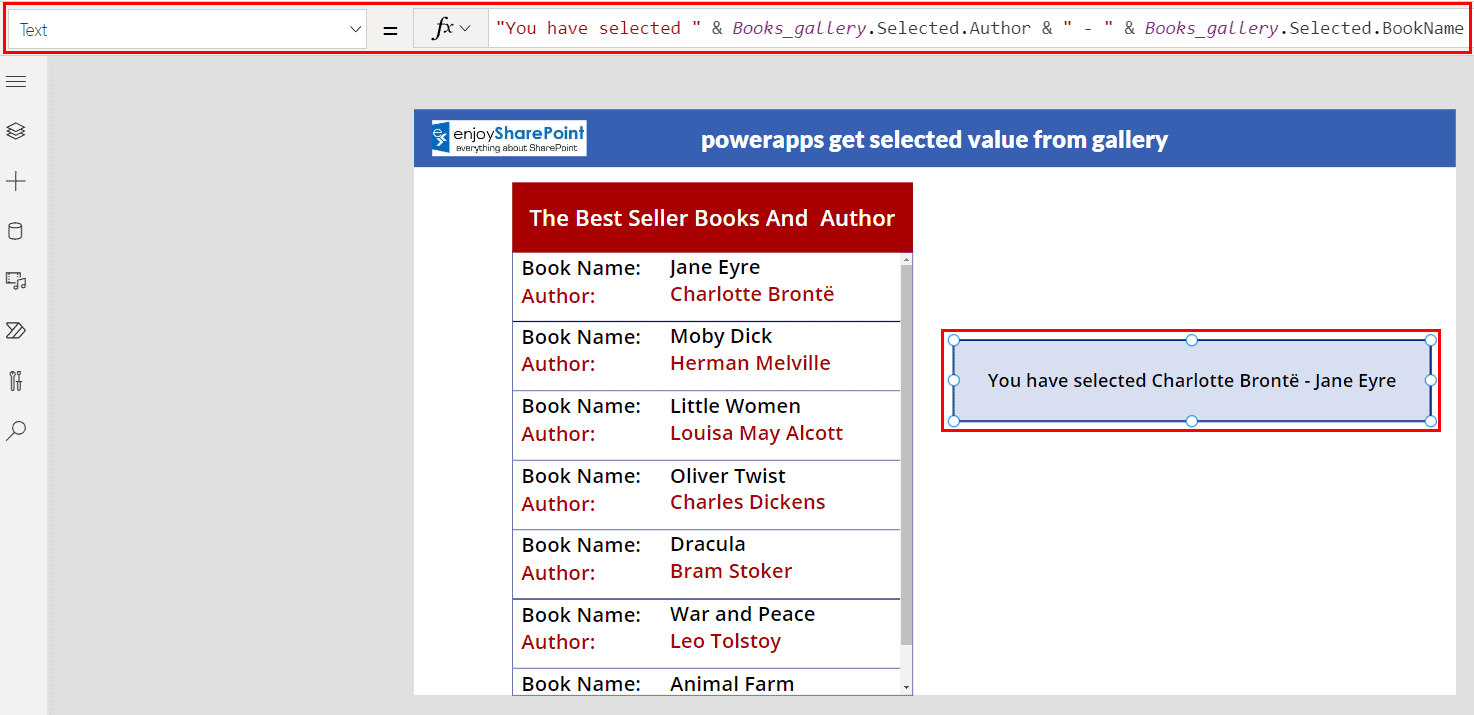
When the app starts, the first item is selected, so the label shows it right away. To make the selection visible, set the gallery’s TemplateFill:
If(ThisItem.IsSelected, Color.Cornsilk, Color.White)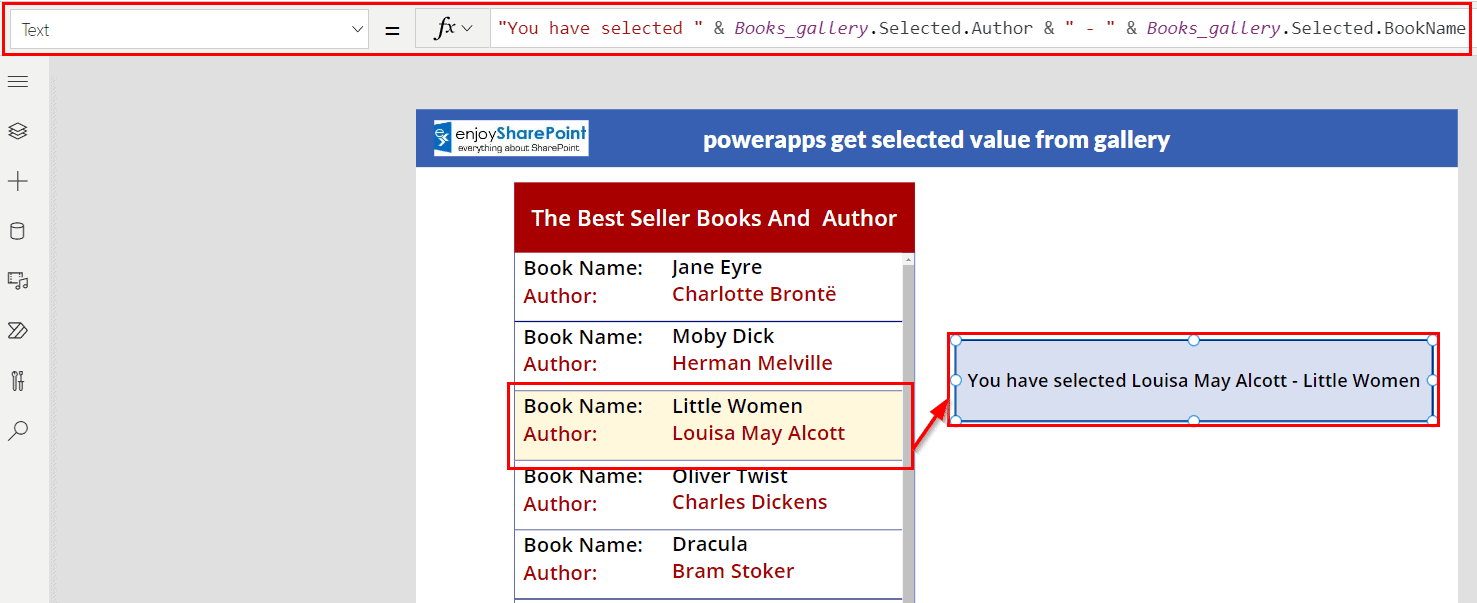
For more highlighting options, see how to highlight the selected item in a Power Apps gallery.
Open the selected item in an edit form
This Projects Management list has single line of text, date, choice and currency columns:

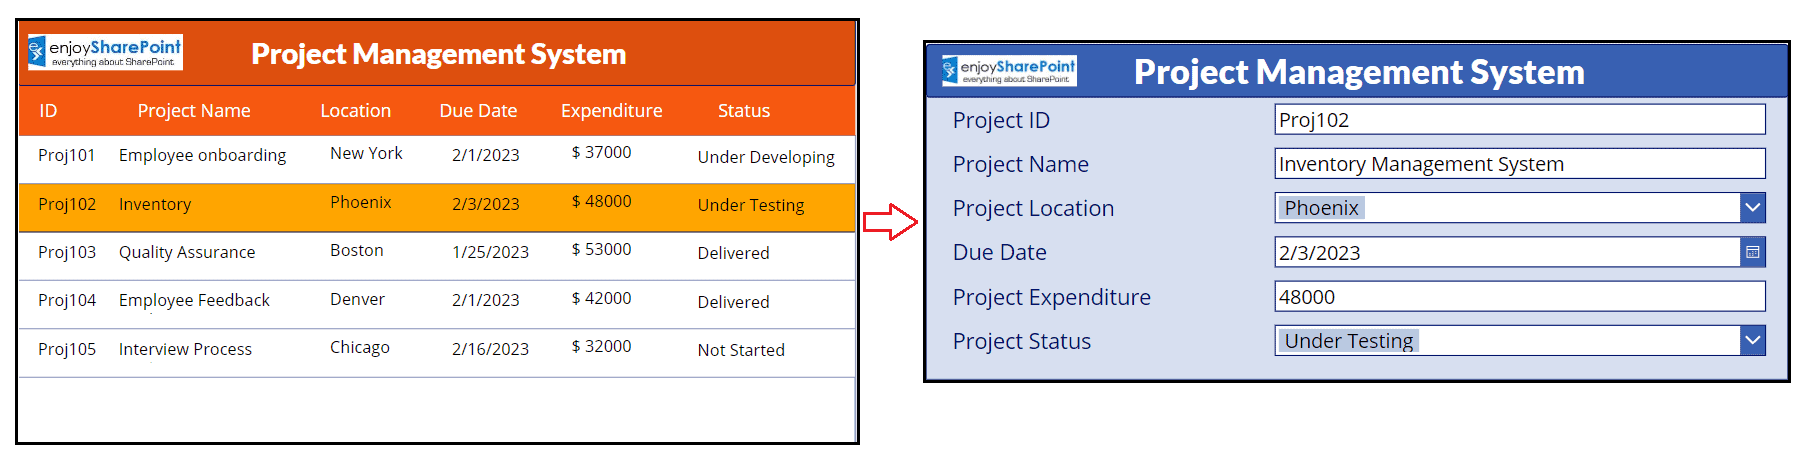
The gallery shows the projects, with the selected row highlighted in orange (If(ThisItem.IsSelected, Color.Orange, Color.White)):

On a second screen, add an Edit form and set its data source to the same list:

Now connect the two. In the gallery’s OnSelect, save the item in a variable and go to the form screen:
Set(varSelectedItem, ThisItem);
Navigate('Project Edit Screen')
Then set two properties on the edit form, which are easy to miss:
- Item:
varSelectedItem, so the form knows which record to show. - DefaultMode:
FormMode.Edit. In New mode, the form ignores its Item and shows empty fields. (Or callEditForm(Form1)in OnSelect before Navigate.)
Preview the app and select a project. The form opens with its details, ready to edit:
Why save the item in a variable?
You could set the form’s Item to Gallery1.Selected directly, and on the same screen that’s fine. But Microsoft calls Selected “a moving target”: it changes when the gallery’s data refreshes or its Items change. After you save a form, for example, the selection can jump back to the first item. A variable holds a stable copy of what the user picked, and it also works across screens.
Show the selected item in a display form
A display form works the same way, but it’s read-only:

Add a Display form on another screen and set its data source to the list:

Use the same OnSelect in the gallery, navigating to the display screen:

Then set the display form’s Item property (singular, not Items) to the variable:
varSelectedItem
Display forms don’t have a mode to set; they always show the record in Item.
Get the selected item by ID
Sometimes you only want to store the ID, for example to pass it to another screen or to always load a fresh copy of the record from SharePoint. This product catalog shows the selected product’s details on the right:

The gallery’s Items is the Products List:

Its TemplateFill highlights the selected product:

A display form on the same screen is connected to the list:

In the gallery’s OnSelect, save only the ID. Because the form is on the same screen, you don’t need Navigate:
Set(varItemID, ThisItem.ID)Then set the form’s Item to the record with that ID. Looking up by ID is delegable to SharePoint, so it works on large lists:
LookUp('Products List', ID = varItemID)
Select a product, and the form shows it:

For more on this approach, see how to get a gallery item by ID in Power Apps.
Select the newest item by default
The gallery’s Default property decides which item is selected when the screen loads. You may see Last(Self.AllItems) suggested for “select the last item”, but it isn’t reliable: AllItems only includes the items the gallery has loaded so far, and Last isn’t delegable. Instead, point Default at a record from the data source. For the most recently added item:
First(Sort('Products List', ID, SortOrder.Descending))You can then show any column of the selection elsewhere, such as the product image in an Image control:
Product_Gallery.Selected.Image
To select the first item instead, see how to select the first item in a Power Apps gallery.
Common problems
- The form shows the wrong record or nothing. Check that the form’s Item (not Items) is set, and that an edit form isn’t in New mode.
- The selection jumps back to the first item. The data refreshed. Store the selection in a variable, as shown above.
- A button inside the gallery uses the previous row. Controls inside a gallery can run before the selection changes. Use
ThisIteminside the gallery instead ofGallery1.Selected. - You can’t put the form inside the gallery. Forms aren’t supported in a gallery template; place them next to it or on another screen.
These Power Apps gallery tutorials go further:
- Gallery Control in Power Apps – How to Use
- How to Highlight the Selected Item within a Power Apps Gallery?
- How to Select First Item in a Power Apps Gallery
- How to Get Gallery Item By ID in Power Apps
- Power Apps Gallery Patch [With Various Examples]
- Power Apps Gallery Filter: Search, Dropdown, Date & More
Frequently Asked Questions
How do I get the selected item from a gallery in Power Apps?
Use Gallery1.Selected, which returns the whole record, and add a column name, such as Gallery1.Selected.Title. Microsoft explains how Selected behaves in its gallery best practices.
How do I show the selected gallery item in a form?
Set the form’s Item property to Gallery1.Selected, or to a variable you set with Set(varSelectedItem, ThisItem) in the gallery’s OnSelect.
Why does my edit form show empty fields?
It’s probably in New mode, which ignores Item. Set DefaultMode to FormMode.Edit, or call EditForm(Form1) before you navigate.
How do I highlight the selected item in a gallery?
Set the gallery’s TemplateFill to If(ThisItem.IsSelected, Color.LightBlue, Color.White).
How do I select a specific item by default?
Set the gallery’s Default property to a record from the data source, such as First(Sort(‘Products List’, ID, SortOrder.Descending)) for the newest item.

I have worked with Microsoft technologies for more than 18 years, including SharePoint, Microsoft 365 and the Power Platform (Power Apps, Power Automate and Power BI), at companies like HP, TCS and KPIT. I started EnjoySharePoint in 2011 to share the solutions I build in real projects with readers in the United States, Canada, the United Kingdom, Australia, New Zealand and beyond. Microsoft has recognized this work with the Microsoft MVP award 13 times since 2014.