
A plain text box is fine for a name or a number, but not for an announcement, a meeting note or a product description. Users want bold text, bullet points and links. The Rich text editor control gives your canvas app a small word processor, and it saves the result as HTML.
In this tutorial, I’ll show you how to add the control, set its default text, save what users write to SharePoint, show it back as formatted or plain text, add links, and work around its limitations.
Quick answer: Select Insert and add a Rich text editor. Set its Default to the starting text (plain text or HTML), and read what the user wrote from its HtmlText property, for example Patch(Announcements, Defaults(Announcements), {Body: RichTextEditor1.HtmlText}). Use PlainText(RichTextEditor1.HtmlText) when you need the text without formatting.
What the control can do

The toolbar supports bold, italic and underline, text color and highlight color, text size, numbered and bulleted lists, hyperlinks, and clear formatting. Press Alt+0 while the editor has focus to see the keyboard shortcuts.
| Property | What it does |
|---|---|
| Default | The text the control starts with, as plain text or HTML |
| HtmlText | The user’s content as HTML (this is what you save) |
| DisplayMode | Edit, View (read-only) or Disabled |
| EnableSpellCheck | Turns the browser’s spell check on or off |
| AccessibleLabel | The label screen readers announce |
For simple one-line input, the regular text input is still the better choice. See how to bind text input values to a dropdown for a text input example.
Add the rich text editor
In Power Apps Studio, select Insert, search for Rich text editor and add it to the screen:
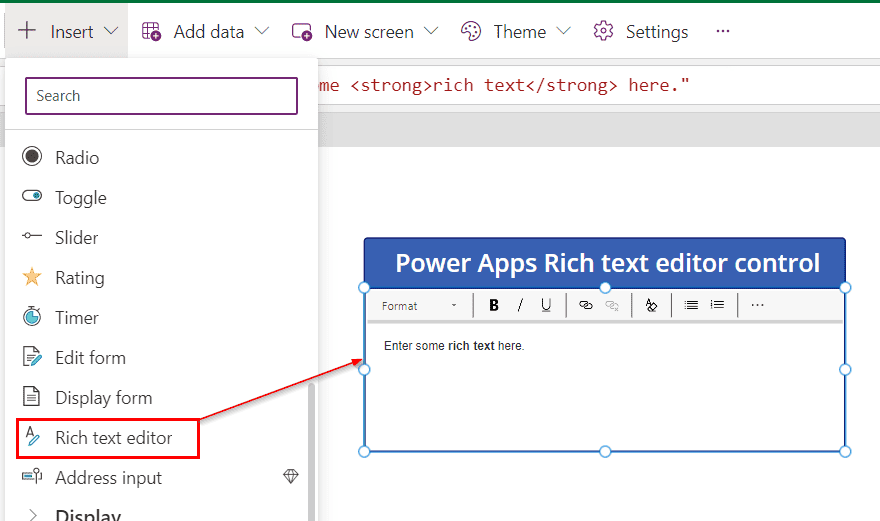
The control appears with its toolbar and an empty editing area:

Type some text and format it with the toolbar. Here I made a heading bold, italic and colored:


Highlight text
To highlight words, select them and choose a color from the highlight color button in the toolbar:

Set the default text
The Default property sets what the control shows when the screen loads. You can use plain text or HTML, so formatting carries over:
"<p>With the rich text editor you can:</p><ul><li>Format text</li><li>Highlight text</li><li>Add links</li></ul>"

Default is only the starting point. Whatever the user types lives in HtmlText until the screen reloads, and it’s lost unless you save it somewhere, which is the next step.
Save the text to SharePoint
Create a Multiple lines of text column in your list, for example Body in an Announcements list. Then save the editor’s HtmlText with Patch:
Patch(
    Announcements,
    Defaults(Announcements),
    {Title: txtTitle.Text, Body: RichTextEditor1.HtmlText}
)
In an Edit form, you can also replace the multi-line text card’s input with a rich text editor: unlock the card, insert the editor, and set the card’s Update property to RichTextEditor1.HtmlText. For more on Patch, see how to update a SharePoint list item with Patch.
To show the saved text later, use an HTML text control with HtmlText set to the column, or set the editor’s Default to it and its DisplayMode to View. In SharePoint itself, a rich text column shows the formatting; you can also customize SharePoint list forms with Power Apps.
Get plain text
For an email subject, a search, or a character count, strip the formatting with PlainText(RichTextEditor1.HtmlText). It removes the HTML tags and keeps the words.
To email the formatted text instead, pass HtmlText to a flow and use it as an HTML email body, as in how to send table reports from Power Apps by email.
Reset the editor
To clear the editor after saving, or go back to the default text, add Reset(RichTextEditor1) to the button’s OnSelect:


If Reset gives an error, see how to fix the Power Apps Reset function error.
Add hyperlinks
Select the words, then select the link button in the toolbar. Enter the display text and the URL, and select OK:


Links open from the editor while it’s in Edit mode. In View mode they don’t open, so show saved content in an HTML text control if users need to click links:

Spell check
Turn on the EnableSpellCheck property, and the browser underlines misspelled words while the user types:


It uses the browser’s dictionary, so it isn’t available in the Power Apps app for Windows.
Limitations
- It isn’t supported inside a gallery.
- Hyperlinks don’t open when the control is in View mode.
- The Alt key shortcuts don’t work in Power Apps Studio, only when you preview or play the app.
- Pasted images may not show, depending on their format and where they’re hosted.
- The control removes script, style and object tags, so it can’t run code.
- There’s no modern version of the control yet; use this classic one.
These Power Apps tutorials go well with this one:
Frequently Asked Questions
How do I save rich text from Power Apps to SharePoint?
Save the editor’s HtmlText to a Multiple lines of text column with Patch or a form. Microsoft lists the properties in its rich text editor control reference.
How do I get plain text from the rich text editor?
Use PlainText(RichTextEditor1.HtmlText). It removes the HTML tags and returns only the text.
Can I use the rich text editor in a gallery?
No. It isn’t supported inside a gallery. Show saved content with an HTML text control instead.
Why don’t links open in my rich text editor?
Links don’t open when the control is in View mode. Use an HTML text control to display content with clickable links.

I have worked with Microsoft technologies for more than 18 years, including SharePoint, Microsoft 365 and the Power Platform (Power Apps, Power Automate and Power BI), at companies like HP, TCS and KPIT. I started EnjoySharePoint in 2011 to share the solutions I build in real projects with readers in the United States, Canada, the United Kingdom, Australia, New Zealand and beyond. Microsoft has recognized this work with the Microsoft MVP award 13 times since 2014.
How do you insert images from this Rich Text toolbar?
You cant